background image

EN

86

EN

87

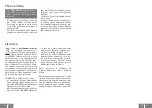
Intended use

The appliance is intended for distribu-

tion of dry air in private interiors). The 

appliance is not intended for commer-

cial use.

Any other use or modification to the 

appliance is considered as improp-

er use and could cause considerable 

dangers.

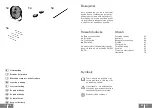
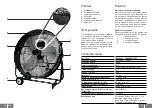
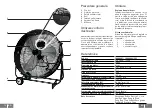
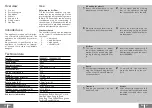
Overview

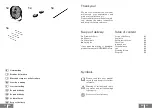
Control

Protective grille

Fan blades

Wheels

Supply cord

Fixing screws

Handles

Use

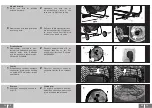
Adjusting the Air Flow

Tilt the ventilator upwards or down-

wards into the required angle. Fix the 

position by tightening the fixing screws 

6

 firmly. The ventilator can be used in 

combination with air conditioning. If 

the ventilator is tilted upwards, the air 

at ground level is aspirated and subse-

quently distributed into the room.

Ventilator Speed

The ventilator speed can be adjusted 

on the control 

1

 on the backside of the 

ventilator:

= low speed

= medium speed

= high speed

= ventilator off

Art. no

10604861 / 10604862 (CH)

Nominal voltage

220-240 V~ / 50 Hz

Rated power  

124 W

Ventilator diameter 

61 cm

Speed settings

Low - Med - Hi - Off

Protection Class

 / I

Degree of protection

IPX0

Weight 

10.5 kg

Maximum fan flow rate (F)

111.72 m

3

/min

Fan power input (P)

119.1 W

Service value (SV)

0.94 (m

3

/min)/W

Maximum air velocity (c)

3.381 m/s

Measurement standard for SV

EN IEC 60879:2019

Standby power consumption (Q)

38.112 kWh/a

Fan sound power level (L

WA

)

73.5 dB(A)

Contact for information

Zhongshan Reffon Electric Co., Ltd.

Heping Village, Dongfu Road, 

Dongfeng Town 528425 Zhongshan

People´s Republic China

Technical data

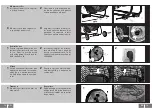
Insert the power supply cord 

5


into a suitable wall socket. For 

Switzerland, only use the venti-

lator 10604862.

Storage

After use pull the supply cord 

5


out of the wall socket and wind 

the cable onto the holder on the 

backside.

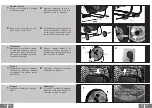
Mount the wheels 

4

 onto the re-

spective ends of the wheel axle.

Air flow

Tilt the ventilator to adjust 

the air flow upwards or down-

wards. Fix the position by tigh-

tening the fixing screws 

6

 firm-

ly.

Speed

Set the required speed by pres-

sing the corresponding button 

on the control 

1

 on the backside 

of the ventilator.  

To switch off the ventilator, 

press the button 

0

 on the con-

trol 

1

.  

Transport

Pick up the ventilator  by the 

handles 

7

 only.

Mounting the wheels

Insert the wheel axle to the 

wheel mount on the frame.

Secure the wheels 

4

 with the 

two remaining split pins. Make 

sure the ends of all six split pins 

are bent apart.

Fix the wheel axle by sticking 

four of the split pins through 

the respective holes in the axle.

1

3

1

1

1

2

4

2

2

2

Содержание 10604861

Страница 1: ...tambour mobile Ventilatore mobile a tamburo Mobiele trommelventilator Mobil trumfl kt Mobiln bubnov ventil tor Mobiln bubnov ventil tor Ventilator mobil cu tambur Mobile drum ventilator Deutsch2 Fran...

Страница 2: ...an Ihren HORNBACH Markt Zeichenerkl rung Bitte lesen Sie diese Bedie nungsanleitung aufmerksam durch und bewahren Sie diese f r sp teren Gebrauch auf Vorsicht Unfall und Verlet zungsgefahr sowie schw...

Страница 3: ...erwendet wird ist eine dau ernde berwachung erfor derlich 11 Stellen Sie sicher dass der Ventilator w hrend des Be triebs aufrecht auf einer stabi len ebenen Fl che steht 12 Stellen Sie den Ventilator...

Страница 4: ...erung des Ger tes wird als unsachgem e Verwendung be trachtet und kann erhebliche Gefahren verursachen berblick 1 Steuerung 2 Schutzgitter 3 Ventilatorfl gel 4 R der 5 Netzkabel 6 Halteschrauben 7 Han...

Страница 5: ...hlen Sie die gew nschte Ge schwindigkeit indem Sie die entsprechende Taste auf der Steuerung 1 auf der R ckseite des Ventilators dr cken Zum Asschalten dr cken Sie die Taste 0 auf der Steuerung 1 Tra...

Страница 6: ...ich abzuho len oder Ihnen die R ckgabe in Ihrer unmittelbaren N he zu erm gli chen F r weitere Informationen wenden Sie sich an www hornbach com oder an die rtlichen Beh rden Kinder d rfen auf keinen...

Страница 7: ...ment le pr sent manuel de l utilisateur et le conserver pour s y reporter ult rieurement Avertissement Risque d ac cidents ou de blessures et de dommages mat riels impor tants Produit de classe de pro...

Страница 8: ...ilis proximit d enfants de per sonnes g es ou d animaux domestiques une surveil lance permanente est n ces saire 11 S assurer que le ventilateur Consignes de s curit est plac sur une surface stable et...

Страница 9: ...teur peut tre r gl e sur la commande 1 situ e l ar ri re du ventilateur 1 vitesse faible 2 vitesse moyenne 3 vitesse lev e 0 ventilateur teint R f art 10604861 10604862 CH Tension nominale 220 240 V 5...

Страница 10: ...rme ment les vis de fixation 6 Vitesse R gler la vitesse souhait e en appuyant sur le bouton corres pondant de la commande 1 si tu e l arri re du ventilateur Pour teindre le ventilateur appuyer sur le...

Страница 11: ...n net toyage de reprendre gratuitement dans votre magasin HORNBACH jusqu 3 appareils lectriques ou lec troniques usag s du m me type jusqu 25 cm de c t m me si vous n en achetez pas un nouveau collect...

Страница 12: ...l vostro ne gozio HORNBACH Simboli Si prega di leggere attentamen te il presente manuale e di con servarlo per futuri riferimenti Avvertimento di incidenti dan ni a persone e danni gravi alle cose Pro...

Страница 13: ...necessario sorvegliare costantemente il ventilatore se lo si utilizza vicino a bam bini persone anziane o ani mali 11 Sincerarsi che durante il fun zionamento il ventilatore sia Istruzioni di sicurezz...

Страница 14: ...La velocit del ventilatore pu essere regolata agendo sul comando 1 posto sul lato posteriore del ventilatore 1 velocit bassa 2 velocit media 3 velocit alta 0 ventilatore off N art 10604861 10604862 CH...

Страница 15: ...ti di fissaggio 6 Velocit Impostare la velocit desidera ta premendo il tasto corrispon dente sul comando 1 posto sul lato posteriore del ventilatore Per spegnere il ventilatore pre mere il tasto 0 sul...

Страница 16: ...spento e scollegato dalla rete elettrica Al fine di evitare lesioni personali oppure danni al ventilatore e ad altri oggetti si prega di prestare atten zione quando si svolgono lavori sul ventilatore...

Страница 17: ...CH winkel Symbolen Lees deze handleiding zorgvul dig bewaar de handleiding om hem later te kunnen raadplegen Waarschuwing voor ongelukken of persoonlijke verwondingen en ernstige materi le schade Besc...

Страница 18: ...e bruikt in de buurt van kinde ren ouderen of huisdieren is permanent toezicht vereist 11 Zorg ervoor dat de ventilator tijdens gebruik op een sta biele en vlakke ondergrond staat Veiligheidsinstructi...

Страница 19: ...e ventilator is in te stellen met de bediening 1 aan de ach terzijde van de ventilator 1 lage snelheid 2 medium snelheid 3 hoge snelheid 0 ventilator uit Art nr 10604861 10604862 CH Nominaal voltage 2...

Страница 20: ...raai en Snelheid Stel de gewenste snelheid in door op de betreffende knop op de bediening 1 aan de achterzij de van de ventilator te drukken Om de ventilator uit te schake len drukt u op knop 0 op de...

Страница 21: ...ijn wanneer u werkzaamheden verricht in de buurt ervan Gebruik geen water of reinigings ook zonder nieuwe aankoop tot 3 oude elektrische of elektroni sche apparaten van hetzelfde type tot een maximale...

Страница 22: ...r L s bruksanvisningen noga och spara den f r framtida bruk Varning f r olycksfall som kan medf ra personskador och all varliga skador p egendom Produkt med skyddsklass I Inneh llsf rteckning Leverans...

Страница 23: ...detekteringen 10 Om fl kten anv nds i n rhe ten av barn ldre personer eller husdjur kr vs konstant tillsyn 11 Se till att fl kten r placerad p ett stabilt och j mnt un derlag under drift 12 Anv nd int...

Страница 24: ...n via reg lage 1 p fl ktens baksida 1 l g hastighet 2 medelhastighet 3 h g hastighet 0 fl kt avst ngd Art nr 10604861 10604862 CH M rksp nning 220 240 V 50 Hz M rkeffekt 124 W Fl ktens diameter 61 cm...

Страница 25: ...stskruvarna 6 ordentligt Hastighet St ll in nskad hastighet ge nom att trycka p motsvarande knapp p reglage 1 p fl ktens baksida F r att st nga av fl kten trycker du p knapp 0 p reglage 1 Transport Ly...

Страница 26: ...arbetar runt el ler reng r fl kten f r att f rhindra personskador eller skador p fl kten och andra f rem l elektroniska apparater av samma apparattyp upp till 25 cm kantl ngd utan kostnad till HORNBA...

Страница 27: ...obra te se pros m na sv j mar ket HORNBACH Symboly Tento n vod k pou it si pozorn p e t te a ulo te si ho k pozd j mu nahl dnut Varov n p ed nehodami a razy osob a v n mi v cn mi koda mi V robek t dy...

Страница 28: ...d je tento ventil tor pou v n v bl zkosti d t star chosobnebodom c ch zv at je nutn st l dohled 11 Ujist te se e je ventil tor b hem provozu um st n na stabiln m a rovn m povrchu 12 Nepou vejte ventil...

Страница 29: ...stran ventil toru 1 n zk rychlost 2 st edn rychlost 3 vysok rychlost 0 ventil tor vypnut Obj 10604861 10604862 CH Jmenovit nap t 220 240 V 50 Hz Jmenovit v kon 124 W Pr m r ventil toru 61 cm Nastaven...

Страница 30: ...en m upe v ovac ch roub 6 Ot ky Po adovanou rychlost nastavte stisknut m p slu n ho tla tka na ovlada i 1 na zadn stran ventil toru Chcete li ventil tor vypnout stiskn te tla tko 0 na ovlada i 1 Dopra...

Страница 31: ...o p i jeho i t n dbejte zv en opatr nosti aby se zabr nilo riziku razu osob nebo po kozen ventil toru a jin ch objekt P i i t n ventil toru nebo lopatek ventil toru nepou vejte vodu ani n zp t a 3 sta...

Страница 32: ...BACH Symboly Tento n vod na pou itie si po zorne pre tajte a odlo te si ho na bud ce pou itie Upozornenie na nebezpe en stvo nehody a poranenia os b a z va n po kodenie majetku Produkt triedy ochrany...

Страница 33: ...ar ch ud alebo dom cich zvierat je potrebn neust ly doh ad 11 Dbajte na to aby bol ventil tor po as prev dzky umiest nen na stabilnom a rovnom povrchu 12 Ventil tor nepou vajte v bl zkosti otvoren ho...

Страница 34: ...na ovl da i 1 na zadnej strane ventil tora 1 n zka r chlos 2 stredn r chlos 3 vysok r chlos 0 ventil tor vypnut V r slo 10604861 10604862 CH Menovit nap tie 220 240 V 50 Hz Menovit v kon 124 W Priemer...

Страница 35: ...n m utiahnut m upev ovac ch skrutiek 6 R chlos Po adovan r chlos nastavte stla en m pr slu n ho tla idla na ovl da i 1 na zadnej strane ventil tora Ventil tor vypnete stla en m tla idla 0 na ovl da i...

Страница 36: ...te opatrn Na istenie ventil tora alebo lopa tiek ventil tora nepou vajte vodu aj bez novej k py zobra do predaj ne HORNBACH bezodplatne sp a 3 elektrick a elektronick pou it pr stroje rovnak ho druhu...

Страница 37: ...acest manual de utilizare i p stra i l pentru o eventual utilizare ulterioar Avertizare de pericol de acci dentare v t mare corporal a persoanelor i de pagube consi derabile Produsul se ncadreaz n cl...

Страница 38: ...ste folosit n apropierea copii lor persoanelor mai n v r st sau a animalelor atunci trebuie asigurat o suprave ghere permanent 11 Asigura i v ca n timpul uti liz rii ventilatorul s fie pozi ionat pe o...

Страница 39: ...ui poate fi reglat cu butonul de reglare 1 de pe spatele ven tilatorului 1 vitez mic 2 vitez medie 3 vitez mare 0 ventilator oprit Cod art 10604861 10604862 CH Tensiunea nominal 220 240 V 50 Hz Putere...

Страница 40: ...ngerea ferm a uru bului de fixare 6 Vitez Seta i viteza ventilatorului prin ap sarea butonului corespun z tor de pe partea decoman d 1 aflat pe spatele ventilato rului Pentru a opri ventilatorul ap sa...

Страница 41: ...ilatorului sau c nd l cur a i Nu folosi i ap sau detergen i pentru cur area ventilatorului sau a palelor s recep ioneze f r costuri p n la 3 aparate electrice sau electronice uzate de acela i tip cu o...

Страница 42: ...BACH Store Symbols Please read this user manual carefully and keep it for further reference Warning of accident and injury to persons and serious damage to property Protection class I product Table of...

Страница 43: ...is ventilator is used near children elderly people or pets a permanent surveil lance is required 11 Make sure the ventilator is positioned on a stable and level surface during opera tion 12 Do not ope...

Страница 44: ...19 1 W Service value SV 0 94 m3 min W Maximum air velocity c 3 381 m s Measurement standard for SV EN IEC 60879 2019 Standby power consumption Q 38 112 kWh a Fan sound power level LWA 73 5 dB A Contac...

Страница 45: ...o not purchase a new appliance when delivering a new electrical or electronic appliance to a private household to collect an old applian ce of the same type free of charge or to enable you to return i...

Отзывы: