background image

  R2-3500 Media Player/Recorder                                                                                  Appendix 

5.2  Precautions 

Before using your R2-3500 media player, please carefully read the following paragraphs relating to 
the safety issues of your device. 
 

5.2.1  Power on/off precautions 

The R2-3500 remote control provides the power ON/OFF button that controls the power status of 
your device when connected to the TV. It is highly recommended to switch the unit off when not in 
use. 
 
To re-locate the R2-3500 media player and connect it to the computer and when not in use for a 
longer period of time, we strongly recommend removing the power supply from the wall socket. 
 

5.2.2  Location and placing precautions 

Set the media player up in a vertical position and do not place any other objects on top of it. Do not 
place the unit on an amplifier or other equipment that can become hot. 
 
Avoid positioning your media player in the following places: 

  Locations with direct sunlight, next to radiators, other sources of heat, or in vehicles that are 

parked directly in the sun with the windows and doors closed. 

  Locations with very high temperature (more than 38° C) or humidity (more than 90%). 

  Very dusty or sandy locations. 

  Locations subject to vibration, shock, or with a sloping base. 


5.2.3  Electricity and power plug 

Careful attention must be paid to the following points in order to avoid operational faults with the 
equipment and to prevent electric shock, fire, and/or injury: 
 

  When removing the power cable from the socket, always pull on the plug and never on the 

cable. 

  Do not connect and remove the power cable with wet hands. 

  Keep the power cable away from heaters. 

  Never try to repair the power cable yourself or to modify it in any way. 

  If the unit is dropped or becomes damaged in any other way, unplug the power cable. 

  If the unit should emit smoke, unusual smell, or noise, switch it off and unplug the power cable. 

In such cases, please contact your vendor. 

  If the unit is not used for extended periods of time, then the power plug should be removed from 

the socket. 


5.2.4  Cables 

Use only the cables supplied or recommended by your vendor in order to avoid the risk of 
malfunction, electric shock, and/or possible interference to the device. 


Page 31 

Содержание R2-3500

Страница 1: ...gital Media Player Recorder User Manual May 26 2009 v1 0 Firmware 20090512 The diagrams and images contained in this document may not fully represent the actual product and are there for illustration...

Страница 2: ...ng Video In 9 2 4 Transferring Files File Copy 10 2 5 Playing back Media Files Browser 10 2 6 Setup Menu Setup 11 2 7 Scheduled Recording Timer REC 11 3 Examples 12 3 1 Video In 12 3 2 File Copy 14 3...

Страница 3: ...at can be connected to the TV and playback media files from USB drives its internal hard drive media cards and network folders as well as record videos directly to its internal SATA hard drive It supp...

Страница 4: ...ple during video recording and turns off when system is in standby mode Standby LED lights up orange when the system is in standby mode LAN LED lights up yellow during network activity Card Reader LED...

Страница 5: ...R2 3500 Media Player Recorder Getting Started 1 2 3 Top Pause Step TV System Mute Card Copy Home main screen Record Stop Arrow keys for navigation Play Enter Page 3...

Страница 6: ...To jump to chapter time Zoom In photos videos Return to previous screen Enter Arrow keys for navigation No function No function Pause Step Play Recording Stop Fast Forward Previous File Page Fast Reve...

Страница 7: ...k 2x 3x 4x 8x Zoom Out N A Return Returns to previous screen and moves up by one directory Delete N A Rec Starts or stops recording Pause Step Pauses playback and plays frames step by step Play Starts...

Страница 8: ...ia files 1 Remove the two screws from the bottom push the side cover from the front to slide it off the back and lift it off the case Remove the screws for the metal shielding and take it off 2 Remove...

Страница 9: ...en installed a warning message that the drive is about to be formatted will pop up automatically after the system is turned on If the drive has already been formatted but you would like to change the...

Страница 10: ...atulation dialog will appear Press OK to close it and exit the disk utility The device will restart automatically Note The R2 3500 media player will be able to write to the first FAT32 partition only...

Страница 11: ...be displayed Use the arrow buttons to highlight a menu and the Enter button to select it Note To get back to the main screen press the Guide button on your remote control or the Home button on the med...

Страница 12: ...e Note The destination drive must be formatted using the FAT32 file system The NTFS file system can only be used as source but not as destination The media cards can be found under USB devices 2 5 Pla...

Страница 13: ...recording schedules as well as view the current status and history of the recordings Select Edit to create new schedules select delete to remove already scheduled programs select Status to view the c...

Страница 14: ...that the device connected to the AV in port is turned on and playing or the correct channel on your TV is selected If there is no input the recording will fail If the wrong channel is selected it wil...

Страница 15: ...be initialized and the recording starts 3 Once the recording message disappears you can use the Play Pause and FF FR buttons for playback control just like when watching recorded videos 4 Press the Di...

Страница 16: ...ol 2 Use the Up and Down buttons to select the source and press Enter to confirm it Use the Up and Down buttons to select the destination and press Enter to confirm it 3 Use the Up Down and Enter butt...

Страница 17: ...ual keyboard to name the new directory and select OK to create the new folder 6 Once the destination has been defined press the Right button to continue Confirm the dialog by selecting OK and pressing...

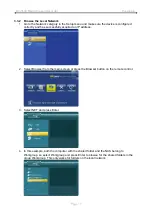
Страница 18: ...ilter the content by media types Music Photo Movies or select All to display all types 3 Use the Up Down and Enter buttons to locate the media file s 4 For images and videos a small preview is shown T...

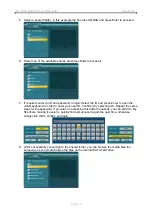
Страница 19: ...lly acquired an IP address 2 Select Browser from the main screen or press the Browser button on the remote control 3 Select NET and press Enter 4 In this example both the computer with the shared fold...

Страница 20: ...the virtual keyboard in order to enter your user ID Confirm it by selecting OK Repeat the same steps for the password If you plan on accessing this folder frequently you can add it to My Shortcuts ma...

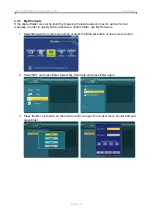
Страница 21: ...t manually in order to quickly find and access a certain folder use My Shortcuts 1 Select Browser from the main screen or press the Browser button on the remote control 2 Select NET and press Enter Se...

Страница 22: ...of the shortcut add a domain and add a host name 6 To manage the existing shortcuts simply select a shortcut and press the Rec List button again to open the context menu You will be able to modify th...

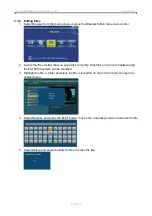
Страница 23: ...hat you would like to modify Only files on a drive formatted using the FAT32 file system can be modified 3 Highlight the file or folder and press the Rec List button on the remote control to open the...

Страница 24: ...player The start time and recording length can be set with the Up and Down buttons Repeat can be set to Once only or to one of the presets depending on the day of the week e g Everyday Mon Fri Mon Sa...

Страница 25: ...iles Depending on the device settings of your recordings they will be either on the internal HDD or an external USB drive The system will automatically create a folder called My Recordings the first t...

Страница 26: ...3 Select Delete the selected schedule to remove only the selected schedule or select Delete all schedules to remove all existing schedules 3 4 4 Changing the Status 1 To change the status of an exist...

Страница 27: ...the signal If there is no sound on your system switch to LPCM HDMI LPCM LPCM audio output via high definition multimedia interface cable HDMI RAW RAW audio signal via high definition multimedia inter...

Страница 28: ...get device where the recorded videos are to be stored HDD Internal SATA HDD USB 1 USB front port USB 2 USB rear port 4 3 3 Quality The higher the recording quality the larger the resulting video file...

Страница 29: ...rs from 0 9 and letters from a f It also supports WPA encryption with passwords using numbers from 0 9 and letters from a z or A Z IP Address Select Auto to automatically acquire the IP address and ne...

Страница 30: ...rrect date and time in order for the other time stamps especially during recording to be accurate Note If the time is reset to factory default after a power loss or when the power adapter has been rem...

Страница 31: ...andom effect or select one of the presets from the list Cross Fade Fades in and out Left to Right Loads new image from left to right Top to Bottom Loads new image from top to bottom Waterfall Dissolve...

Страница 32: ...3 RCA HDMI digital audio video Output ports USB 2 0 High Speed Input ports USB 2 0 host for USB HDD or card reader Ethernet 10 100M connection for video streaming Optional wireless LAN connection 802...

Страница 33: ...ctly in the sun with the windows and doors closed Locations with very high temperature more than 38 C or humidity more than 90 Very dusty or sandy locations Locations subject to vibration shock or wit...

Страница 34: ...hts or other IP Intellectual Property rights Each user of the R2 3500 media player may only use it in connection with materials legally owned by or licensed to the user and only extend such ownership...

Страница 35: ...menu and make sure the settings are correct and the device has acquired an IP address Second make sure the shared folders are on the same local network as the media player and the folders are accessi...

Отзывы: