Quick Star
t Guide
9
Quick Start Guide
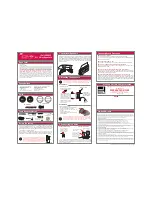
Front & Rear Panel
Descriptions –
1. Power Connector
Connect the supplied AC power cord
to this IEC jack.
2. Power Switch
Turns the SRM150 on and off. The Power LED
will illuminate when powered.
3. Circuit Breaker
Trips the circuit if the SRM150 exceeds the
rated load. To reset, turn the SRM150 power off and flip this
switch up.
4. Inputs 1–3
Connect a mic, instrument, stereo RCA
or line-level signal from a mixer or other signal source.
5. Gain
Adjusts the mic/line input sensitivity.
6. Level
Adjusts the overall output level.
7. EQ Knobs
Boosts or cuts the level at certain frequencies
to enhance the sound.
8. 48V Phantom Power Switch
Provides 48V, affecting all
XLR jacks simultaneously.
9. Line/Hi-Z Switch
Engage the switch to play a guitar through
channel 1 without using a DI Box.
10. Main In
Connect a balanced line-level signal using an XLR
or 1/4" connector.
11. Thru Output
Connect additional full range loudspeakers.
12. Mic/Line Switch
Adjusts the output sensitivity to optimize
the thru jack for connecting to mic or line-level inputs.
1. Toma de corriente
Conecte en esta toma IEC el cable
de alimentación incluido.
2. Interruptor de encendido
Le permite encender y apagar
este SRM150. El piloto Power se iluminará cuando la unidad
esté encendida.
3. Interruptor del circuito
Corta el circuito si el SRM150
sobrepasa su carga media. Para reiniciar el sistema, apague
el SRM150 y pulse este interruptor.
4. Entradas 1–3
Conecte una señal de nivel de línea, micro,
instrumento o RCA stereo procedente de un mezclador u otra
fuente de señal.
5. Gain
Le permite ajustar la sensibilidad de entrada de la señal
de micro/línea.
6. Level
Este mando le permite ajustar el nivel de salida global.
7. Mandos EQ
Realzan o cortan el nivel en determinadas
frecuencias para intensificar el sonido.
8. Interruptor de alimentación phantom de 48V
Activa 48 V,
que afectarán a todas las tomas XLR simultáneamente.
9. Interruptor Line/Hi-Z
Active este interruptor para hacer pasar
la señal de una guitarra a través del canal 1 sin usar una DI box.
10. Main In
Conecte aquí una señal balanceada de nivel de línea
usando un conector XLR o de 6,3 mm.
11. Salida Thru
Le permite la conexión de altavoces de rango
completo adicionales.
12. Interruptor Mic/Line
Le permite ajustar la sensibilidad
de salida para optimizar la toma thru (en serie) para la conexión
a entradas de micro o nivel de línea.
EN ES FR DE
Descripción del panel frontal
y trasero –
EN ES FR DE
EN ES FR DE
1. Netzanschluss
Verbinden Sie das mitgelieferte Netzkabel
mit diesem IEC-Anschluss.
2. Power-Schalter
Schaltet den SRM150 ein/aus.
Bei eingeschaltetem Gerät leuchtet die Power LED.
3. Trennschalter
Wird aktiviert, wenn das SRM150 die
Nenn belastbarkeit überschreitet. Um die Trennschaltung
zurückzusetzen, schalten Sie das SRM150 aus und kippen
den Schalter nach oben.
4. Eingänge 1–3
Hier schließen Sie Mikrofone, Instrumente oder
stereo Cinch- und Line-Pegel-Quellen von Mischern oder anderen
Geräten an.
5. Gain
Steuert die Mic/Line-Eingangsempfindlichkeit.
6. Level
Regelt den Gesamtausgangspegel.
7. EQ-Regler
Verstärken oder bedämpfen bestimmte Frequenzen,
um den Klang zu verändern.
8. 48V Phantom Power-Taste
Liefert 48 Volt Spannung für alle
XLR-Buchsen.
9. Line/Hi-Z-Taste
Aktivieren Sie diese Taste, wenn Sie über
Kanal 1 eine Gitarre ohne DI-Box spielen möchten.
10. Main In
Schließen Sie hier ein symmetrisches
Line-Pegel-Signal via XLR- oder Klinken-Stecker an.
11. Thru-Ausgang
Zum Anschließen weiterer
Breit band laut sprecher.
12. Mic/Line-Schalter
Regelt die Ausgangsempfindlichkeit,
um die Thru-Buchse für den Anschluss an Eingänge mit Mikrofon-
oder Line-Pegel zu optimieren.
1. Embase d’alimentation
Connectez le cordon secteur
fourni à cette embase CEI.
2. Bouton marche/arrêt
Permet de placer le SRM150 sous/hors
tension. La Led Power s’illumine.
3. Disjoncteur
Coupe le circuit si la charge du SRM 150 est
trop élevée. Pour le réactiver, mettez le SRM150 hors tension
et poussez l'interrupteur vers le haut.
4. Entrées 1–3
Permettent de connecter un signal niveau micro,
instrument, phono ou ligne d’une console de mixage ou d’une autre
source.
5. Gain
Réglage de sensibilité de l’entrée micro/ligne.
6. Level
Réglage du niveau de sortie général.
7. EQ Potentiométres
Amplification/atténuation de certaines
fréquences pour modifier le son.
8. Interrupteur 48V Phantom Power
Fournit une tension
de 48 V à tous les connecteurs XLR simultanément.
9. Bouton Line/Hi-Z
Enfoncez ce bouton pour pouvoir connecter
votre guitare à la voie 1 sans utiliser de boîtier de direct.
10. Entrée Main In
Permet de connecter un signal symétrique
niveau ligne avec une fiche XLR ou Jack 6,35 mm.
11. Sortie Thru
Permet de connecter une enceinte large bande
supplémentaire.
12. Sélecteur Mic/Line
Permet de régler la sensibilité de la
sortie Thru afin de l'optimiser pour les signaux niveau ligne ou
micro.
Vorder- & Rückseite –
Description des faces
avant et arrière –
EN ES FR DE