


DRM P
rofes
sional P
ow
er
ed L
oudspeak
er S
eries
16
DRM Professional Powered Loudspeaker Series
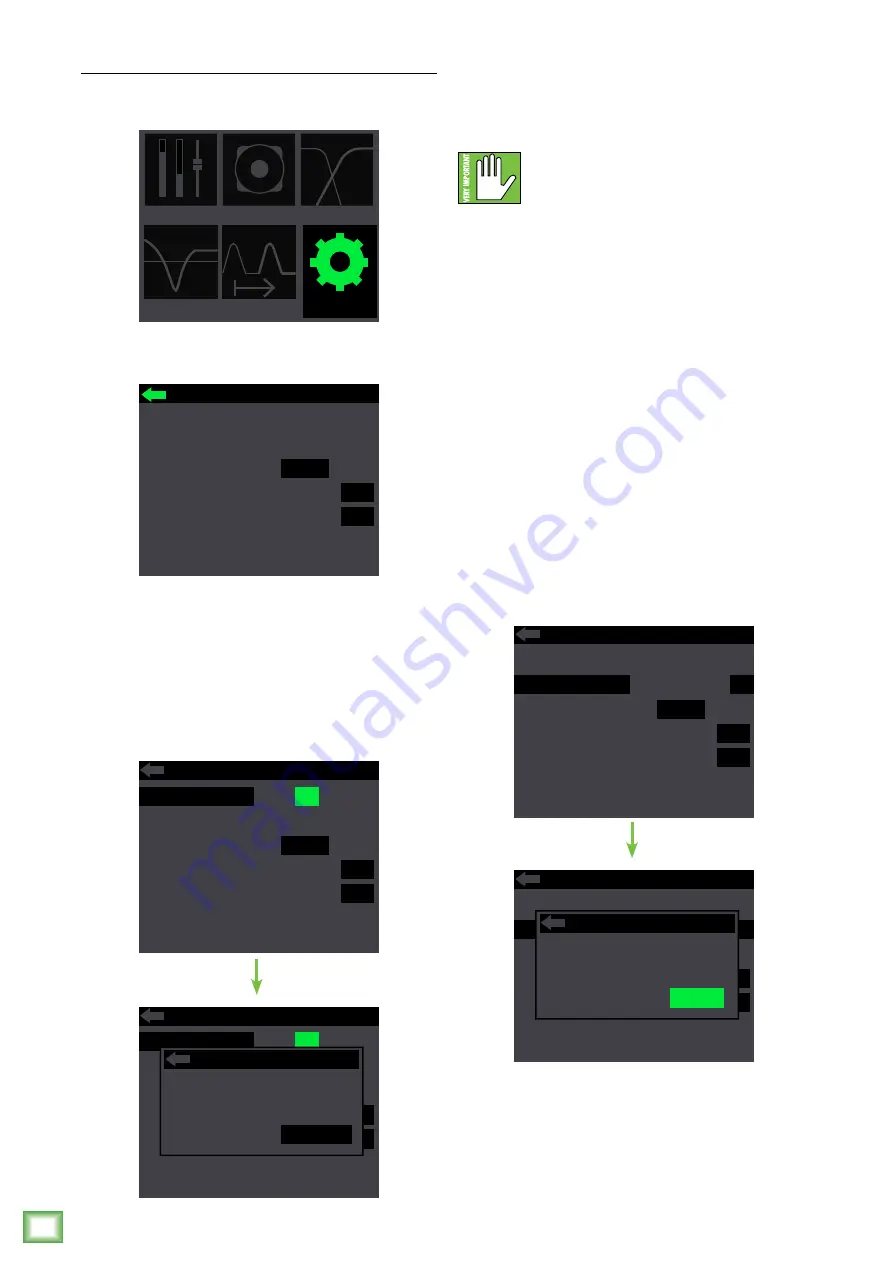
Configuration
This is where to recall / store settings to memory,
lock access to the settings, select Ch. 2 input setting
and more.
This is similar to what you will see after first entering
the configuration screen. The current Ch2 in, backlight
and front LED settings will be illuminated.
To change a setting, just rotate the speaker
control knob until the configuration you desire
to change is illuminated, then push to select it.
These are the choices from top to bottom:
Memory –
When memory is selected, settings may be
saved to memory and recalled at a later time. No more
having to reset levels, EQ, voicing, etc. upon every
power-up.
MAIN
EQ
DELAY
MODE
SUB
CONFIG
CONFIGURATION
MEMORY
1 2 3 4 5 6
ABOUT
CH2 IN
LO-Z
HI-Z
LOCK PIN
1 2 3 4
BACKLIGHT
FRONT LED
RESET
OFF DIM
ON
OFF
ON
CONFIGURATION
MEMORY
1 2 3 4 5 6
ABOUT
CH2 IN
LO-Z
HI-Z
LOCK PIN
1 2 3 4
BACKLIGHT
FRONT LED
RESET
OFF DIM
ON
OFF
ON
CONFIGURATION
MEMORY
1 2 3 4 5 6
ABOUT
CH2 IN
LO-Z
HI-Z
LOCK PIN
1 2 3 4
BACKLIGHT
FRONT LED
RESET
OFF DIM
ON
OFF
ON
MEMORY
User memory
RECALL
STORE
3:
There are six user memory snapshots which should
be more than enough.
Store – Tap this to store the current settings
to the corresponding memory snapshot.
Please be aware that the new settings
will replace the currently saved settings.
Recall – Tap this to recall the settings of the selected
memory snapshot.
Illuminating and selecting the left-facing arrow
returns you to the previous screen.
Lock Pin –
This is where to lock and unlock the
interface with a secret 4-digit numeric password.
Rotate the speaker control knob until lock pin
is illuminated, then push in to enter lock mode.
From here, rotate the speaker control knob until
the first number you desire is illuminated and press
to select. Follow the same procedure for the next
three numbers.
As seen below, we decided to go with 1-2-3-4 because
that’s (a “5” shy of) the same code that was used
on Spaceballs. A confirmation dialog helps prevent
accidents. No further changes may be made until
the control access is unlocked.
Unlocking – If you try to make any changes
or select anything, you will be asked to enter
the pin. Here you will need to re-enter the 4-digit
code and push the speaker control knob to unlock.
CONFIGURATION
MEMORY
1 2 3 4 5 6
ABOUT
CH2 IN
LO-Z
HI-Z
LOCK PIN
1 2 3
4
BACKLIGHT
FRONT LED
RESET
OFF DIM
ON
OFF
ON
CONFIGURATION
MEMORY
1 2 3 4 5 6
ABOUT
CH2 IN
LO-Z
HI-Z
LOCK PIN
1 2 3
4
BACKLIGHT
FRONT LED
RESET
OFF DIM
ON
OFF
ON
LOCK
Lock user
interface?
YES
NO


