background image

6

MCSW40-2

Getting

 Started . . .

Operation


> When sawing ensure the product does not touch any foreign materials such as rocks, 

fences, nails etc. Such objects may be flung out and could result in damage to the 

product, serious or even fatal injuries.


> Never operate the product on a ladder or other insecure support.


> If the chain jams in the cut: STOP THE ENGINE. Do not try to pull the product free. 

Use a lever to open the cut and free the chain. Failure to do so could result in serious 

or even fatal injuries.


> Only cut with the engine at high speed in order to avoid blockage.


> Use extreme caution when cutting small size bushes and saplings. Slender material 

may catch the saw chain and whip toward the operator or put the operator off balance.


> Operate the product only in well ventilated areas.


> Do not operate the product with one hand! This product is intended for two handed 

use only. Place right hand on the rear handle and left hand on the front handle. You 

cannot control reactive forces and you may lose control of the product, which may 

result in the skating or bouncing of the bar and chain along the limb or log.


> Do not operate the product if you are tired or ill.


> Do not operate the product under the influence of drugs, alcohol or medication.


> Do not operate the product if you have any medical conditions that might be aggravated 

by strenuous work. Consult a doctor before operating this product.


> Do not touch the exhaust during use - IT GETS VERY HOT during use.


> Do not operate the product if it is damaged, improperly adjusted, or not completely 

and securely assembled. Make sure that the saw chain stops moving when the 

throttle trigger is released.


> Do not operate the product on a tree unless you have been specifically trained to 

do so. Operation of the product while up on a tree may result in serious or even 

fatal injuries.


> Do not operate the product near or around flammable liquids or gases.


> Do not smoke whilst operating the product.


> Do not lock the product over fixed stands.


> Do not grip the handles with constant or excessive pressure. This might increase the 

feeling of vibration and the risk of “Vibration White Finger (VWF)” disease.


> Do not over-reach when operating the product or cut above shoulder height.


> When cutting a limb (branch) that is under tension, be alert for spring back so that 

you will not be struck when the tension in the wood fibres is released.


> Always keep proper footing and operate the chain saw only when standing on fixed, 

secure and level surface. Slippery or unstable surfaces such as ladders may cause 

a loss of balance or control of the chain saw.


> Cut wood only. Do not use the product for purposes not intended. For example, do 

not use chain saw for cutting plastic, masonry or non-wood building materials. Use 

of the chain saw for operations different than intended could result in a hazardous 

situations.

Safety information

Содержание MCSW40-2

Страница 1: ...2__V10322 MCSW40 2 EAN 5059340255873 BX220IM B3 WARNING Read the instruction handbook thoroughly before using the product First time operators should receive practical use instructions of the product...

Страница 2: ...Safety information 03 Your product 13 Technical specifications 14 Before you start 16 Quick start 26 In more detail 29 Product functions 29 Operation 31 Care and maintenance 42 Troubleshooting 54 Rec...
Страница 3: ...pets animals children and bystanders Follow instructions for lubricating chain tensioning and changing accessories Improperly tensioned or lubricated chain may either break or increase the chance for...

Страница 4: ...afety steel toe capped footwear compliant to EN ISO 20345 Class 2 Wear sturdy cut retardant snug fitting protective clothing Wear a dust mask First Aid Kit in case of injury Dry powder fire extinguish...

Страница 5: ...fuel before turning the engine on again If fuel has ignited put out the fire with a dry powder fire extinguisher Never breathe in any fuel fumes when you are refuelling the product Keep fuel fresh le...

Страница 6: ...ted by strenuous work Consult a doctor before operating this product Do not touch the exhaust during use IT GETS VERY HOT during use Do not operate the product if it is damaged improperly adjusted or...

Страница 7: ...orage Causes and operator prevention of kickback Kickback may occur when the nose or tip of the guide bar touches an object or when the wood closes in and pinches the saw chain in the cut Tip contact...

Страница 8: ...keep it well lubricated where appropriate Plan your work schedule to spread any high vibration tool use across a longer period of time Emergency Familiarise yourself with the use of this product by m...

Страница 9: ...duces an electromagnetic field during operation This field may under some circumstances interfere with active or passive medical implants To reduce the risk of serious or fatal injury we recommend per...

Страница 10: ...practice not related to personal injury Caution Warning Read the instruction manual Note Remark Wear hearing ear protection compliant to EN 352 1 Wear eye protection compliant to EN 166 Wear head pro...

Страница 11: ...rd and backwards what may cause serious injury to user Stop the engine before refuelling Never refuel the product while the engine is running Only refuel unleaded petrol and oil mixture in ratio 40 1...

Страница 12: ...g Chain brake the symbol shows the position in which the brake is released Engine manual start recoil starter Guaranteed sound power level value in dB The product complies with the applicable European...

Страница 13: ...n brake 5 Front handle for left hand 6 Top cover 6a Spark plug connector 6b Air filter 7 Choke knob 8 Throttle trigger lock out 9 Rear handle for right hand 10 Throttle trigger 11 Stop switch 12 Oil t...

Страница 14: ...w chain and empty tank approx 4 65 kg Machine with guide bar saw chain and empty tank in normal operating configuration approx 5 35 kg Fuel tank capacity 310 ml Petrol type Octane rating of at least 9...

Страница 15: ...rator position 99 4 dB A Measured sound power level LWA 110 3 dB A Uncertainty K 3 0 dB A Guaranteed sound power level LWA acc to 2000 14 EC amended by 2005 88 EC 115 dB A Vibration emission level Han...

Страница 16: ...ing or show damage do not use the product and contact your dealer Using an incomplete or damaged product represents a hazard to operators and property 4 Ensure that you have all the accessories and to...

Страница 17: ...Take care of small parts that are removed during assembly or when making adjustments Keep them secure to avoid loss Installing the guide bar and saw chain WARNING Always use a saw chain designed as l...

Страница 18: ...he chain brake Fig 1 1 4 2 Loosen the fixing nuts 18 using the multi tool 24 and remove the clutch cover 20 Fig 2 Ensure the spiked bumper 16 is properly fixed to the product Tighten the 2 bolts if ne...

Страница 19: ...3 over the drive sprocket and fit around the guide bar 2 Fig 4 NOTE This symbol indicates the direction which the saw chain 3 runs Fit the saw chain 3 in the correct direction Fig 4 3 1 2 2 4 Drive sp...

Страница 20: ...multi tool 24 Fig 6 NOTE Tighten the fixing nuts 18 finger tight only at this stage The chain tension cannot be adjusted with the fixing nuts fully tightened 6 20 18 24 19 Tensioner pin Tightening th...

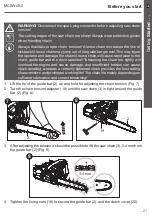
Страница 21: ...ightly will overload the engine and cause damage and insufficient tension can cause chain derailing whereas a correctly tightened chain provides the best cutting characteristics and prolonged working...

Страница 22: ...he product on a stable level surface with the oil tank cap 12 facing upwards We recommend laying a non flammable sheet under the product 2 Unscrew and remove the oil tank cap 12 Fig 10 3 Fill suitable...

Страница 23: ...the guide bar 2 and saw chain 3 Checking the lubrication requires starting the engine Before checking the product must be fully assembled and all instructions must have been read 1 Make sure the guide...

Страница 24: ...1 Place the product on a stable level surface with the fuel tank cap 13 facing upwards We recommend laying a non flammable sheet under the product 2 Pour a regular grade unleaded petrol and a quality...

Страница 25: ...l with a soft cloth Refit and screw the fuel tank cap 13 firmly Fig 14 14 13 15 5 mm NOTE Fuel and oil deteriorate over time It may be difficult to start the engine if you use fuel which has been kept...

Страница 26: ...Getting Started Operating controls Front hand guard Primer Throttle trigger lock out Throttle trigger Stop switch Recoil starter handle Choke knob Oil tank cap Fuel tank cap Chain oil flow adjuster Q...

Страница 27: ...o I position Fully pull choke knob Press primer 6 times Pull recoil starter handle 4 times 6 7 8 9 10 Fully press in choke knob Pull recoil starter handle until engine starts Press and release throttl...

Страница 28: ...For safe use it is essential to read the entire instruction manual before first use Intended use This petrol chain saw MCSW40 2 is designated with a power output of 1 5 kW The product is intended for...

Страница 29: ...For safety reasons it is essential to read the entire instruction manual before first operation and to observe all the instructions therein This product is intended for private domestic use only not f...

Страница 30: ...aw chain is stopped as soon as the chain brake is activated Fig 18 Chain brake test manual chain brake The following function check should be carried out before each use The purpose of the chain brake...

Страница 31: ...check that accessories and the guide bar saw chain are properly fixed 3 Check the fuel level and chain oil level refill if necessary 4 Always hold the product by its handles Keep the handles dry and...

Страница 32: ...nly release the recoil starter handle Allow the rope to return slowly and in a controlled manner each time it is pulled NOTE The break in period Do not use new product at full speed full throttle revo...

Страница 33: ...the recoil starter handle 15 briskly and strongly Repeat until the engine starts 10 Squeeze the throttle trigger lock out 8 and throttle trigger 10 and release them 11 Let the product run in idle for...

Страница 34: ...ing the engine 1 Leave the engine running at idling speed for a while 2 Slowly press down on the throttle trigger 10 to increase the engine speed The clutch will be released when the engine speed is h...

Страница 35: ...ct at the right hand side of your body Fig 24 24 4 Check the proper lubrication as described in section Before you start Chain lubrication before performing any cut 5 Ensure the saw chain 3 is running...

Страница 36: ...eed to the chain is operating correctly run the chain saw at medium speed and ensure that the chain has received a consistent coating of oil Kickback WARNING Beware of kickback Kickback can lead to da...

Страница 37: ...handles A firm grip will help you reduce kickback and maintain control of the product 6 You should carefully read all safety warnings and user instructions before attempting to operate this product T...

Страница 38: ...otified immediately 2 The product operator should keep on the uphill side of the terrain as the tree is likely to roll or slide downhill after it is felled 3 An escape path should be planned and clear...

Страница 39: ...the tree begins to fall remove the product from the cut stop the engine put the product down then use the retreat path planned Be alert for overhead limbs falling and watch your footing Limbing and p...

Страница 40: ...ections for easy cutting When the log is supported along its entire length Fig 33 it is cut from the top overbuck 2 When the log is supported on one end Fig 34 cut 1 3 the diameter from the underside...

Страница 41: ...free a trapped saw the release cuts should always be outboard toward the tips of the branch in order to prevent the saw being taken with the section and further complicating the situation Regardless...

Страница 42: ...and damaged parts Do not operate it if you find broken and worn parts Replace worn parts as necessary or contact an authorised service centre for repair before using the product again WARNING Only pe...

Страница 43: ...uide bar slot using the putty knife not provided Fig 39 Use a damp lint free cloth to clean the surface Wipe the surface with a dry cloth afterwards Maintenance table Inspect and maintain this product...

Страница 44: ...X clean every 10 hours of operation or whenever necessary replace whenever necessary Drive sprocket check X replace every 25 hours of operation or whenever necessary Spark plug check X replace wheneve...

Страница 45: ...to complete straight cuts If the guide bar is insufficiently lubricated and the product is operated with a saw chain which is too tight this will contribute to rapid bar wear To help minimise bar wea...

Страница 46: ...43 6 Check the saw chain 3 for possible wear and damages Replace it with a new one if required Experienced user can sharpen a dull saw chain see section Saw chain sharpening below 7 Refit the saw cha...

Страница 47: ...bove the cutter s top plate 5 File at an angle perpendicular to the bar and at an angle of 25 to the direction of travel Fig 45 6 File each tooth from the inside towards outside only File one side of...

Страница 48: ...he fixing screw and remove the top cover 6 Fig 47 2 Remove the air filter 6b 3 Using the screwdriver 28 separate the air filter 6b into its two parts and tap them on a stable surface to remove dust Us...

Страница 49: ...contact an authorised service centre or a similarly qualified person or a similarly qualified person Spark plug NOTE For good performance the spark plug must be properly gapped and free of deposits I...

Страница 50: ...rburetor has been carefully set at the factory Adjustment may be necessary if you notice that the engine does not idle e g the saw chain 3 keeps running when the throttle trigger 10 is released Contac...

Страница 51: ...r If it be necessary to modify or replace the silencer contact an authorised service centre or a similarly qualified person Spare parts Replacement parts The following parts of this product may be rep...

Страница 52: ...le free 1 Clean the product as described above 2 Attach transportation guards if applicable 3 Store the product and its accessories in a dry frost free well ventilated place 4 Always store the product...

Страница 53: ...n 4 Disconnect the spark plug connector 6a and remove the spark plug 5 Let a teaspoon of clean two stroke engine oil run into the combustion chamber 6 Pull the recoil starter handle 15 slowly several...

Страница 54: ...procedure Follow the engine starting procedure Spark plug connector not firmly attached Attach the spark plug connector firmly Spark plug connector is dirty Clean the spark plug connector Excess fuel...

Страница 55: ...smoke from the engine Incorrect fuel or incorrect mixture Stop the engine and empty tank then fill up with the correct mixture of fuel to oil 40 1 Chain does not start Chain brake engaged Disengage c...

Страница 56: ...invoice or other evidence admissible under applicable law please keep your proof of purchase in a safe place For this guarantee to apply the product you purchased must be new it will not apply to sec...

Страница 57: ...le choice and you will be doing your bit for the environment How does it work Step 1 Step 2 Step 3 Step 4 Step 5 Find your proof of purchase and get in touch with the Customer Care and Technical Helpl...

Страница 58: ...ssistance or visit www kingfisherspares com For assistance contact the customer services helpline UK 0800 0789647 uk Kingfisherservice com EIRE 1800 932226 eire kingfisherservice com Further informati...

Страница 59: ...n the Environment by Equipment for Use Outdoors Regulations 2001 as amended Electromagnetic Compatibility Regulations 2016 as amended The Restriction of the use of Certain Hazardous Substances in Elec...

Страница 60: ...aat 175E 1011 VM Amsterdam The Netherlands www kingfisher com products This declaration of conformity is issued under the sole responsibility of the manufacturer La pr sente d claration de conformit e...

Страница 61: ...t relatif aux exigences concernant les limites d mission pour les gaz polluants et les particules polluantes telle que modifi e 2011 65 UE Directive relative la limitation de l utilisation de certaine...

Страница 62: ...body TUV Rheinland No 0197 performed EC Type Examination and issued Where applicable the notified body TUV Rheinland No 0197 performed EC Type Examination and issued the certificate XXXXXXXXX the cert...

Страница 63: ...nal Products Limited 3 Sheldon Square London W2 6PX United Kingdom EU Manufacturer Kingfisher International Products B V Rapenburgerstraat 175E 1011 VM Amsterdam The Netherlands www diy com www screwf...

Отзывы: