Always be sure that the tool is switched off and unplugged from the supply outlet before installing
or removing saw blade.
Always clean out all chips or foreign matter adhering to the blade, blade clamp and/or slider.
Failure to do so may cause insufficient tightening of the blade, resulting in a serious injury.
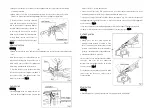
To install the blade, loosen the clamping
screw with the hex wrench. Insert the blade
with its edge upward or downward between
the blade clamp and the slider so that the pin
on the slider fits into the hole in the blade
shank. And then tighten the clamping screw
securely. Make sure the blade cannot be
extracted by trying to pull it out with your hand.
(Fig. 1)
Adjusting the Shoe
CAUTION:
Always be sure that the tool is switched off and unplugged from the supply outlet before adjusting the
shoe.
When the blade loses its cutting efficiency in one
place along its cutting edge, reposition the shoe to
utilize a sharp, unused portion of its cutting edge.
This will help to lengthen the life of the blade.
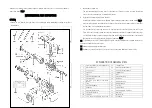
To reposition the shoe, loosen the two bolts holding
the shoe and slide the shoe forward or backward to
the desired position. Then tighten the two bolts
firmly to secure the shoe. (Fig. 2)
Switch Action
CAUTION:
Before plugging in the tool, always check to see
that the switch trigger actuates properly and
returns to the “OFF” position when released.
Switch can be locked in the “ON” position for ease of operator comfort during extended use. Apply
caution when locking tool in the “On” position and maintain firm grasp on tool.
To start the tool, simply pull the switch trigger. Release the trigger to stop. For continuous operation, pull
the trigger and then push in the lock button. To stop the tool from the locked position, pull the trigger fully
and then release it. (Fig. 3)
Speed can be adjusted by turning the adjusting knob on the switch trigger. Turn the adjusting knob
clockwise (+) to increase the speed and counterclockwise (-) to lower the speed. (Fig. 3)
Cutting Operation
CAUTION:
Always press the shoe firmly against the
workpiece during operation. Overexert or if the
shoe is held away from the workpiece during
operation, strong vibration and/or twisting will be
produced, causing the blade to snap dangerously.
Always wear suitable eye protection.
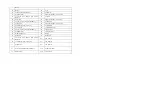
Switch on the tool and wait until the blade attains
full speed, then press the shoe against the
workpiece and start cutting operation. Do not allow
the tool to bounce. (Fig. 4)
For cutting precisely, first make a pilot groove with a
slower speed and then use a faster speed to
continue cutting.
Metal Cutting
CAUTION:
Always wear gloves to protect your hands from hot flying chips when cutting metal.
-5- -6-


