background image

21

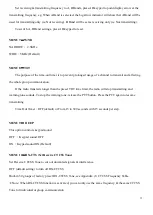
Edit user name for MENU 26 Power On Message Display function.

Enter User-N function, use Manual/Frequency/Channel Switch or numeric keypad to input user name from

left to right, press VFO key to advance to next character, until user name is complete. Press MENU key to

complete User Name input.

Note: Input alphabet or numbers in the same manner as MENU 21 Memory Channel Function.

Note: To display user name, select MENU 26 Power On Message “USER” option.

MENU 28

RESET (RESET to DEFAULT)

3 RESET options

VFO

Reset A/B bands to default factory settings (SOURCE setting), press MENU key to execute RESET to

default factory settings. (Default option).

MEM_CH

Reset Memory Channels. Press MENU key, select MEM_CH, screen displays “SOURCE”,

press MENU key to erase and reset Memory Channels.

ALL

Reset all frequencies, including VFO, MEM CH to factory default settings. Press MENU key, select

ALL, screen displays “SOURCE”, press MENU key to reset all to default factory settings. Screen displays

OK! when reset is completed and the transceiver will be reactivated.

FM Radio Instructions Manual:

General Operation

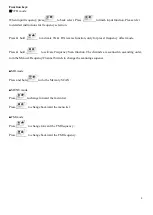
Select FM Radio mode and use numeric keypad or turn the Channel Switch to input FM radio frequencies.

Alternatively, use Channel Scan, press

or

keys to search and select desired FM

Channel.

Saving Memory FM Channel

Select FM Radio mode and use numeric keypad or turn the Manual/Frequency/Channel Switch to

select desired radio channel. Press MENU key, screen displays “SAV M1” to enter FM radio Channel

memory mode. Press any Numeric Keypad 0-9 to input FM radio channel memory. Repeat above steps to

input other FM radio channel memory.

Содержание AHT-3-UV

Страница 1: ......

Страница 2: ...ng der Tasten 8 Nutzung der Einstellmenüs Funktionstabelle 10 Frequenzeinstellung 12 Suchlauf 12 Bandumschaltung A und B 12 VFO Frequenz einstellen Speicherbetrieb 12 1750 Hz Rufton 12 Einstellmenüs im Detail 13 Nutzung des FM Rundfunkempfängers 20 Anhang 1 CTCSS Frequenzen 21 Anhang 2 DCS Codes 21 Fragen und Antworten zur Problembehebung 22 Technische Daten 23 Konformitätserklärung 24 2 ...

Страница 3: ...anäle im Speicherkanal Einstellmodus mit Namen oder Nummern versehen 50 CTCSS Töne und 105 DCS Codes Crossband Repeaterbetrieb möglich UHF Empfang und VHF Senden bzw umgekehrt Eingebauter Sprachverschlüsseler mit 5 Codes als Schutz gegen unberechtigtes Mithören des Funkverkehrs Darf auf den Amateurfunkbändern nicht genutzt werden VOX Funktion zur automatischen Sende Empfangs Umschaltung mit sieben...

Страница 4: ... wird erhitzt sich das Funkgerät was unter ungünstigen Umständen einen Defekt verursachen kann Falls Rauch oder unangenehme Gerüche aus dem Lautsprecher dringen schalten Sie das Funkgerät aus und nehmen Sie den Akku ab Lagern oder verwenden Sie Ihr AHT 3 UV nicht an staubigen oder feuchten Plätzen Legen Sie es immer so ab dass es nicht auf den Boden fallen kann Verwenden Sie zum Reinigen Ihres AHT...

Страница 5: ...hlbar Hub für Bandbreiten 25 kHz bzw 12 5 kHz wählbar Kanalnamen editierbar 2x 10⁵ DCS Codes und 50 CTCSS Frequenzen Sprachmeldung bei niedriger Akkuspannung Busy Channel Lockout Funktion BCLO Transmit Over Timer Funktion TOT Mehrere Abstimmschrittweiten 5 6 25 10 12 5 25 50 und 100 kHz Tastenverriegelung Verschiedene Suchlauf Modi Beleuchtetes Display PC programmierbar Lieferumfang Funkgerät AHT ...

Страница 6: ......

Страница 7: ...nquittungston Roger Piep Busy Anzeige Sendeleistungsanzeige Band A Anzeige bei RPT ON Pfeilspitze größer Band B Anzeige bei RPT ON Pfeilspitze größer Funktionstasten Icon Akku voll geladen Akku leer S Meter Sendeleistungsanzeige kurz drücken lange drücken Zifferntasten Zweitfunktionen kurz drücken zurück lange drücken Duplex kurz drücken vorwärts lange drücken Suchlauf ...

Страница 8: ...verriegelung ein oder auszuschalten VFO Taste kurz drücken um zwischen VFO und Speichermodus umzuschalten lange drücken um den gewünschten Anrufkanal zu wählen Funktionen im Menü Modus kurz drücken um den Menü Modus aufzurufen Taste noch einmal kurz drücken um die Einstellmöglichkeit zu aktivieren bzw zu deaktivieren Funktionen im FM Rundfunkmodus kurz drücken um die Frequenz in einen Speicher M1 ...

Страница 9: ...Informationen dazu im Abschnitt Frequenzeinstellung lange drücken um die TX RX Revers Funktion ein oder auszuschalten mit dem voreingestellten Offset lange drücken um den Suchlauf in Richtung höherer Frequenzen zu starten Den Abstimmknopf betätigen um die Suchlaufrichtung umzukehren Im Speichermodus lange drücken um den Speichersuchlauf zu starten Im Menü Modus drücken um zum vorherigen Menü zu ge...

Страница 10: ...nktion OFF voreingestellt ON 7 W NB Bandbreite Hub WIDE 25 5 kHz NARROW 12 5 2 5 kHz 8 TOT Time Out Timer OFF voreingestellt 15 bis 300 Sek in 15 Sek Schritten 9 BEEP Tastenquittungston ON voreingestellt OFF 10 RX CTS CTCSS Decoder OFF voreingestellt 50 Töne zwischen 67 0 Hz und 254 1 Hz 11 TX CTS CTCSS Coder OFF voreingestellt 50 Töne zwischen 67 0 Hz und 254 1 Hz 12 RX DCS DCS Decoder OFF vorein...

Страница 11: ...MEM Speicherkanäle CALL 001 bis 199 20 CH DEL Speicherkanal löschen 1 bis 199 21 CHNAME Speicherkanalname editieren 22 PF1 Programmierbare Funktionstaste 1 FM A B FM Rundfunk und Handfunkgerät gleichzeitig voreingestellt RADIO CALL SCAN OFF 23 BUSY Sender bei geöffneter Squelch verriegelt OFF voreingestellt ON 24 ABLAMP Beleuchtungsfunktion OFF KEY voreingestellt TX RX BOTH 25 VOXDLT VOX Haltezeit...

Страница 12: ...f dem Band in dessen Zeile ein Pfeilsymbol sichtbar ist Das Pfeilsymbol kann mit der A B Taste in die andere Zeile auf das andere Band umgeschaltet werden 2 lange drücken um in den Einband Modus umzuschalten Das Pfeilsymbol lässt sich wiederum mit der A B Taste in die andere Zeile umschalten VFO Frequenz einstellen Speicherbetrieb Funktion der VFO MR Taste Durch mehrfaches Drücken der VFO MR Taste...

Страница 13: ...empfangen wird oder länger als 10 Sek keine Bedienung am Handfunk gerät erfolgt schaltet sich die Batteriesparfunktion automatisch ein Sie schaltet sich wie der aus sobald ein Signal empfangen wird oder eine Bedienung erfolgt OFF Batteriesparfunktion aus 1 1 0 2 Sek Empfang 0 2 Sek Stand by voreingestellt 1 2 0 2 Sek Empfang 0 4 Sek Stand by 1 3 0 2 Sek Empfang 0 6 Sek Stand by 1 4 0 2 Sek Empfang...

Страница 14: ...enn er eingeschaltet ist empfängt das Handfunkgerät z B auf VHF und sendet im UHF Band wobei das Sendeband immer durch ein großes Pfeilsymbol vor der Frequenz mar kiert ist Durch Drücken der A B Taste kann man das Sende und Empfangsband vertau schen MENÜ 7 W NB Bandbreite Hub NARROW 12 5 2 5 kHz WIDE 25 5 kHz voreingestellt MENÜ 8 TOT Time Out Timer Die TOT Funktion verhindert überlanges Dauersend...

Страница 15: ... Rauschsperre sodass nur erwünschte Signale die Rauschsperre öffnen können OFF DCS Funktion ausgeschaltet voreingestellt 210 2x 10⁵ Codes sind wählbar siehe Anhang 2 DCS Codes Normale Codes D023N bis D754N und inverse Codes D023I bis D754I Hinweis Die DCS Codes können im Speichermodus nicht geändert werden MENÜ 13 TX DCS DCS Coder Damit die Gruppenmitglieder die Vorteile der DCS nutzen können muss...

Страница 16: ... kHz Beispiel Gewünschte Repeater Ablage 600 kHz 006000 eingeben Beispiel Gewünschte Repeater Ablage 4 MHz 04 eingeben und drücken Hinweis Drücken von ergänzt die fehlenden Nullen Hinweis Damit die Repeater Ablage angewandt wird muss man im Menü 18 die entspre chende Einstellung vornehmen Hinweis Die Repeater Ablage kann im Speichermodus nicht geändert werden MENÜ 18 SFT D Duplex Ablagerichtung OF...

Страница 17: ...eicherkanäle erfolgt mit den gleichen Bedienschritten wie im Menü 19 Wenn im Display CH DEL NONE angezeigt wird bedeutet dies dass kein zu löschender Speicherkanal vorhanden ist Wenn im Display eine Speichernummer z B CH DEL 001 angezeigt wird kann der Speicherkanal z B CH001 mit den Zifferntasten und der MENU Taste gelöscht werden Zum Löschen die Speicherkanalnummer mit den Zifferntasten eingeben...

Страница 18: ...u können ist die PF1 Taste erneut zu drücken Hinweis Siehe auch Abschnitt Nutzung des FM Rundfunkempfängers CALL Anrufmodus PF1 Taste drücken um den Anrufkanal aufzurufen Um zur ursprünglichen Frequenz zu rückzukehren die PF1 Taste noch einmal oder die MENU Taste drücken Hinweis Die PF1 Taste hat im Anrufmodus die gleiche Funktion wie die VFO MR Taste für den Aufruf des Anrufkanals SCAN Frequenz S...

Страница 19: ...rs siehe Menü 27 MENÜ 27 USER N Benutzername editieren Eingabe des Namens des Benutzers für die Einschaltmeldung Menü 26 Im Menü 27 wählt man mit dem Abstimmknopf das Zeichen für die erste Stelle Danach betätigt man die VFO Taste um zur nächsten Stelle zu gelangen für die man wiederum mit dem Abstimmknopf das gewünschte Zeichen wählt Dies so oft wiederholen bis der Name vollständig eingegeben ist ...

Страница 20: ...erkanäle belegt sind kann man die MENU Taste ein weiteres Mal drücken sodass SAV M2 Speichergruppe 2 im Display erscheint Auch in dieser Speichergruppe können bis zu zehn Frequenzen gespeichert werden Um das Speichern zu beenden ist die MENU Taste ein weiteres Mal zu betätigen Hinweis Während des Speicherns von FM Rundfunkfrequenzen kann die Frequenz einstellung nur mit dem Abstimmknopf erfolgen G...

Страница 21: ...47 051 053 054 065 071 072 073 Nr 01 02 03 04 05 06 07 08 09 10 11 12 13 14 15 Code 074 114 115 116 122 125 131 132 134 143 145 152 155 156 162 Nr 16 17 18 19 20 21 22 23 24 25 26 27 28 29 30 Code 165 172 174 205 212 223 225 226 243 244 245 246 251 252 255 Nr 31 32 33 34 35 36 37 38 39 40 41 42 43 44 45 Code 261 263 265 266 271 274 306 311 315 325 331 332 343 346 351 Nr 46 47 48 49 50 51 52 53 54 ...

Страница 22: ...gewöhnlich bzw unlogisch Akku ist entladen Akku laden und erneut versuchen Akku Kontakte sind verschmutzt und geben schlecht Kontakt Kontakte säubern Antenne ist kurzgeschlossen oder Stecker hat keinen Kontakt Antenne überprüfen Stecker ersetzen oder neu anlöten Squelch Schaltpegel ist zu hoch eingestellt Einstellung korrigieren Lautstärke ist zu niedrig eingestellt Lautstärkeknopf weiter nach rec...

Страница 23: ...ie VHF UHF Crossband Sendeleistung max VHF 5 W UHF 4 W Modulationsart FM F3E Maximaler Frequenzhub 5 kHz bzw 2 5 kHz Nebenaussendungen 60 dB Frequenzstabilität 2 5 ppm Empfindlichkeit 0 18 µV NF Ausgangsleistung 500 mW Stromaufnahme Senden 1 5 1 0 0 7 A HIGH MID LOW Stromaufnahme Empfang 90 mA bzw weniger je nach Einstellung der Batterie sparfunktion Gewicht 250 g Abmessungen 62 mm 116 mm 36 mm B ...

Страница 24: ...t user requirements 199 available memory channels can be programmed to memory in either A or B Bands User can input memory channel name or memory frequency number while in Memory Channel Setting mode Provides 50 groups CTCSS Tone 105 groups DCS Tone Transceiver can be set to receive signal in UHF and transmit signal in VHF through working with Repeater or vice versa 5 groups built in voice scrambl...

Страница 25: ... device directly Pressing PTT continuously for too long may generate excessive heat and cause damage In case of any smog or peculiar smell please turn the power off take out the battery immediately and contact distributor right away Do not place the AHT 3 UV transceiver in excessively dusty humid and or wet areas or on unstable surfaces Do not use caustic chemicals to clean the AHT 3 UV transceive...

Страница 26: ...ard instruction 8 Shortcut Menu Instructions Functions Table 10 Frequency Setting Instructions 13 A B mode instruction 13 VFO Frequency Setting mode MR Memory Channel mode Instructions 13 Shortcut Menu Instructions Operation 14 FM instruction 22 Appendix 1 24 Appendix 2 24 Specification 25 MAINTENANCE Q A 26 ...

Страница 27: ...dwidth selection 25KHz 12 5KHz Channel Name edit and display 210 groups D C S 50 groups CTCSS Low voltage voice prompt Busy Channel Lockout Transmit Over Timer Multi step frequency 5K 6 25K 10K 12 5K 25K 50K 100K Keyboard lock Multiple scan modes Bright flashlight illumination Programmable by computer PACKAGE INCLUDES AHT 3 UV Transceiver x 1 Antenna x 1 1600mAh Lithium battery x 1 Desktop charger...

Страница 28: ... I AHT 3 UV Overview II PTT key Speaker Microphone Battery clip PF 1 Programmable Function Key 1 PF 2 Programmable Function Key 2 Power Volume Switch Keypad Manual Frequency Channel Switch Antenna LED indicator LCD screen ...

Страница 29: ...ck select Press Press and hold Number key CTS DCS Tone indicator Busy indicator TX Power indicator A band indicator RPT ON Arrow will be magnified Function indicator B band indicator RPT ON Arrow will be magnified Roger tone Duplex indicator Duplex indicator Power Save Keyboard Luck Battery indicator Narrow band Memory channel Vox indicator Scrimble indicator Keyboard tone ...

Страница 30: ...lock feature VFO key Press to enter Frequency Selection Memory Channel modes Press and hold to select desired call channel MENU mode Press to enter MENU mode press again to Enter leave functions setup FM Mode In FM mode press to save FM frequency into memory M1 1 10 M2 1 10 The is for switching to FM tuning mode or FM memory mode 1 0 Number Keypad Input Frequency in VFO mode Input Channel in MR mo...

Страница 31: ... preset frequency offset mode Press hold to activate Frequency Scan function The channels are scanned in ascending order turn the Manual Frequency Channel Switch to change the scanning sequence MR mode Press and hold to do the Memory SCAN MENU mode Press to change forward the menu list Press to change backward the menu list FM mode Press to change forward the FM frequency Press to change backward ...

Страница 32: ...requency is VHF TX RX 136 174 MHz UHF TX RX 400 470 MHz On Key Lock mode Turn power OFF Press and hold PF1 under the PTT key Turn power ON then will sound beep thrice beep beep beep The frequency is VHF TX RX 135 175 MHz UHF TX RX 400 480 MHz UHF RX 400 525 MHz 1750Hz TONE for Repeater PTT PF1 press and hold PTT then press PF1 Functions MENU key Select function MENU key Select argument MENU key A ...

Страница 33: ...ransmit CTCSS Tone OFF Turn CTCSS OFF 50 groups of 67 0Hz 254 1Hz 12 RX DCS Set Receive DCS value OFF Turn DCS OFF 210 groups of D023N D754I 13 TX DCS Set Transmit DCS value OFF Turn DCS OFF 210 groups of D023N D754I 14 SCAN T SCAN MODE TO TO Time 5 sec CO TO Carrier disappear SE TO Carrier instant 15 ROGER Transmit Voice Prompt OFF Turn ROGER OFF BOT ROGER ON as PTT pressed EOT ROGER ON as PTT re...

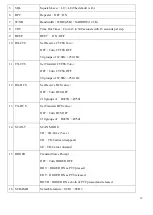
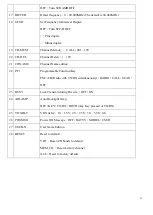
Страница 34: ... Name edition 22 PF1 Programmable Function Key FM A B Radio with TX RX simultaneously RADIO CALL SCAN OFF 23 BUSY Lock Transmit during Receive OFF ON 24 ABLAMP Auto Backlight lamp OFF KEY TX RX BOTH Any Key pressed or TX RX 25 VOXDLT VOX delay 1S 1 5S 2S 2 5S 3S 3 5S 4S 26 PONMSG Power ON Message OFF BATT V MODEL USER 27 USER N User Name Edition 28 RESET Reset to default VFO Reset A B bands to def...

Страница 35: ...Band Indicator Lower Row of Display B Band Indicator Both A B Bands accept VHF or UHF frequency setting When arrow indicates A Band transceiver will transmit from preset A Band frequency if user presses PTT button to talk To transmit from B Band press AB keypad 2 Press hold AB keypad to operate using single band arrow indicates the selected A or B Band Press AB keypad again to switch to the other ...

Страница 36: ...eypad or VFO keypad Transceiver will automatically exit setup mode after a few seconds of inactivity Function setup items are as listed below MENU 1 STEP Step Frequency Selection Turn Manual Frequency Channel Switch to scan and increase decrease frequency step There are 7 step frequency selections from 5KHz 6 25KHz 10KHz default values 12 5K 25KHz 50KHz 100KHz MENU 2 PSAVE Power saving setup When ...

Страница 37: ...HI default values MENU 5 SQL The purpose of the squelch is to mute the speaker noise when no signals are received or the signals are weak When the squelch is activated you can hear noise from the speaker when the squelch is deactivated you will not hear noise from the speaker Selecting the squelch level is to the signal strength level strong enough to enable the squelch or weak enough to disable t...

Страница 38: ...If the radio transmits longer than the preset TOT time limit the radio will stop transmitting and warning tone sounds To stop the warning tone release the PTT button Press the PTT again to resume transmitting Time Out Timer OFF default or From 15 to 300 seconds with 15 seconds per step MENU 9 BEEP This option controls keypad sound OFF Keypad sound OFF ON Keypad sound ON Default MENU 10 RX CTS Set ...

Страница 39: ...DCS values see Appendix 2 DCS Table Normal Parameters D023N D754N Inverse Parameters D023I D754I Note RX DCS values cannot be changed in MR mode MENU 13 TX DCS Set Transmit DCS Value Set Transmit DCS value to cut out unwanted signals interference OFF default setting to turn off TX DCS Note TX DCS values cannot be changed in MR mode MENU 14 SCAN T Multi scan Mode 3 scan modes TO Default setting Whe...

Страница 40: ...fference between receiving and transmitting frequencies Frequency offset range between 0 80 000MHz with minimum 100KHz Eg If desired frequency offset is 600KHz Input 006000 Eg If desired frequency offset is 4MHz input 04 press Note automatically adds 0 to input Note Please select Menu 18 Offset Frequency to activate desired frequency offset Note Frequency offset values cannot be changed in MR mode...

Страница 41: ...annel If user proceeds to input channel memory the new channel setting will be stored as transmitting frequency and the receiving frequency is unchanged Screen will display CH MEN 001 to indicate that a frequency offset has be set for this channel Warning This will override previous frequency offset setting MENU 20 CH DEL Delete Channel Memory Use the same steps to delete Channel Memory If screen ...

Страница 42: ... key again to turn off FM radio Note See FM radio instructions for FM radio functions RADIO FM radio mode Press PF1 key to enter FM radio mode transceiver function will be switched off Press PF1 key again to turn off FM radio and return to transceiver mode Note See FM radio instructions for FM radio functions CALL CALL Mode Press PF1 key to enter CALL function Use MENU key or numeric keypad or pre...

Страница 43: ...or numeric keypad to turn on Auto Backlight Default setting TX RX Auto Backlight turns on when receiving or transmitting signal BOTH Auto Backlight turns on when using Manual Frequency Channel or Power Volume Switches or numeric keypad or when receiving or transmitting signal MENU 25 VOXDLT VOX Delay When using VOX function VOX delay can be set to allow transceiver to switch from transmitting mode...

Страница 44: ...splays SOURCE press MENU key to erase and reset Memory Channels ALL Reset all frequencies including VFO MEM CH to factory default settings Press MENU key select ALL screen displays SOURCE press MENU key to reset all to default factory settings Screen displays OK when reset is completed and the transceiver will be reactivated FM Radio Instructions Manual General Operation Select FM Radio mode and u...

Страница 45: ...Channel Switch to adjust Radio Channel frequency Radio Channel Memory Instructions Select FM Radio mode press VFO key screen displays FM M1 lower right hand corner of screen displays M01 to show that user is currently tuning in to Channel 1 from Channel memory group M1 Press any Numeric Keypad 0 9 or turn the Channel Switch to select Channel memory groups M1 to M10 Press VFO key and the screen dis...

Страница 46: ...23 Appendix 1 Appendix 2 23 附錄2 註 組為 正碼 以記號 表示 組為 反碼 1 105 DCS 106 210 DCS 以記號 表示 ...

Страница 47: ...n or different frequency single operation Power VHF 5W UHF 4W Classification of Emissions F3E Maximum frequency deviation 5 KHz Remanent radiation 60 dB Frequency stability 2 5 ppm Sensitivity 0 18 uV Audio frequency power 500 mW TX current 0 7A 1 0A 1 5A RX current 90 mA The maximum is 45mA depending on setting rate of save mode Weight 250g Volume 62 116 36 mm Specifications are subject to change...

Страница 48: ...or solder the antenna connector again Squelch attenuator function is activated Setup SQL level to the threshold No sound comes from the speaker Volume is too low Rotate PWR VOL switch clockwise The CTS DCS is activated Please setup the correct CTS DCS Squelch is set too high Please set the squelch level to the threshold Transmission is automatically cut off Time out timer is activated Please set t...

Страница 49: ...ernen des Copyright Hinweises ist verboten maas funk elektronik Inh Peter Maas Heppendorfer Str 23 50189 Elsdorf Berrendorf Tel 02274 9387 0 Fax 02274 9387 31 info maas elektronik com www maas elektronik com 0 1 2 3443 0 2 5 0 1 2 6 7 8 3 4 0 1 2 0 3 0 4 4 2 4 3 0 4 5 6 7 42 9 9 5 5 ...

Отзывы: