background image

Front and Back Panel Descriptions
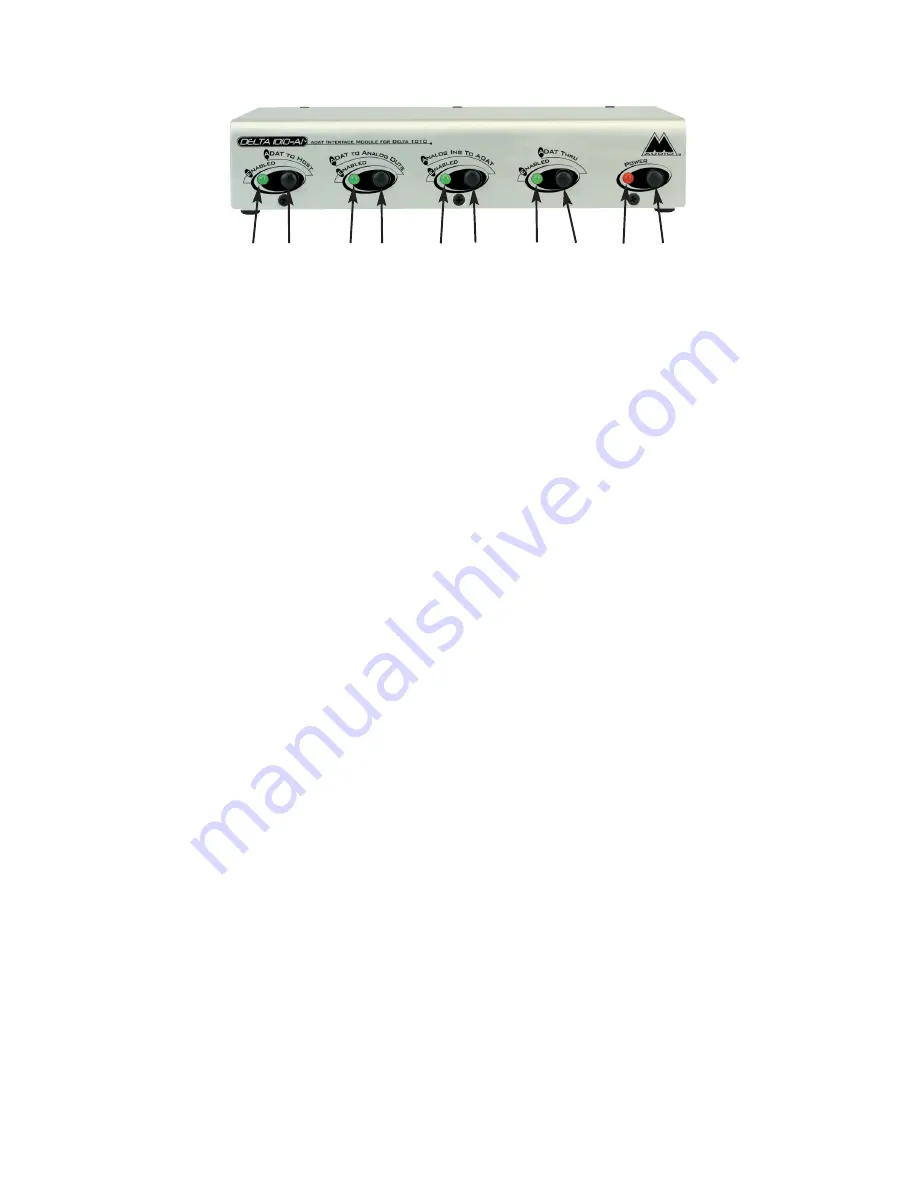
Front Panel

1. ADAT to Host “Enabled” LED: When lit, this LED indicates that “ADAT to

Host” mode has been enabled.

2. ADAT to Host Button: Pressing this button and locking it to the “in”

position will enable “ADAT to Host” mode.  The incoming 

Delta 1010-AI

ADAT signal will then be routed to the Delta 1010 PCI “host” card in your
computer.

3. ADAT to Analog Outs “Enabled” LED: When lit, this LED indicates that

“ADAT to Analog Outs” mode has been enabled.   

4. ADAT to Analog Outs Button: Pressing this button and locking it to the “in”

position will enable “ADAT to Analog Outs” mode.  The incoming

Delta 1010-AI

ADAT signal will then be routed directly to the analog outs

on the Delta 1010 rack unit.

5. Analog Ins to ADAT “Enabled” LED: When lit, this LED indicates that

“Analog Ins to ADAT” mode has been enabled.

6. Analog Ins to ADAT Button: Pressing this button and locking it to the “in”

position will enable “Analog Ins to ADAT” mode.  Analog inputs on the
Delta 1010 rack unit will then be routed directly to the ADAT out on the

Delta 1010-AI

.

7. ADAT Thru “Enabled” LED: When lit, this LED indicates that “ADAT

Thru” mode has been enabled.

8. ADAT Thru Button: Pressing this button and locking it to the “in” position

will enable “ADAT Thru” mode.  The 

Delta 1010-AI

ADAT In is then

routed directly to the 

Delta 1010-AI

ADAT Out.

9. Power Indicator LED: When lit, this LED indicates that power has been

applied to the 

Delta 1010-AI

.

10. Power Button: Pressing the “Power” button and locking it to the “in”

position will apply power to the 

Delta 1010-AI

, provided that the proper

power supply has been plugged into the 

Delta 1010-AI

9v DC jack.

➊ ➋

➌  ➍

➎  ➏ 

➓ 

3

Содержание DELTA 1010-AI

Страница 1: ...h your Delta 1010 4 Hooking Up Your ADAT Optical Device 5 Using Your Delta 1010 AI 6 ADAT to Host 8 ADAT to Analog Outs 8 Analog Ins to ADAT 9 ADAT Thru 9 Mixed Modes 9 Standalone Mode 9 Master Clock...

Страница 2: ...all and configure the Delta 1010 s PCI card Features ADAT I O for PC Windows 95 98 NT Linux and Apple MacOS computers operating up to a full 24 bit 48kHz Provides ADAT record through and playback usin...

Страница 3: ...nalog Ins to ADAT Enabled LED When lit this LED indicates that Analog Ins to ADAT mode has been enabled 6 Analog Ins to ADAT Button Pressing this button and locking it to the in position will enable A...

Страница 4: ...from the Delta 1010 PCI host card and the Delta 1010 AI Setting up the Delta 1010 AI with your Delta 1010 If you already have your Delta 1010 PCI Recording System installed make sure that you have yo...

Страница 5: ...andard for optical cables plugs and jacks Using two good quality TOSLink optical cables 1 Plug one end of an optical cable into the TOSLink optical output jack of your ADAT or other 8 channel ADAT opt...

Страница 6: ...10 rack mount unit can also be used in a standalone mode in which the Delta 1010 A D converters send signal directly to the AI s optical output and the Delta 1010 AI optical input connects directly to...

Страница 7: ...10 AI in addition to the Delta 1010 analog outs 1 through 8 on the 1010 s rack mount unit by default All other Delta 1010 AI modes are bypassed MIDI I O simply passes through the Delta 1010 AI to the...

Страница 8: ...selected from within your music program s audio setup page Once you have opened that page select Wordclock as your master clock source You must also set the Delta control panel to match the sample ra...

Страница 9: ...T Optical out of the Delta 1010 AI This default routing is defeated whenever a different source is selected for the ADAT Optical out such as Analog Ins to ADAT Mixed Modes Any combination of Delta 101...

Страница 10: ...hen host computer is off or not attached and the Delta 1010 AI is in standalone mode the Delta rack unit s D A comverters will know to get its master clock signal from the ADAT signal at the optical i...

Страница 11: ...I O is enabled in the software s MIDI setup page Check your software s documentation You will need to enter a timecode offset into the software s sync setup page also Your BRC may be sending out MTC f...

Страница 12: ...roduct requires repair because of user misuse or regular wear it will assess a fair repair or replacement fee The customer will have the option to pay this fee and have the unit repaired and returned...

Отзывы: