


Turn on the power to the operator. Test all controls and safety devices to make sure they are working properly. Refer to
the previous instructions in this manual to make necessary adjustments.
TESTING THE SYSTEM
IMPORTANT NOTE:
Do not leave operator power on unless all safety and entrapment devices have been tested and are working properly.
Be sure you have read and understand all Safety Instructions in this manual.
IMPORTANT NOTE:
Be sure the owner or person(s) responsible for the operation of the door have read and understand the Safety
Instructions, know how to electrically operate the door in a safe manner, and know how to use the manual disconnect
operation of the door system.
MAINTENANCE SCHEDULE
To avoid SERIOUS PESONAL
INJURY or DEATH from
electrocution
, disconnect
ALL electric power BEFORE
performing ANY maintenance.
WARNING
13
MDJ, MDJH, MDJB, MDJBH
MDJ, MDJH, MDJB, MDJBH
12
IMPORTANT NOTE:
ITEM
PROCEDURE
EVERY
3
MONTHS
EVERY
6
MONTHS
Drive Chain
Check for excessive slack, adjust as needed.
Lubricate.
Sprockets
Check for set screw tightness.
Clutch
Check, adjust as needed.
Belt
Check condition & tightness.
Fasteners
Check, tighten if needed.
Manual Disconnect
Check & operate.
Brake (if present)
Check, adjust as needed.
•
•
•
•
•
•
•
•
Do not...
•
Use grease or silicone
spray
•
Lubricate motor
•
Lubricate Clutch or V-belt
Do...
•
Disconnect ALL electric power
BEFORE performing any
maintenance.
•
Use SAE 30 Oil.
•
Inspect and service whenever
a malfunction is observed or
suspected.
To prevent possible SERIOUS INJURY or DEATH,
install reversing sensors when the 3-button control
station is out of sight of the door or any other control
(automatic or manual) is used. Reversing devices are
recommended for ALL installations.
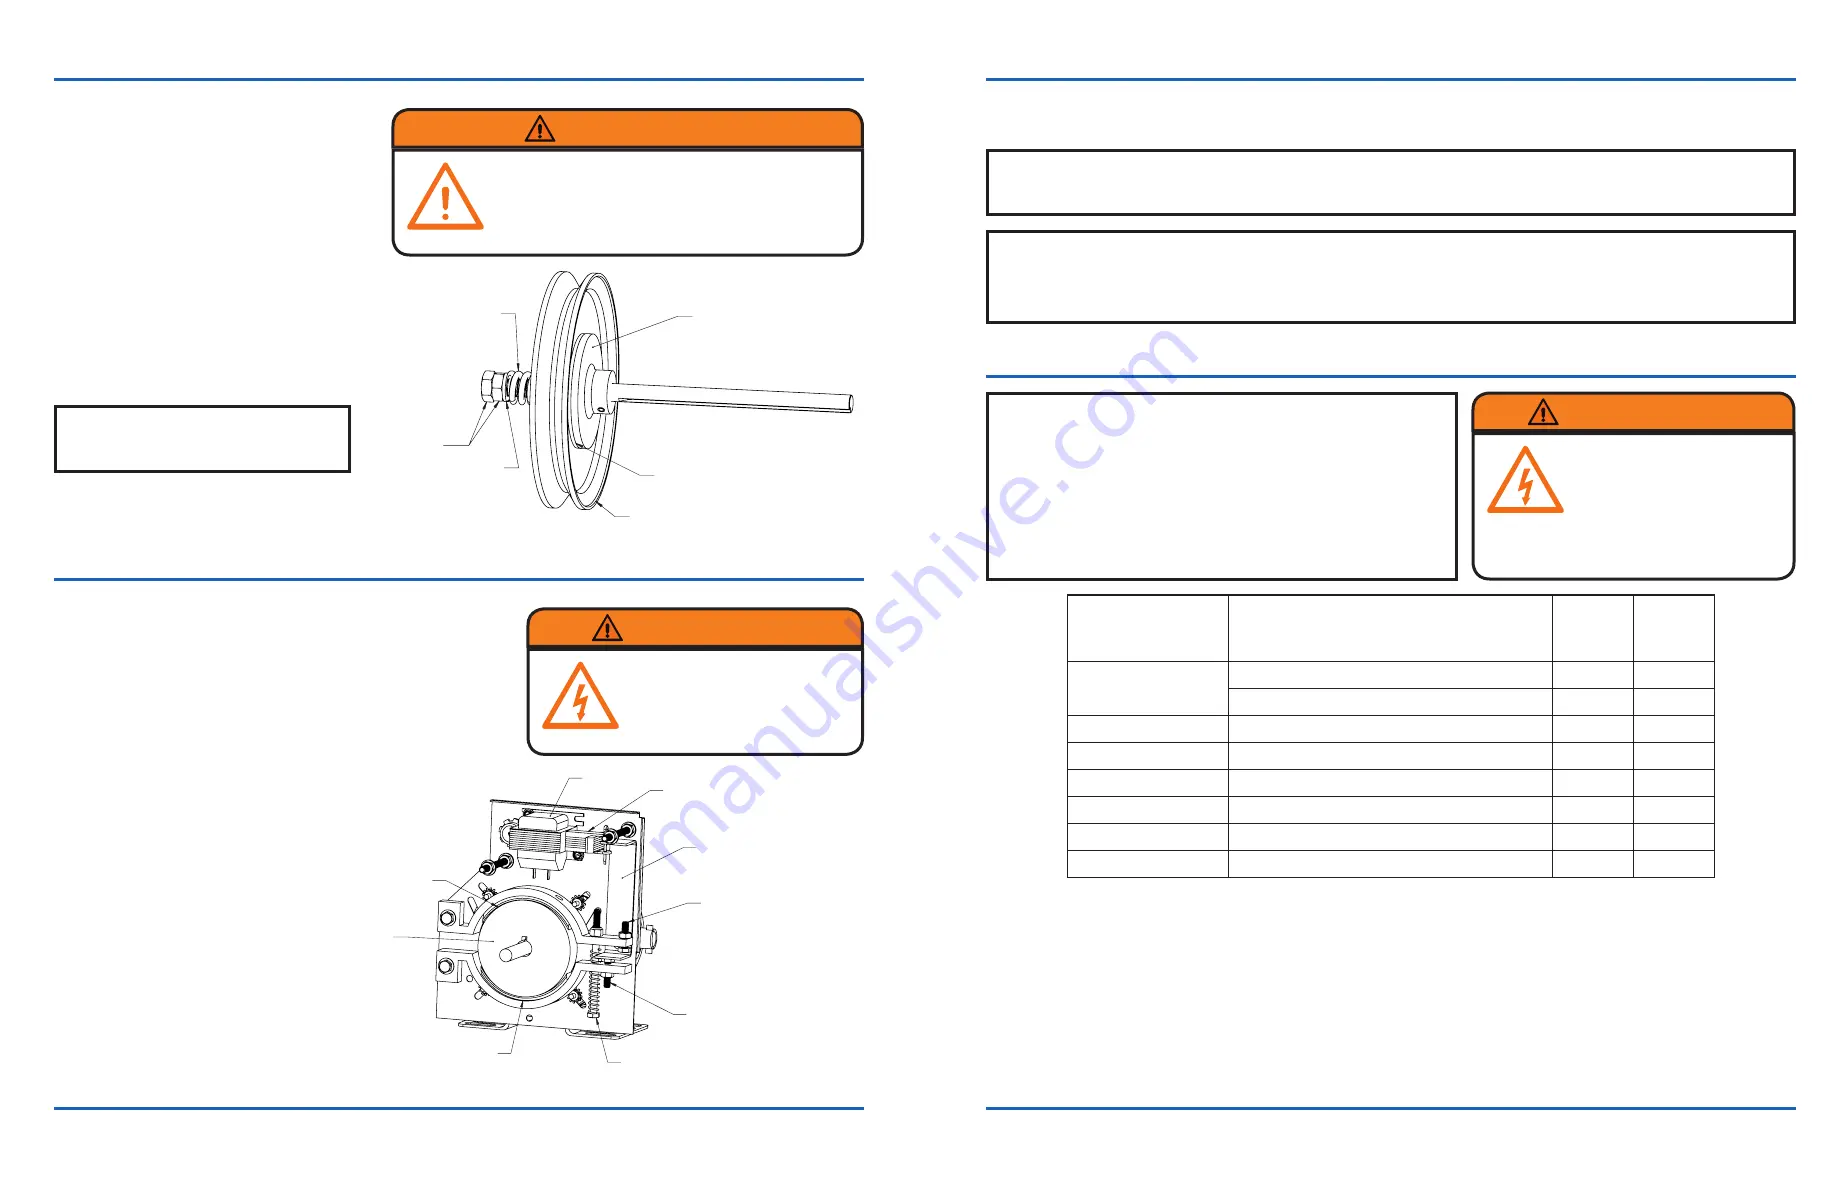
CLUTCH ADJUSTMENT
1. Loosen the adjustment jam nuts until
there is little tension on the clutch
spring.
2. Tighten the inner jam nut gradually until
there is just enough tension to permit
the operator to move the door smoothly
but to allow the clutch to slip if the
door is obstructed. When the clutch is
properly adjusted, it should generally be
possible to stop the door by hand during
travel.
3. Tighten the outer jam nut and lock the
nuts in place by tightening them against
one another.
IMPORTANT NOTE:
The adjustable friction clutch is NOT an
automatic reversing device.
Clutch Hub
Fiber Disc
Spring
Adjustment
Jam Nuts
Washer
Clutch Pulley
On models LDJB and LDJBH a brake is supplied from the
factory. It is designed to stop and hold the door in position
whenever power is removed from the motor.
On first installation the brake should not need adjustment. The
brake operation should be inspected every 3 months. As the
brake pads wear, adjustments need to be made to maintain
proper operation.
With the power disconnected to the
operator, carefully try to rotate the large
drive pulley by hand. The brake should
be engaged and it should be very
difficult to turn.
While pushing the solenoid plunger
in by hand, there should now be
clearance between the brake pads
and the drum (approximately .020")
allowing the pulley to rotate freely. To
achieve the proper operation, adjust
the upper and lower pad spacing bolts
(A&B) accordingly.
BRAKE ADJUSTMENT
Solenoid
Drum
Lower Brake Pad
Upper Brake Pad
Pivot Plate (C)
Spring Tension
Adjustment Bolt
Upper Pad Spacing Bolt (A)
Lower Pad Spacing Bolt (B)
Solenoid Plunger
WARNING
To avoid SERIOUS PERSONAL
INJURY or DEATH from
electrocution
, DISCONNECT
electric power BEFORE
performing any maintenance
WARNING


