


FinishLynx Scholastic System Quick Start Guide
Page 4
Step 5.
Configure the network for Windows
7 & 8
(if applicable)
Note: Sections 1 and 2 should be completed on both
FinishLynx and Meet Management computer.
1.
G
o to
the windows
Control Panel
. On the top right is
View By
with a drop down arrow. Click the drop down
arrow and choose Small or Large Icons.
2.
Find and double click on
Network and Sharing
Center
. They are listed alphabetically by icon name.
3.
This will open the
Network and Sharing Center
. On the
left is a blue section titled Control Panel Home.
4.
Click on the
Change Adapter Settings
icon.
5.
A new window will open displaying your network
connections. Right click on the
Wireless Network
Connection
and select
Disable
from the list of
items. This is only necessary for the FinishLynx Capture
computer.
6.
Right click on the
Local Area Connection
and select
Properties
from the list of items. A new window will
appear with a list of connection items. Click to select
Internet Protocol Version 4 (TCP/IPv4)
and click the
Properties
button.
7.
A Properties window will appear and is typically set to
Obtain an IP address automatically
. Click to select the
radio button for
Use the following IP address
. In the box
for IP address, enter 192.168.0.5 for FinishLynx and hit
Tab
key to auto fill in Subnet mask 255.255.255.0
8.
Click OK and navigate back to the Control Panel. In the
control panel click on the Windows Firewall icon. Under
Control Panel Home, on the left, click on
Turn Windows
Firewall on or off
.
9.
Turn off both Home and Public Firewalls (Domain for
Windows Pro).
Step 6.
Set up the EtherLynx Scholastic
camera and tripod
Note:
In addition to following the instructions in this quick
start guide, we recommend you view the
Camera Setup,
Mounting,
and
Alignment
videos available on the Lynx
YouTube channel and website:
www.finishlynx.com/support/setup-videos/
1.
Open the legs of the tripod in line with the finish line,
preferably on the infield and approximately 8-10 feet
back.
2.
Extend the legs of the tripod so they are at full height -
approximately 6 feet.
3.
Attach the supplied 1/4” to 3/8”
brass adaptor to the screwed stud
on top of the tripod (Adaptor is
taped to adjustment handle of
tripod)
4.
Secure the geared head to the stud on top of
the tripod.
5.
Note how the mounting plate is attached to
the geared head. Then, pull back on the lever at the top
of the geared head to release the mounting plate.
6.
Using the hole closest to the camera lens on the bottom
of the camera, tighten the mounting plate by screwing it
into place. The arrow on the bottom of the mounting
plate should point toward the lens. Use a flathead
screwdriver or a coin to tighten the mounting plate.
7.
Make minor adjustments to the tripod legs so both
bubbles on the tripod are centered.
Step 7.
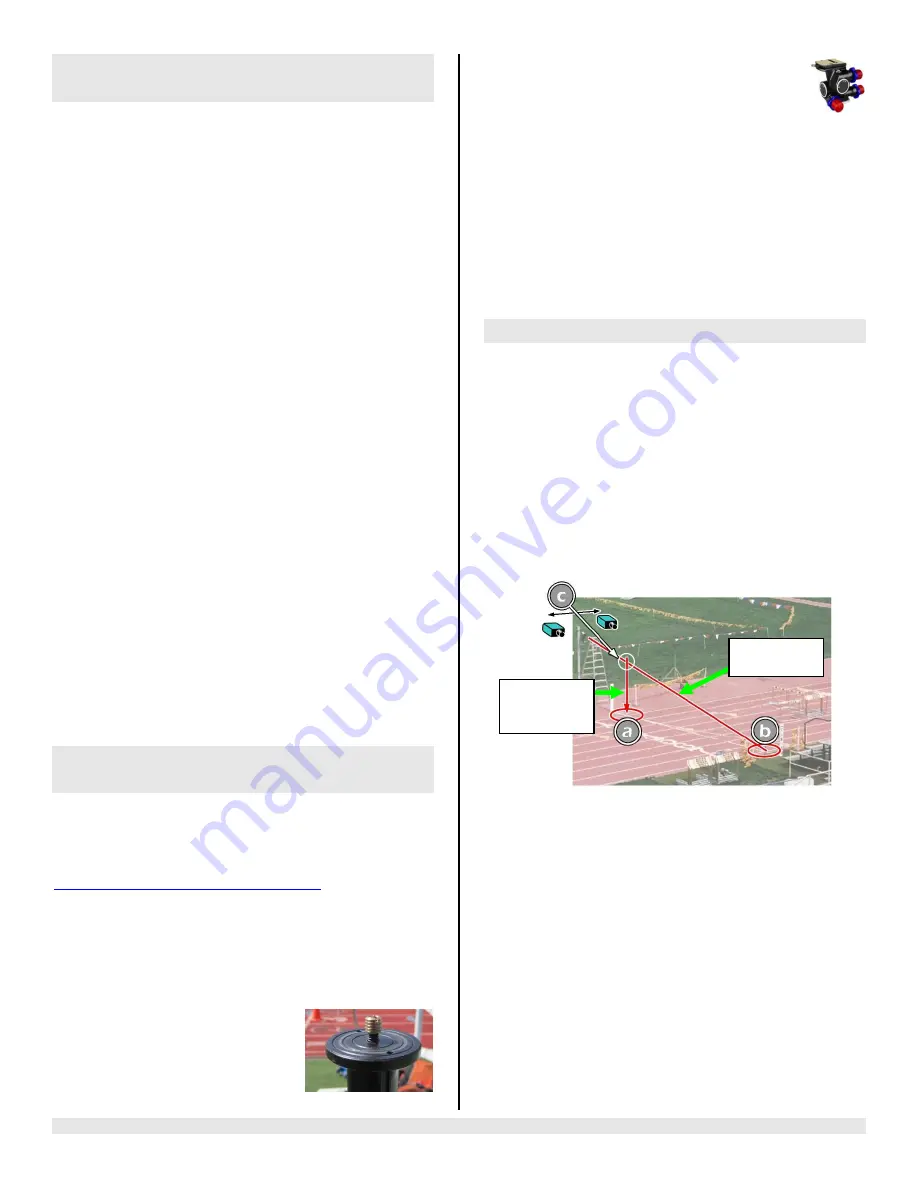
Align camera on finish line
1.
On the near side of the finish line, hold the plumb bob so
that it is suspended directly above the middle of the
finish line. This is the
plumb line
, shown as
a
in the image
below.
2.
Tie string to the screw on the top of the tripod head.
Have your assistant take the other end of the string to
the far side of the finish line and hold the string taught.
This is the
sight line
, shown as
b
in the image below.
3.
Move the tripod to the left or right until the plumb line
and sight line touch at position c
in the image below. The
camera is now in the finish line plane.
4.
Attach the camera to the tripod by clicking the mounting
plate in place on top of the geared head. The lens should
point toward the finish line.
5.
Turn the black knob on the geared head that controls the
tilt
of the camera so that it is at about a 30 degree angle
to the ground
Sight line
Plumb
line


