background image

V7 Version 1.96 


Januar 2012 


Page 33 of 39 

8.2.1.1.1


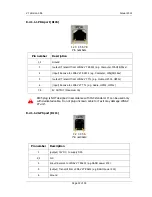
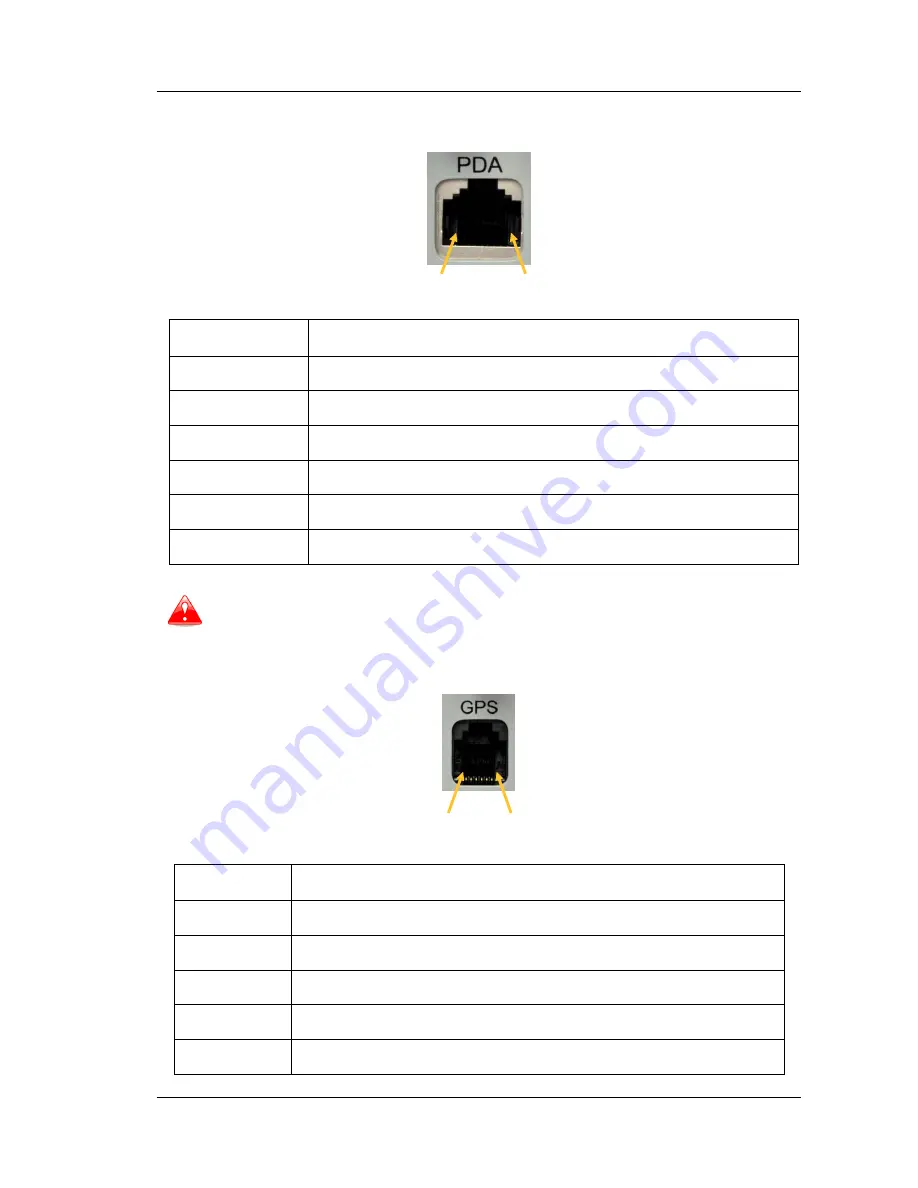
PDA port (RJ45) 


1 2 3 4 5 6 7 8 

Pin numbers 

Pin number 

Description 

1,2 

Ground 

(output) Transmit from LXNAV V7 RS232 (e.g. Computer, IPAQ38/39xx) 

(input) Receive to LXNAV V7 RS232 (e.g. Computer, IPAQ38/39xx) 

(output) Transmit from LXNAV V7 TTL (e.g. Oudie, HP302, HP31x) 

(input) Receive to LXNAV V7 TTL (e.g. Oudie, HP302, HP31x) 

7,8 

5V OUTPUT (maximum 1A) 


RJ45 plug is NOT designed in accordance with IGC standard.  It can be used only 

with dedicated cable.  Do not plug unknown cable to it as it may damage LXNAV 
V7 unit. 

8.2.1.1.2


GPS port (RJ11) 


1 2 3 4 5 6  

Pin numbers 


Pin number  Description 

(output) 12V DC, to supply GPS  

2,3 

N.C. 

(input) Receive to LXNAV V7 RS232 (e.g.NANO power 232) 

(output) Transmit from LXNAV V7 RS232 (e.g.NANO power 232) 

Ground  

Содержание V7

Страница 1: ...V7 Digital speed to fly variometer and final glide calculator Version 1 96 LXNAV d o o Kidričeva 24a 3000 Celje Slovenia tel 386 592 33 400 fax 386 599 33 522 info lxnav com www lxnav com ...

Страница 2: ......
Страница 3: ...itching off 12 5 Operating Modes 13 5 1 Main screen and needle 13 5 1 1 Flarm Warning 14 5 1 2 Direct link between PDA and GPS 14 5 2 Quick access menu 15 5 3 Settings Mode 15 5 3 1 Navigate 16 5 3 2 Logbook 17 5 3 3 QNH and RES 17 5 3 3 1 QNH 17 5 3 3 2 Safety Altitude 17 5 3 4 Vario Parameters 18 5 3 4 1 Vario needle filter 18 5 3 4 2 Vario sound filter 18 5 3 4 3 Smart filter 18 5 3 4 4 Vario r...

Страница 4: ...he LXNAV V7 28 7 1 On the Ground 28 7 1 1 Power on Procedure 28 7 1 2 Set Elevation and QNH 28 7 1 3 28 7 1 4 Pre flight Check 29 8 Installation 30 8 1 Installing the LXNAV V7 31 8 2 Installation of Options 32 8 2 1 Ports and Wiring 32 8 2 1 1 LXNAV V7 ports 32 8 2 1 2 LXNAV V7 wiring 34 9 Firmware Update 35 9 1 Updating LXNAV V7 firmware 35 10 Options 38 10 1 Rear Seat Device LXNAV V7D 38 10 1 1 ...

Страница 5: ...ts that fail in normal use Such repairs or replacement will be made at no charge to the customer for parts andlabor the customer shall be responsible for any transportation cost This warranty does not cover failures due to abuse misuse accident or unauthorised alterations or repairs THE WARRANTIES AND REMEDIES CONTAINED HEREIN ARE EXCLUSIVE AND IN LIEU OF ALL OTHER WARRANTIES EXPRESSED OR IMPLIED ...

Страница 6: ...V7 Version 1 96 Januar 2012 Page 6 of 39 2 Packing Lists LXNAV V7 in Metric or Imperial units as specified Main power cable for V7 CAN terminator Speaker PDA cable generic RS232 GPS cable generic RS232 ...

Страница 7: ...ed with a push button LXNAV V7 can be expanded through CAN bus to one or more repeaters LXNAV V7D Both pilots can have equal control of all functions from front or rear seat 3 1 1 LXNAV V7 Features Extremely bright 2 5 cm colour display readable in all sunlight conditions with the ability to adjust the backlight One rotary switch knob with push button function is used for input Pre loaded polar da...

Страница 8: ...tions By using a CAN bus system a second seat device can be connected The unit installed in the rear seat of the glider is independently powered and receives all necessary data from the main unit The communication between both units is exclusively via the CAN bus system 3 1 4 Technical Data Power input 10 16 V DC Consumption of LXNAV V7 at 12 V o 120 mA minimum brightness without audio o 180 mA ma...

Страница 9: ...ill turn the V7 off 4 2 Rotary Switch The one rotary switch knob with integrated pushbutton function can control all functions on LXNAV V7 The rotary switch moves up or down through the menus Variables can also be changed using the switch Pushing the button at the same time as rotating will step the values in larger increments Example 1 Set elevation menu normally values are with step 1m If you pu...

Страница 10: ...ummarised as Text editor Spin controls Selection control Checkboxes Slider control To move the function from one control to another rotate the rotary knob up or down as follows Clockwise rotation will select the next control Counterclockwise rotation will select the previous control PUSH button enters the selected feature 4 4 1 Text Edit Control The Text Editor is used to input an alphanumeric str...

Страница 11: ...ue from a list of predefined values Use the page selector to scroll through the list 4 4 4 Checkbox and Checkbox List A checkbox enables or disables a particular parameter Press push button to toggle the value If an option is enabled a check mark will be shown otherwise an empty rectangle will be displayed 4 4 5 Slider selector Some values like volume and brightness are displayed as a slider With ...

Страница 12: ...ed in the power off procedure We strongly recommend switching off the unit using push button and not use a separate master switch If the system is powered off by a master switch changed data will not be saved Flight parameters at takeoff like target altitude and position will remain in stored memory so your final glide calculations are not affected ...

Страница 13: ...ay with user selected data Description of LXNAV V7 is shown on next picture Mechanical needle displays vario netto relative or speed to fly value It can be setup separately for climb mode or cruising mode Printed scale can be chosen when ordered in the range of 5 to 5 or from 10 to 10 Within the software the range can be set to 2 5 5 10m s or 5 10 20kts or 500 1000 2000fpm Mechanical needle Averag...

Страница 14: ...alue in last 20 seconds In LXNAV V7 there is an integrated 3 axis 6g accelerometer All accelerations can be recorded and indicated with accelerometer red bar Red bar which is not shown on picture above displays maximum negative and positive acceleration in g 5 1 1 Flarm Warning If Flarm warnings are enabled the following is a typical screen display The screen indicates relative position of threat ...

Страница 15: ...ation is checked only three Mc Bugs and Bal are available If use GPS navigation is disabled two additional settings are available Wind component and distance 5 3 Settings Mode In the setup menu users can configure the LXNAV V7 Turn the knob to select the appropriate setup item Press the PUSH button to enter a menu A dialogue or sub menu will open ...

Страница 16: ...screen will not be displayed It means that pilot must manually enter distance and wind component See Chapter 5 2 If GPS is transmitting RMB sentences LXNAV V7 will automatically calculate final glide to that point On picture below LXNAV V7 navigates to waypoint Line 11 Be sure that you set correct target elevation If target elevation is not set LXNAV V7 will not show Arrival altitude but Required ...

Страница 17: ...d to offset the altitude datum as the result of pressure changes during the flight Since changing the QNH influences the indicated altitude care should be taken when changing the value as an incorrect setting could upset the final glide calculation 5 3 2 2 Safety Altitude This setting is the altitude reserve or safety altitude and is the height that the instrument adds to the final glide altitude ...

Страница 18: ...ed It defines the difference between increasing vertical speed versus decreasing vertical speed E g If the vario filter is set to 1s and the Smart Filter set to 4s the filtering for increasing vario would be 1s and for decreasing vario would be 2s This will produce an effect similar to a Sage Variometer 5 3 3 4 Vario range Sets full scale range of the vario 2 5 m s 5 m s or 10 m s Default value is...

Страница 19: ...mandatory setting for LX Remote There is another input called VARIO PRIORITY When this input is activated by grounding the appropriate wire the unit will change over to Vario immediately This input wire is set open not grounded as a factory default on delivery 5 3 3 8 Integrator time Defines the integration period for the average vario in seconds The default is 20 seconds 5 3 3 9 Auto reset integr...

Страница 20: ...ximately the same length The best sensor to use is the combined pitot static Prandtl tube If problems are experienced with the electronic TE compensation the most likely cause is the glider s static source The static source can be checked by plumbing the pneumatic tubes for electronic compensation and then setting the TE to 0 In still air accelerate to approximately 160 km h and slowly reduce the ...

Страница 21: ...io mode has four modes SC positive sound is interrupted with silence every few milliseconds when the needle is positive on negative side sound is linear not interrupted SC negative inverse function to SC positive SC sound is linear and non interrupted in full scale range SC Mixed for positive relative values the sound represents relative for negative relative values the sound represents SC for tha...

Страница 22: ...ned as weight glider Minimum ballast Water weight Pilot weight glider Empty overload Load which is entered in kg m2 or lb ft2 Weight of water ballast If this option is used the weights of the glider and pilot must be entered Refer to Chapters 5 3 8 for more details of how to enter glider and pilot weights ...

Страница 23: ...ning time Altitude NN altitude Distance distance to the navigation point Arrival altitude final glide altitude difference to the navigation point Speed TAS Leg speed speed on leg QNH ft NN altitude in ft Flight levels Outside air temperature Battery voltage Blue Arrow Symbol enables or disables to display MC symbol Green T Symbol enables or disables the display thermal symbol Red Diamond Symbol ha...

Страница 24: ...hould be disabled If a pilot wants to show on the PDA the altitude from a flight recorder that is connected to GPS port altitude source must be set to Flight recorder otherwise to Vario First option may be usable in competitions where pilot wants to see altitude which is measured by the flight recorder to avoid airspace or other limitations 5 3 8 Polar and Glider Use this dialogue to enter glider ...

Страница 25: ...ree weights to enter Min weight corresponds to the min load value and represents the value at which the polar was measured or recalculated Max weight is the maximum take off weight allowed for a glider It is not used in the calculation it is just a reminder to the pilot of the maximum take off weight Empty weight is weight of the glider without pilot and ballast The overload factor is calculated a...

Страница 26: ...26 of 39 5 3 11 Reset of accelerometer g meter Accelerometer can any time be reset manually After take off it is reset automatically 5 3 12 About In about page is information about firmware versions hardware versions and serial numbers ...

Страница 27: ...neumatic compensation with a TE probe The quality of the TE compensation depends entirely on the location size and dimension of the TE tube The installation must be leak proof If an electronic TE compensation is selected the TE Pst port should be connected to a good static pressure source If pneumatic compensation is selected the TE Pst port should be connected to the TE probe Altimeter The altime...

Страница 28: ...version of the boot loader firmware hardware and serial number The boot procedure normally takes few seconds When completed Set Elevation dialogue is shown 7 1 2 Set Elevation and QNH This setting is crucial for final glide calculation therefore pay careful attention to it The instrument will offer elevation over standard pressure level QNE Use the knob to fine tune the elevation The QNH should be...

Страница 29: ...allast and bugs settings be set to match the current glider configuration Press the push button The dialogue for MacCready Ballast and Bugs will appear Use the rotary knob to modify the MacCready setting Refer to Chapter 5 2 for more details It is also highly recommended to check the safety altitude setting Refer to Chapter 5 3 2 to find out how to define the safety altitude ...

Страница 30: ...ion the connections are as follows Pstatic Static Ptotal Pitot or Total pressure TE Pstatic Static If the unit is to be configured for pneumatic TE compensation using a TE tube then the connections are TE Pstatic TE tube Pstatic Static Ptotal Pitot or Total pressure If the Ptotal and Static are connected the wrong way around there will be no integrator average climb and speed to fly indication dur...

Страница 31: ...e screws Install V7 into the panel screw back all screws and knob Make sure that between knob and panel is some space to push button Be sure that LXNAV V7 is placed far enough from compass Inside is stepper motor which generates magnetic field interferences 8 2 Connecting LXNAV V7 LXNAV V7 is connected to 12V DC power supply Red wire goes to positive and blue wire goes to gound If you don t use V7...

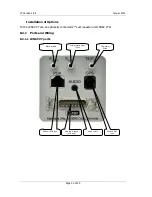
Страница 32: ...ons To the LXNAV V7 can be optionally connected 2nd seat repeater unit LXNAV V7D 8 2 1 Ports and Wiring 8 2 1 1 LXNAV V7 ports Static probe Total pressure probe Pitot TE probe or Static Audio output PDA port RJ45 type GPS port RJ11 type Main power supply V7 wiring ...

Страница 33: ... g Oudie HP302 HP31x 6 input Receive to LXNAV V7 TTL e g Oudie HP302 HP31x 7 8 5V OUTPUT maximum 1A RJ45 plug is NOT designed in accordance with IGC standard It can be used only with dedicated cable Do not plug unknown cable to it as it may damage LXNAV V7 unit 8 2 1 1 2 GPS port RJ11 1 2 3 4 5 6 Pin numbers Pin number Description 1 output 12V DC to supply GPS 2 3 N C 4 input Receive to LXNAV V7 R...

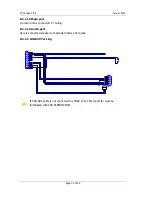
Страница 34: ...le V 7 S C 1 9 2 1 0 3 1 1 4 1 2 5 1 3 6 1 4 7 1 5 8 SC switch 30 cm 50 cm V P O A T 1 5m O A T LABEL OAT LABEL SC shield Reserved for CAN BUS SUBD9 female CAN H C A N H C A N L 12V IN 1 6 2 7 3 8 4 9 5 J 3 CAN L CAN GND CAN GND 1 2 V LABEL CAN BUS 1 2 3 G N D LM335Z GND SHIELD GND SHIELD 50 cm LABEL 12V DC IN RED BLUE If CAN BUS cable is not connected to LXNAV V7D CAN connector must be terminated...

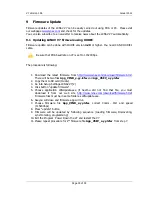
Страница 35: ...irmware html There will be two files App_VINB_x yy lxfw and App_VSEV_x yy lxfw 2 Copy them to SD card Oudie 3 Go into Setup Settings LXNAV V7 2 4 Click button update firmware 5 Choose application LXNUpdate exe if SeeYou did not find that file you must download it from our web site http www lxnav com download firmware html Firmware files must be in same folder as LXNupdate exe 6 Seeyou will close a...

Страница 36: ...ed CC NP 232 cable and free serial port on your PC If your PC has no serial ports you can use USB to SERIAL converter Be sure that PDA baudrate on V7 is set to 115200bps 1 From http www lxnav com download firmware html download Flash uploader zip package 2 Unpack file to one folder and run FlashLoader485App exe 3 Choose firmware file App_VINB_x yy lxfw 4 Choose correct serial port and baud rate ...

Страница 37: ... start It will cycle in bootloader application with red message Falsh integrity failed Bootloader application is waiting to receive new firmware from OUDIE or PC over PDA port After successful firmware update LXNAV V7 will start again If V7 gives you message Flash integrity failed means that firmware update was not successful and need to be repeated If the menus are still working behind the messag...

Страница 38: ... of MC Bal Bugs Volume polar settings on PDA will have also influence on LXNAV V7 Same will happen also in opposite way 10 1 2 Available cables for GPS and PDA ports GPS port Device Cable code Nano power CC NP LX RX TX are crossed Generic RS232 with female DB9 V7 GPS 232 Flight recorders and flarms with standard 6p IGC connector RJ11 type V7 GPS IGC Power flarm RJ45 K6 mux V7 GPS PF PDA port Devic...

Страница 39: ...V7 Version 1 96 Januar 2012 Page 39 of 39 11 Revision History November 2011 Initial release of owner manual January 2012 New chapters Ch 9 Ch 8 2 ...

Отзывы: