Luxxor Video System Скачать руководство пользователя страница 8

Luxxor

®

 Video System User Guide

Luxxor

®

 Video System User Guide

14

15

SOFTware INSTaLLaTION

SOFTware INSTaLLaTION

Now plug the USB connector of the VC-USB2 capture device into the USB port 

you plan to use. (NOTE: If you later plug the VC-USB2 into a different USB port on 

your computer, the Found New Hardware wizard will run again. In some versions 

of Windows you will see a warning screen that the device driver has not passed 

Windows Logo testing. If this appears, click Continue Anyway.)
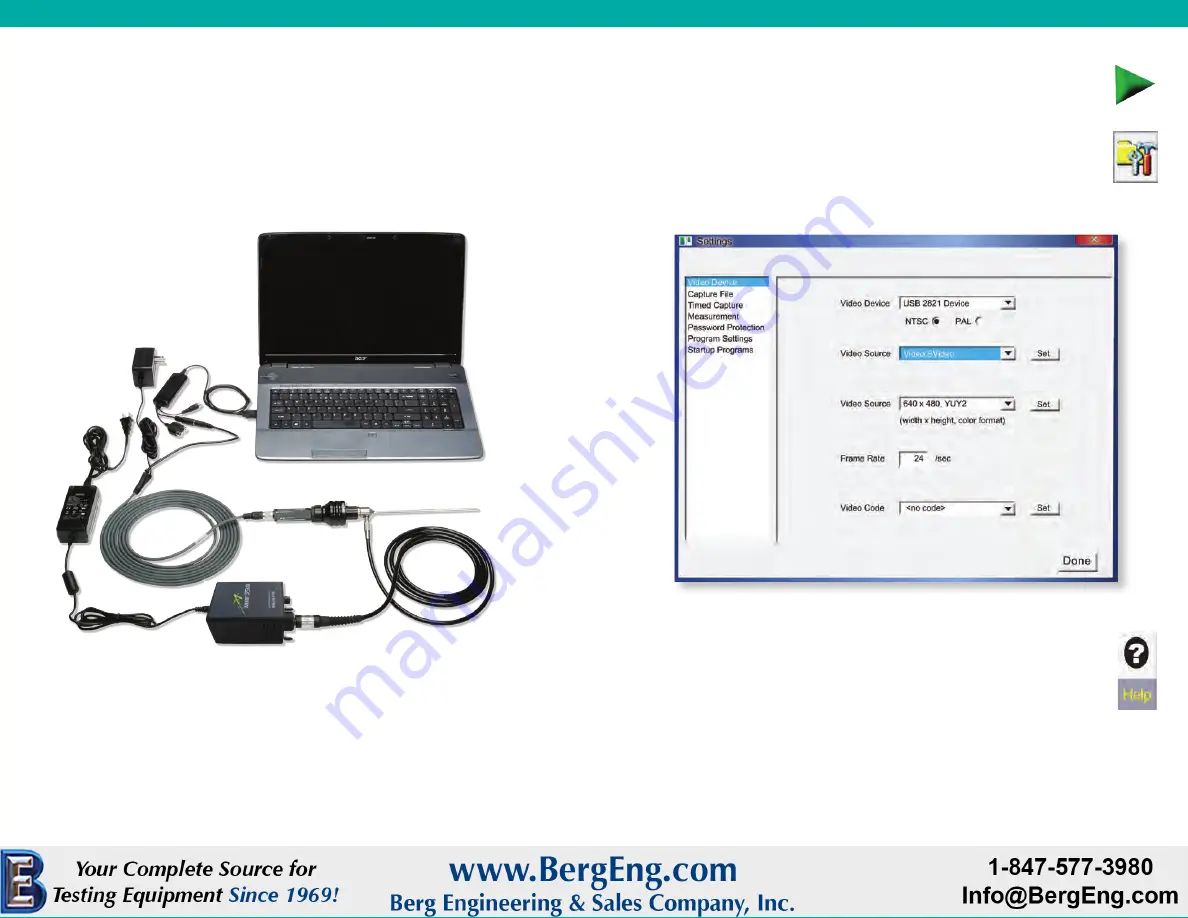
The assembled system will look something like this prior to plugging in the power 

cords. (Your computer may look different.)

Also check to make sure the protective cap has been removed from the 

scope’s insertion tube.

The Video ToolBox Help file has a complete description of all the features 

of the program as well as hints on how to capture the best quality images 

and videos.

Installation is now complete. Double-click the Video ToolBox icon on your 

desktop to start the program. When the program starts up, you should 

have a live image on your screen.
If you have no live image, click the Settings button and choose Video 

Device in the left-hand column of the window that appears. Make sure 

that the Video Source box is set to S-Video as shown below.

Plug the camera cable power supply into a 100-240 VAC, 50/60Hz outlet. Do the 

same with the Luxxor

®

 35 LED light source power cord if you haven’t already.

Содержание Video System

Страница 1: ...Luxxor Video System UserGuide REV 0116 ...

Страница 2: ...stem include the ability to Easily document inspections and store video or still images Share inspection images via e mail or hard copy Hold group reviews of inspection images displayed on a video monitor Easily and quickly conduct repetitive inspections by relieving the physical and mental fatigue of inspectors Setup 3 Operation 9 Software Installation 11 Maintenance 16 Troubleshooting 17 Custome...

Страница 3: ...Pin Connector S Video Connector To remove the cable from the camera grasp the knurled ring on the cable connector and pull away from the camera Locate the S Video connector on the camera cable Insert the S Video connector into the S Video input of your video monitor It may be labeled Line In S Video or Y C IMPORTANT If you are going to use the optional USB 2 0 Image Capture Interface VC USB2 to co...

Страница 4: ... post of the scope until it clicks into place Make sure the Light Intensity Power knob is set to OFF Connect the power supply 1 Plug the output of the power supply into the jack on the rear of the Luxxor 35 LED light source 2 Plug the small connector on the end of the power supply s AC cable into the power supply 3 Plug the other end of the AC cable into a 100 240 VAC 50 60Hz outlet Insert the mal...

Страница 5: ...he power intensity knob rotated fully clockwise Users may find it convenient to set a maximum output limit with the shutter and fine tune the output with the power intensity knob Unrestricted airflow is necessary for cooling Keep at least 1 5 inches of space around sides and rear of the unit Place the bottom on a flat hard surface Do not cover with cloth or other materials while in use caution Do ...

Страница 6: ...ogram will display the following If you are not sure that DirectX 9 0 or later is already installed press the Install button The software will not load if a newer version already exists on your computer USB Connector VC USB2 The included software drivers MUST be installed BEFORE the VC USB2 is connected to your computer s USB port Camera Configuration The Sony XC 505 video camera s configuration i...

Страница 7: ...lBox step Click Install to install the Video ToolBox software 6 After all the Video ToolBox software has been installed you will see the following window Press the Install button to install the USB 2 0 adapter drivers If the drivers were already installed then press the skip button to continue software installation software installation Now with the software properly installed connect the S Video ...

Страница 8: ... look different Also check to make sure the protective cap has been removed from the scope s insertion tube The Video ToolBox Help file has a complete description of all the features of the program as well as hints on how to capture the best quality images and videos Installation is now complete Double click the Video ToolBox icon on your desktop to start the program When the program starts up you...

Страница 9: ...F THE INTERIOR OF THE UNIT Allow to dry DO NOT RECONNECT TO POWER WHEN WET Solutions to Common Problems Problem Video image is slow or jerky when using the VC USB2 to view images on a computer The video speed on the computer monitor is related to the speed of the computer the speed of the video card and the amount of video memory A minimum Pentium III 1 GHz with a 16MB video card is recommended Th...

Страница 10: ...radient Lens Corporation offers its direct customers a money back guarantee If for any reason you are not completely satisfied with your purchase within 30 days call our customer service department A Return Material Authorization RMA number will be issued allowing a refund of the original purchase price from Gradient Lens Corporation excluding shipping and handling charges provided that the produc...

Отзывы: