background image

Pro-WAV™ 200 Lite QUiCK instALL GUiDe

POE (Power Over Ethernet) Option:

(diagram 4)

The EnGenius ECB3500 is capable of using POE power 
from the included Luxul Wireless POE Injector, an 
IEEE 802.3af compliant POE injector or POE enabled 
switch, (Check the POE injector or switch manual for 
instructions).

5. Connect the Ethernet cable from the “DC/Data Out” 

port of the injector to the pass through port on the 
outside of the Pro-WAV Lite.

6. Connect the included Ethernet cable from the pass 

through to the WAN port of the EnGenius ECB3500, 
labeled RJ45/POE.

Position your WAP in the enclosure and use the supplied 
adhesive Velcro to affi x the WAP. You may now power 
your Pro-WAV Lite Wi-Fi system and position it for use.

Direct Power Option: 

(diagram 5)

1.  Connect the Ethernet cable from your data 

source/network to the pass through port on the 
outside of the Pro-WAV Lite.

2. Connect the included Ethernet cable from the 

pass through to the WAN port of the EnGenius 
ECB3500, labeled RJ45/POE.

3. Decide where your Power Supply cord will enter 

the Pro-WAV Lite enclosure.

4. Be sure the power supply is not connect to a 

power source. Attach the EnGenius power supply 
to the “DC IN” port


of the EnGenius ECB3500.

Position your WAP in the enclosure and use the supplied 
adhesive Velcro to affi x the WAP. You may now power 
your Pro-WAV Lite Wi-Fi system and position it for use.

Ethernet
Power
Coax

diagram 4

diagram 5

DC IN

RJ45/POE

(WAN)

EXT ANT

(PRIMARY)

EXT ANT

(SECONDARY)

DC IN

RJ45/POE

(WAN)

EXT ANT

(PRIMARY)

EXT ANT

(SECONDARY)

Power

Supply

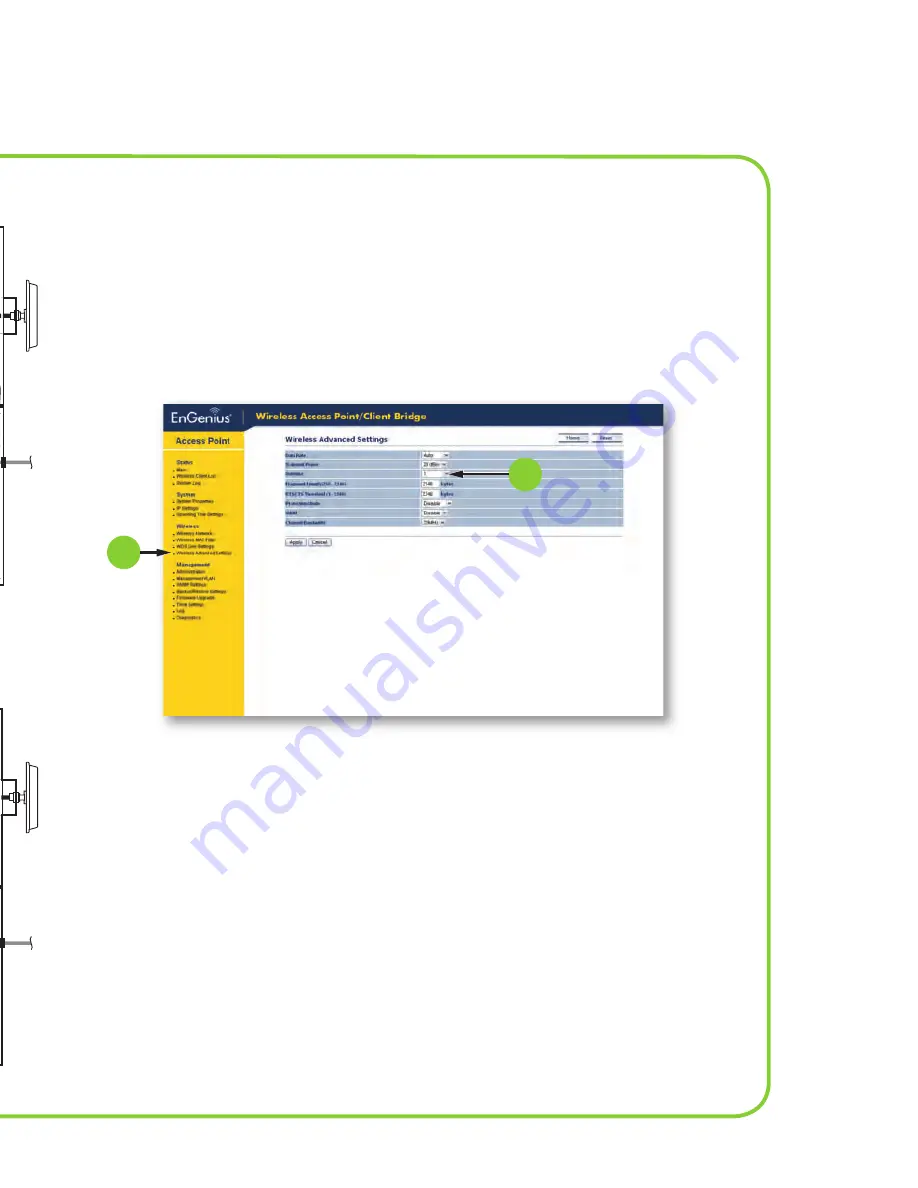
seTTiNg The eCB3500 To The PrimAry ANTeNNA PorT oNLy

Consult your EnGenius ECB3500 documentation to access the WAP Confi guration Soft-
ware. Confi gure the ECB3500 to use only the Primary Antenna Port. Using the Left side 
navigation tree, navigate to the Wireless\Wireless Advanced Settings (diagram 6) 

1

. In 

the Wireless Advanced Settings dialog box set the Antenna drop down to “1” (diagram 6) 

2

. Then apply your change.

2

1

(Consult your ECB3500’s documentation for more details on WAP Confi guration. Contact EnGenius directly 
for additional support or warranty information).

diagram 6

Содержание PW-200-24-Lite

Страница 1: ...our purchase of a Luxul Wireless Pro WAV Lite Wi Fi Range Ex tender System Pro WAV systems are simple to install In just a few short steps you will be able to enjoy the benefits of a farther reaching clearer wireless signal LUXUL WireLess ProDUCTs CoVereD By This gUiDe PW 200 24 Lite Pro WAV Lite 2 4GHz indoor Wi Fi Range Extender System ...

Страница 2: ...P Cable QIG CD User s Manual 5dBi 2 4GHz Dipole Antennas 2 External Ethernet cable from your data source network Max length 329 or 200 meters NOTE Disconnect all power before connecting or disconnecting any cables coax or antennas to or from this device Failure to do so will void your warranty Setting Up Your Pro WAV 200 Lite System Attaching the antennas to the Pro WAV enclosure 1 Connect the two...

Страница 3: ... POE injector or switch manual for instructions Setting up Power Over Ethernet POE diagram 3 1 Install the Luxul POE injector or your injector where you have access to your data source network Ethernet cable and a power source 2 Connect your Ethernet cable from your data source network to the Data In port of the Injector 3 Be sure the power supply is not connect to a power source Connect the power...

Страница 4: ... for use Direct Power Option diagram 5 1 Connect the Ethernet cable from your data source network to the pass through port on the outside of the Pro WAV Lite 2 Connect the included Ethernet cable from the pass through to the WAN port of the EnGenius ECB3500 labeled RJ45 POE 3 Decide where your Power Supply cord will enter the Pro WAV Lite enclosure 4 Be sure the power supply is not connect to a po...

Страница 5: ...use only the Primary Antenna Port Using the Left side navigation tree navigate to the Wireless Wireless Advanced Settings diagram 6 1 In the Wireless Advanced Settings dialog box set the Antenna drop down to 1 diagram 6 2 Then apply your change 2 1 Consult your ECB3500 s documentation for more details on WAP Configuration Contact EnGenius directly for additional support or warranty information diag...

Страница 6: ...ctional antennas Remember to con sider the direction of the signal when positioning the Pro WAV 200 Lite System The signal extends out in both directions from the antennas mounted on the sides of the enclosure If mounting the Pro WAV 200 Lite high in your Wi Fi coverage area the antenna mount may be bent slightly downward to focus coverage Use diagram 7 below to position your Pro WAV 200 Lite syst...

Страница 7: ...WAV 200 Lite system may be mounted to any surface using your fasteners or mount the unit above a drop ceiling using the optional drop ceiling mounting arms See diagram 8 below to mount your Pro WAV 200 Lite system using the optional drop ceiling mounts Part Number HDW PWM diagram 8 Optional Drop ceiling Mounts ...

Страница 8: ...South 670 West Lindon UT 84042 p 801 822 5450 f 801 822 5460 www luxulwireless com LUX QIG 100620090210 PW20024LITE 2009 Luxul Corp All rights reserved TroUBLeshooTiNg Weak or non existent coverage 1 Make sure the cables are properly connected and that there is power to the Pro WAV 200 Lite Wi Fi System 2 Ensure that the X WAV antenna is properly positioned The antenna should be facing the directi...

Отзывы: