Luxaire FHP 240 Скачать руководство пользователя страница 13

035-18200-000-B-1102

Unitary Products Group

13

After the supply air blower motor is operating, adjust
the resistances in both the supply and the return duct
system to balance the air distribution throughout the
conditioned space. The job specification may require
that this balancing be done by someone other than the
equipment installer.

To check the supply air CFM after the initial balancing
has completed”

1.

Drill two 5/16” holes in the side panel as shown in
Figure 15.

2.

Insert at lest 6” of 1/4” tubing into each of these
holes for sufficient penetration into the air flow on
both sides of the indoor coil.

NOTE:

The tubes must be inserted and held in a posi-
tion perpendicular to the air flow so that veloc-
ity pressure will not affect the static pressure
reading.

3.

Using an inclined manometer, determine the pres-
sure drop across a dry indoor coil. Since moisture
on the coil may vary greatly, measuring the pres-
sure drop across a wet coil under field conditions
would be inaccurate. To assure a dry coil, the heat
pump system should be de-activated while the test
is being run.

4.

Knowing the pressure drop across a dry coil the
actual CFM through the unit can be determined
from the curve in Fig. 16.

If the CFM is above or below the specified value, the
supply air motor pulley may have to be re-adjusted.
After one hour of operation, check the belt and pulleys
for tightness and alignment.

After readings have been obtained remove the tubes
and seal up the drilled holes in the side panel. Dot
plugs (5/16” - P/N 029-13880-000) are available
through Source One Parts ordering procedures.

NOTE:

Shut down the heat pump system before tak-
ing any test measurements to assure a dry
indoor coil.

TABLE 6: SUPPLY AIR BLOWER MOTOR PULLEY
ADJUSTMENT

TURNS

OPEN

DRIVE RANGE

625-810 RPM

827-986 RPM

5

625

827

4

662

859

3

699

891

2

736

923

1

773

955

0

810

986

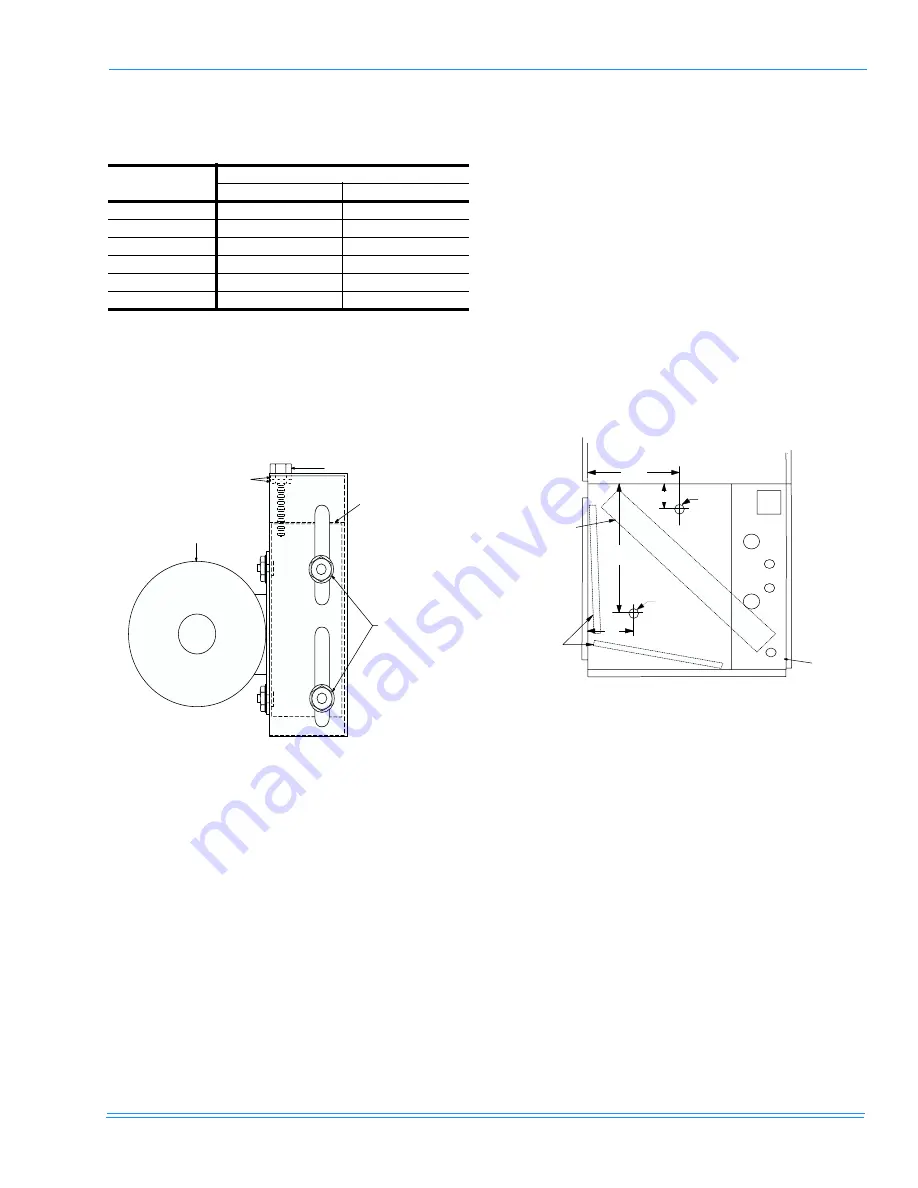
FIGURE 14: TYPICAL MOTOR MOUNTING
ASSEMBLY

B

A

(DO NOT LOOSEN)

MOTOR

MOTOR MOUNT

C

FIGURE 15: HOLE LOCATIONS FOR PRESSURE
DROP READINGS

5 / 1 6 "

H O L E

5 / 1 6 "

H O L E

1 8 "

7 "

2 2 "

1 0 "

E V A P O R A T O R

C O I L

F I L T E R S

C O I L   S E C T I O N

Содержание FHP 240

Страница 1: ...NING Notes are intended to clarify or make the installation easier Cautions are given to prevent equipment damage Warnings are given to alert installer that personal injury and or equipment dam age ma...

Страница 2: ...AIR GRILLE FHP240 10 Fig Pg 8 BASE ACCESSORY FHP180 10 9 BASE ACCESSORY FHP240 10 10 SUPPLY AIR PLENUM FHP180 10 11 SUPPLY AIR PLENUM KNOCKOUTS FHP180 10 12 SUPPLY AIR PLENUM FHP240 11 13 RECOMMENDED...

Страница 3: ...n on the installation and operation of the matching outdoor unit refer to part no 035 17399 000 Installer should pay particular attention to the words NOTE CAUTION and WARNING Notes are intended to cl...

Страница 4: ...RE 4 and make sure that its weight will be distrib uted equally LOCATION These indoor units are not designed for outdoor instal lation They must be located within the building struc ture either inside...

Страница 5: ...re feet 16 7 24 1 Unit Weight lbs Shipping 425 830 Operating 435 720 Accessory Operating Weight Lbs Motor Drive 3 HP 90 90 5 HP 120 Electric Heat 10 KW 63 20 KW 66 126 30 KW 71 129 40 KW 132 50 KW 80...

Страница 6: ...LBS SUSP N POINT W 3 HP MOTOR W HEATER ACCESS W PLENUM ACCESS W HEATER PLENUM ACCESS A 95 95 85 85 B 120 120 100 100 C 95 115 165 185 D 115 140 185 205 Total Wt 425 470 535 575 3 1 1 2 COIL SECTION BL...

Страница 7: ...LOWER SECTION HEATING COIL SUSPENSION CHANNEL 43 3 4 5 A B C D E F 55 HANGER RODS FIELD SUPPLIED ELECTRIC HEAT ACCESS 40lbs each TABLE 4 FHP240 UNIT SUSPENSION WEIGHTS LBS SUSPENSION POINT W 5HP MOTOR...

Страница 8: ...r discharge as shown in illustration a the blower module can be repositioned in the field as shown in illustrations b and c for maximum flexibility The Supply Air Plenum Return Air Grille and Base acc...

Страница 9: ...for wire sizes up through 1 AWG Remove the knockout ring and add a 1 1 2 inch conduit fitting to the 1 31 32 inch hole for wire sizes up through 0 AWG 50 KW Add a 1 1 4 inch conduit fitting to the 1...

Страница 10: ...FIGURE 10 SUPPLY AIR PLENUM FHP 1801 1 Electric Heaters are NOT UL approved for installation within a SUPPLY AIR PLENUM FIGURE 11 SUPPLY AIR PLENUM KNOCKOUTS FHP180 1 9 7 8 1 6 1 8 2 1 2 5 5 3 4 6 0 3...

Страница 11: ...r glass insulation and a sealing material such as permagum should be packed around refrigerant lines where they penetrate a wall to reduce vibration and to retain some flexibiltiy Support all refriger...

Страница 12: ...or mance in Table 6 Knowing the required blower RPM and the blower motor HP the settings turns open for the supply air motor pulley can be determined from Table 6 Each motor pulley has 1 A threaded ba...

Страница 13: ...il under field conditions would be inaccurate To assure a dry coil the heat pump system should be de activated while the test is being run 4 Knowing the pressure drop across a dry coil the actual CFM...

Страница 14: ...esistance based on a wet evaporator coil clean filters and unit tested in horizontal configuration 2 Available static pressure in IWG to overcome the resistance of the duct system and any accessories...

Страница 15: ...TABLE 8 SUPPLY AIR PERFORMANCE FHP2401 RPM CFM 6400 7200 8000 8800 9600 ESP2 BHP3 kW4 ESP2 BHP3 kW4 ESP2 BHP3 kW4 ESP2 BHP3 kW4 ESP2 BHP3 kW4 600 0 15 1 49 1 42 650 0 31 1 71 1 63 0 14 2 00 1 90 700...

Страница 16: ...153 2 175 2 0 AWG 1073 150 460 3 60 57 6 76 6 80 4 AWG 1347 100 FHP240A 5 20 KW 208 3 60 41 6 68 0 70 4 AWG 186 100 230 3 60 46 2 70 6 80 4 AWG 251 100 460 3 60 23 1 35 3 40 8 AWG 381 60 30 KW 208 3...

Страница 17: ...r motor are permanently lubricated and should not require any additional lubricant BELTS Maintain belt tension to extend belt life Replace the signs of failure begin to appear FIGURE 17 TYPICAL FIELD...

Страница 18: ...DIMENSIONS ARE IN INCHES THEY ARE SUBJECT TO CHANGE WITHOUT NOTICE CERTIFIED DIMENSIONS WILL BE PROVIDED UPON REQUEST ACCESSORIES Electric Heaters Add 14 1 4 inches to unit height when using 10 20 30...

Страница 19: ...1 2 2 7 8 8 1 2 8 1 2 ALL DIMENSIONS ARE IN INCHES THEY ARE SUBJECT TO CHANGE WITHOUT NOTICE CERTIFIED DIMENSIONS WILL BE PROVIDED UPON REQUEST ACCESSORIES Electric Heaters Add 14 1 4 to unit height w...

Страница 20: ...change without notice Printed in U S A 035 18200 000 B 1102 Copyright by Unitary Products Group 2002 All rights reserved Supersedes 035 18200 000 Rev A 0401 Unitary 5005 Norman Products York OK Group...

Отзывы: