


10
• If the mower starts to vibrate in an unu-
sual way, immediately check it.
– Look for damages;
– Carry out all necessary repairs to dam-
aged parts;
– Make sure that all nuts, bolts and
screws are tightened firmly.
Maintenance and storage
• Ensure that all nuts, bolts and screws are
tightened and the tool is in a safe operat-
ing state.
• Check the grass collection equipment
regularly for wear or for loss of functional-
ity.
• For safety reasons, replace worn or dam-
aged parts.
• Remember that when using a tool with
multiple blades, moving one blade may
lead to the other blades rotating.
• When adjusting the machine, make sure
that no fingers are trapped between the
moving blades and fixed parts of the
machine.
• Allow the motor to cool down before you
put the machine away.
• When maintaining the blades, remember
that even if the power source is deacti-
vated, the blades can still be moved.
• For safety reasons, replace worn or dam-
aged parts. Only use original spare parts
and accessories.
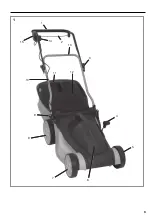
The device at a glance
1. Upper retaining bracket
2. Switch-on lever
3. Quick release lever
4. Lever (for cutting height adjustment)
5. Wheel left
6. Motor
7. Wheel (front)
8. Wheel (rear)
9. Cable grip
10. Cable clamp
11. Grass collector
12. Safety flap
13. Lower retaining bracket
14. Mains plug
15. Safety lock
Scope of supply
• Instructions for use
• Lawn mower
• Upper retaining bracket
• Lower retaining bracket
• Grass collector
• Bag with mounting material
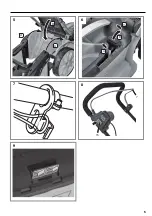
Assembly
Mounting the lower retaining bracket
– Mount the lower retaining bracket (13) as
illustrated.
– Repeat the procedure for the other side.
Mounting the upper retaining bracket
– Mount the upper retaining bracket (1) as
illustrated.
– Repeat the procedure for the other side.
– Adjust the angle and fix using the quick
release lever (3).
– Attach the cable using cable clamp(10)
onto the lower retaining bracket(13).
Attaching the collecting sack
– Mount the grass collector (11) as illus-
trated.
– Press the handle (A) into the upper cover
(C) until it audibly snaps in.
– Insert the mounting bracket (D) and fix it
with washers and screws (E).
– Hook the lower cover (F) into the mount-
ing bracket (D) (carrying lugs are outside).
– Press the fixing bar (G) into the outer
edge of the lower cover (F) until it audibly
snaps in.
Hook on the grass collector
– Mount the grass collector (11) as illus-
trated.
Note:
If a part is missing or dam-
aged, please contact the vendor.
WARNING! Risk of injury!
Place the
product horizontally on a stable, suf-
ficiently load-bearing and level sur-
face.
Note:
It must be possible to close
the quick release levers completely.
If necessary, slightly loosen the self-
locking nuts.
GB
Содержание 468428
Страница 1: ...E 2000 46 468428 GB Electric lawn mower GR...
Страница 2: ...2 GB Original instructions 6 GR 14...
Страница 3: ...3 k 13 14 15 10 4 5 1 2 3 12 11 9 8 7 6 1...
Страница 4: ...4 C B A 2 B A C 3 C A E D F G 4...
Страница 5: ...5 A A B 5 A B C 6 7 15 7 8 9...
Страница 14: ...14 14 14 19 19 20 21 21 22 22 22 24 GR...
Страница 15: ...15 18 GR...
Страница 16: ...16 22 STOP GR...
Страница 17: ...17 30mA GR...
Страница 18: ...18 GR...
Страница 19: ...19 P 3 1 1 2 3 4 5 6 7 8 9 10 11 12 13 14 15 P 4 2 13 P 4 3 1 3 10 13 P 4 4 11 A C GR...
Страница 20: ...20 D E F D G F P 5 5 11 P 4 4 P 5 7 P 5 5 15 2 2 P 5 9 2 15 2 GR...
Страница 21: ...21 21 GR...
Страница 23: ...23 EN 61000 3 11 Zmax 26 5 kg 35 85 mm 468428 GR...
Страница 25: ...25...
Страница 26: ...V 101116 Euromate GmbH Emil Lux Stra e 1 42929 Wermelskirchen GERMANY Hotline 49 0 2196 76 33 33...