e
e
Motorized shade with wireless radio frequency (RF) control.
Installation Guide—Please Read Before Installing
Serena
®
Remote-Controlled Shades
Insulating Honeycomb Shades
English
5
Lutron Electronics Co., Inc., 7200 Suter Road, Coopersburg, PA 18036-1299, U.S.A.
Printed in the U.S.A. 8/13 P/N 368-3194 Rev. B
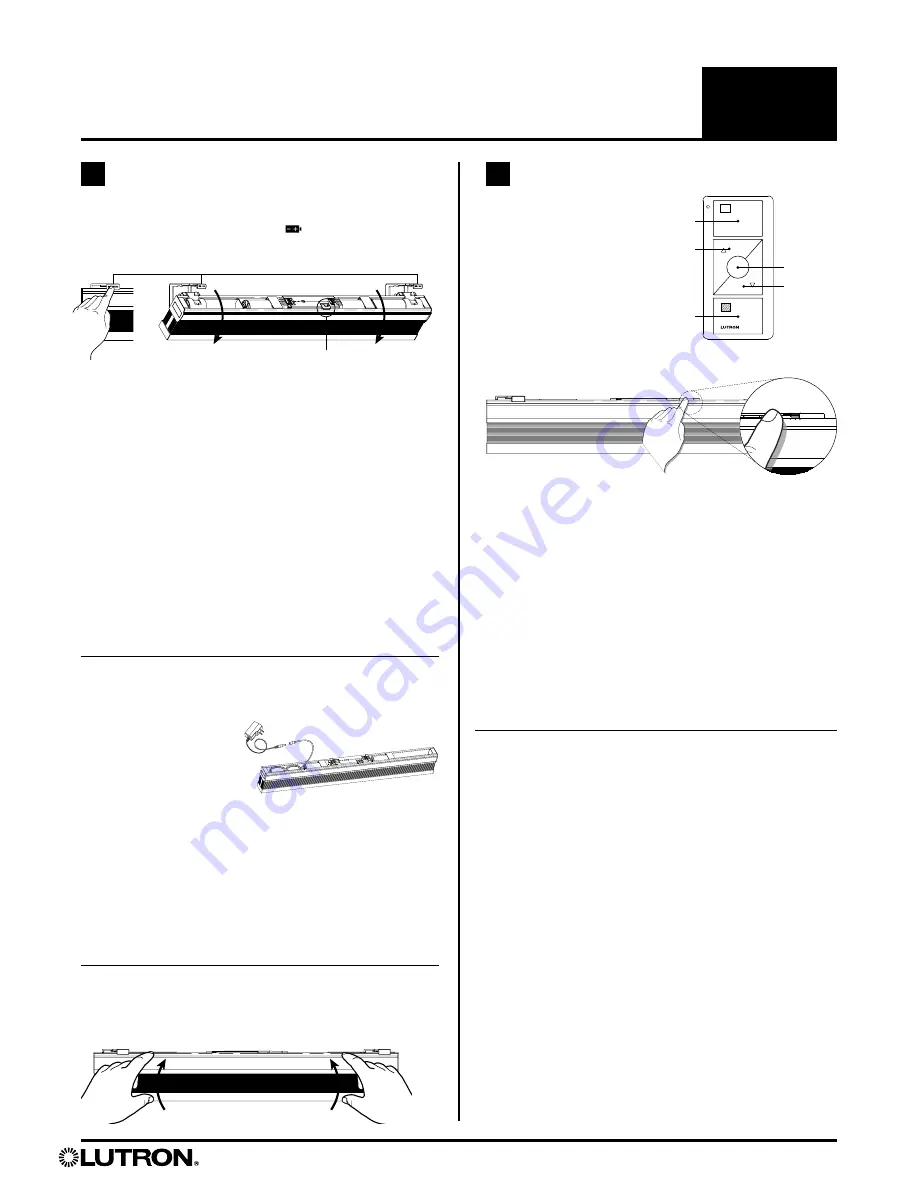
3.2 Connect Power Source
NOTE:
Shades are manufactured for battery power or
wired power according to the original order. The two
types are not interchangeable or convertible.
Battery powered shades
Install the batteries as indicated in the battery holders
(so the +/- signs match). Make sure the batteries are
fully inserted into the trays. The “shade button” will
blink red/green 3 times when shade is powered.
NOTE:
For best battery life, DO NOT mix old and
new batteries. Use ONLY alkaline D size batteries or
lithium AA size batteries. DO NOT install carbon-zinc or
rechargeable batteries, and DO NOT mix battery types.
Wired-power shades
With individual plug-in power supply
Uncoil the cable from
inside the headrail and
plug it into the individual
power supply. Plug the
individual power supply
into an outlet. The “shade button” will blink red/green 3
times when shade is powered.
Connected to 10-output power supply panel
For wiring instructions from a 10 output power
supply, refer to the power panel instruction guide
(P/N 045-348) that came with the 10-output power
supply panel.
3.3 Return Shade to Operating Position
Tilt the shade back into the brackets; pressing gently
until you hear a click.
3.1 Expose Top of Headrail
Press ALL battery release tabs (
PUSH
) above
the headrail. The shade will tilt forward.
Shade button
Compatible Controls
(sold separately)
Pico
®
wireless control
Shade button
(Clear plastic button above headrail)
Shade
Open
Preset
Close
Lower
Raise
4.1 Assign Control
a. Press the “shade button” on one of the shades you
want to assign. The “shade button” illuminates green
while in programming mode.
NOTE:
Programming mode will time out after 30
seconds of inactivity.
b. Press and hold the “Close” button on the control for
about 6 seconds, until the “shade button” blinks and
turns off—exiting programming mode.
c. Repeat steps a and b for each additional shade
assigned to the same control.
d. Repeat steps a, b, and c. for any shades assigned to
additional controls.
4.2 Adjust Upper Limit (OPTIONAL)
The shade’s upper limit is factory programmed based
on the window dimensions and mounting option.
If adjustment is needed, follow these steps:
a. Press the “shade button” on the shade you want to
adjust. The “shade button” illuminates green while in
programming mode.
NOTE:
Programming mode will time out after
30 seconds of inactivity.
b. Press and hold the “Open” and “Raise” buttons on the
control simultaneously for about 5 seconds, until the
“shade button” blinks and remains on.
c. Use the control’s “Raise” and “Lower” buttons to
adjust shade position to the upper limit you prefer.
NOTE:
When raising the shades, do not compress the
fabric too much. Cells should just be gently closed.
d. Press and hold “Open” button for about 5 seconds,
until the shade button blinks and turns off, indicating
the upper limit is set.
3
4
Install Power Source
Assign Control & Program Shade


