


33
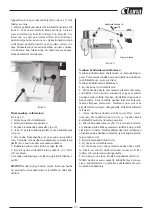
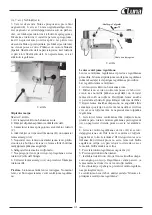
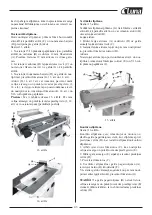
3. Tension eccentric block by tightening the nut (B,
Fig. 8) with a 14mm wrench. Turn the nut in by 1/4
turn increments and test locking handle for proper ten-
sion.
The lock handle is properly tensioned when it requires
positive force to move the eccentric block (attached
to the locking handle) from one side to the other. The
platen and motor assembly must stay in a locked posi-
tion without sliding once the handle has been moved
to the locked position. Re-adjust as necessary.
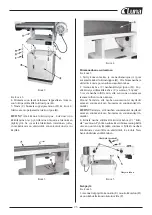
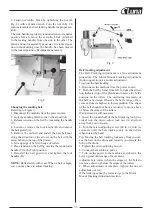
Fig. 8
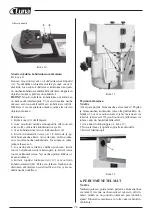
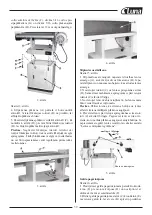
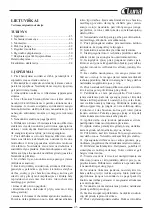
Changing the sanding belt
Referring to Figure 9:
1. Disconnect the machine from the power source.
2. Lock the sanding platen in the vertical position.
3. Release tension on the belt by loosening the handle
(C).
4. Loosen or remove the lock knobs (B) and remove
the belt guard (A).
5. Remove the old belt and install the new belt mat-
ching the direction of the arrows on the belt with the
arrow label on the top of the platen.
6. Line up edge of belt with edge of rollers.
7. Place tension on the belt by moving the tension arm
handle (C) to the Tight position.
8. Reinstall the belt guard (A) and tighten the lock
handles (B)
NOTE:
Belts stretch with wear. When a belt is repla-
ced, you may have to adjust tracking.
Fig. 9
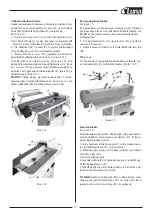
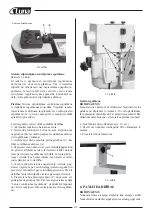
Belt tracking adjustment
The Belt Tracking Adjustment is a fine adjustment
procedure. The Motor Mount Tracking Adjustment
(following section) is a course adjustment.
To adjust the belt tracking:
1. Disconnect the machine from the power source.
2. Push the belt by hand from left to right (the direc-
tion indicated top of the platen) and observe the belt’s
position on the rollers. The oscillating movement of
the belt is by design. Observe the belt’s range of mo
-
vement from its highest to lowest position. The edges
of the belt should not have a tendency to move above
or below the edges of the rollers.
If adjustment is still necessary:
3. Insert the round shaft of the belt tracking tool (pro-
vided) into the micro adjust lock nut (A) and turn
away from you to loosen.
4. Turn the micro adjusting screw (B) in 1/4 turn in-
crements until the belt tracks evenly on the rollers
when rotated by hand.
Tip: Moving the belt tracking tool away from you rai-
ses the belt on the drum and towards you lowers the
belt on the drum.
5. Tighten the micro adjusting nut (A).
6. Connect the machine to power.
7. Turn on the power to the machine and observe the
belt’s up and down range of movement.
Adjustment is correct when the edges of the belt do
not move above or below the edges of the rollers.
8. When adjustment is complete, tighten the micro
adjust lock nut (A).
If the tracking cannot be corrected go to the Motor
Mount Tracking Adjustment section.