background image

Password Protect (Optional)… 

Once setup, Zones and Scenes have been created, they can be password protected to prevent accidental editing or 
deletion. The default password is “

0000”

  This can be changed within the same menu.    


Select Setup Icon 


Select preferences


Select Lock/Unlock


Enter the Default Password: 0000


To change the password select “Set 

Password”.  

To Lock the system select “Lock”  

When locked, Setup, create zone & create 

Scenes and long press edits are greyed out & 

non functional. Repeat the process to Unlock 

the system.


www.Lumishore.com

Lumishore UK Unit 3, Technium 1, Kings Road, Swansea, SA1 8PH, UK  |  +44(0)208 144 1694  |  [email protected]
Lumishore USA 7137 24TH Court East Sarasota, Florida 34234  |  (941) 405-3302  |  [email protected]

www.Lumishore.com

Lumishore UK Unit 3, Technium 1, Kings Road, Swansea, SA1 8PH, UK  |  +44(0)208 144 1694  |  [email protected]
Lumishore USA 7137 24TH Court East Sarasota, Florida 34234  |  (941) 405-3302  |  [email protected]

9

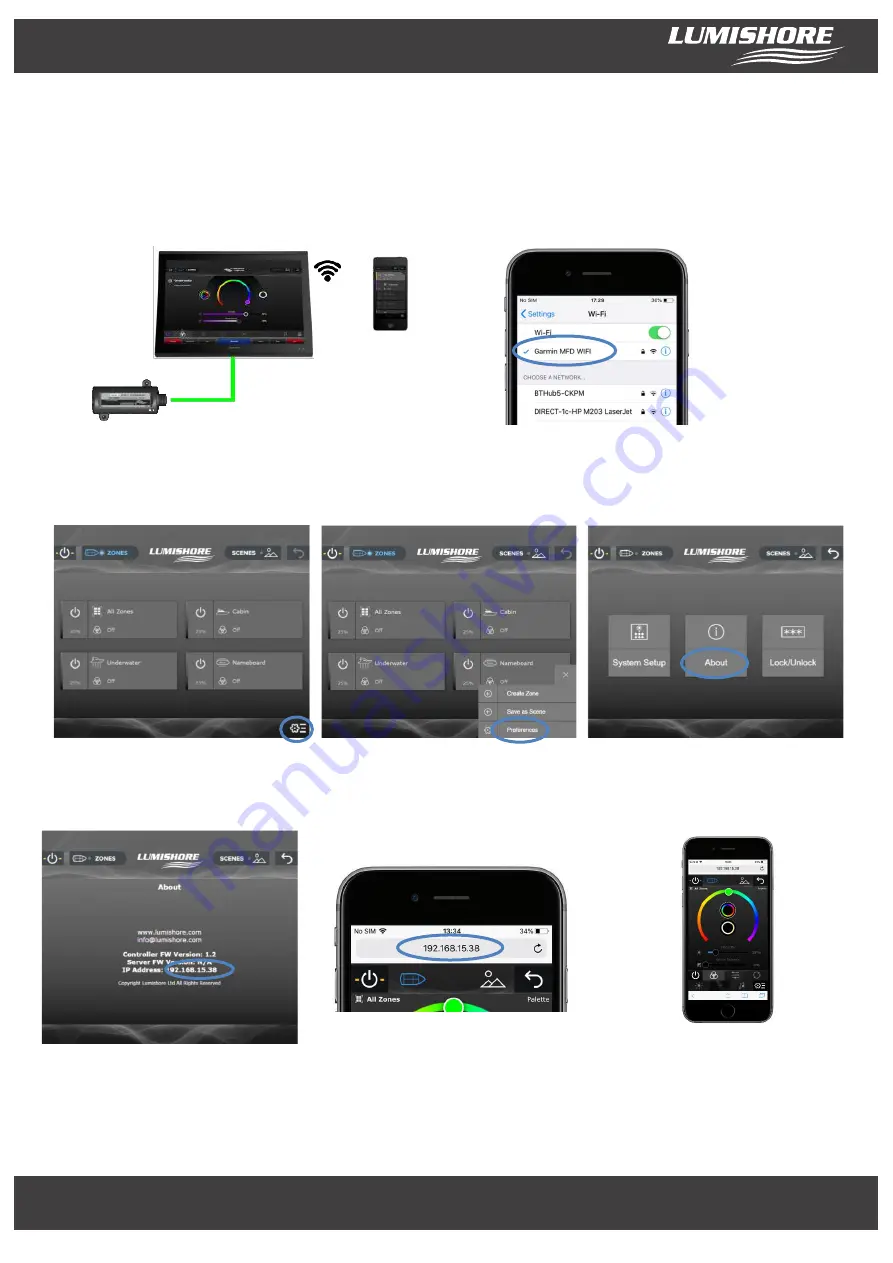
Control from Smart Device or Web browser… 

Ensure your smart device is connected the same network as the Lumi-link Command centre. Depending on 
instalation this may be the vessels onboard WIFI, the MFD WIFI  or the Lumishore Lumi-Link  Display  WIFI.  The 
following example shows the Lumi-link Command center connected to the MFD wifi….  

Ensure the MFD wifi is switched on and the smart device is connected to it. 


Using the MFD – launch the Lumi-link app 

Select Setup Icon 


Select preferences 

Select About Screen 


Make a note of the IP address  

Note: it may be different to the example 

below


Type the IP address into the browser on the 

smart device


You can now control the lights remotley 

using the Lumi-Link app. 


Note - from time to time the MFD or network router may change the IP address automatically. If the Lumi-link app 
does not display ensure you are connected to the correct wifi network and that you have entered the correct IP 
address. 


Содержание Lumi-Link

Страница 1: ...can be setup as a Single zone or as a Multizone For Underwater and Above water installations choose Multizone Mode as per the following examples Configuration examples Exmple 1 Single Zone UW lights Only Example 2 Multizone UW lights Starboard Port Transom Example 3 Multizone UW lights Lumishore LUX E g downlights strip lights and courtesy lights www Lumishore com Lumishore UK Unit 3 Technium 1 Ki...

Страница 2: ...information but can be set if desired Light Discovery Process Upon first installation and before choosing single vs multizone the lights connected to the Lumi link network need to be discovered Perform these steps on first use or if new lights have been added or deleted from the Lumi link network Select Setup Icon Select Preferences Select System Setup Selecet Light Discovery The system discovers ...

Страница 3: ...on of the underwater lights to be set around the vessel This ensures the lights are sent information in the correct order and color change in the correct sequence To set the positions use the following steps and the example positions shown below Wink Light to identify it on the vessel the light will flash RGB Use the diagram above as a guide edit the light position relative to the vessel Repeat fo...

Страница 4: ... Lumishore UK Unit 3 Technium 1 Kings Road Swansea SA1 8PH UK 44 0 208 144 1694 Info Lumishore com Lumishore USA 7137 24TH Court East Sarasota Florida 34234 941 405 3302 Sales LumishoreUSA com 4 Lumi link Control Panel ...

Страница 5: ...asy identification Select Setup Icon Select Create Zone Rename the zone and choose a suitable icon Use the Name of the light or wink Light to identify each light on the network Select which lights to allocate to the Zone and then Save the selection Optional Light positions can be assigned This ensures the sweep mode will work in the correct sequence Eg for Underwater lights The Lights in this zone...

Страница 6: ...s are shared between scenes the Zones will follow the last Scene command In the example below each of the 5 zones has been allocated a different colour and Zone 5 is set to Off To create this as a new scene e g Docking Mode follow the steps below Create the 5 separate lighting zones and select the desired color intensity for each one Select Save as Scene from the Setup menu Rename the scene and se...

Страница 7: ... the user can select the colour effect and intensity for each of these lighting zones These preferences can then be saved as a lighting Scene Scenes can include a single zone or mutiple zones they can also include a zone set to off More than one scene can be active at a time if zones are shared between scenes the Zones will follow the last Scene command In the example below each of the 5 zones has...

Страница 8: ...ck Unlock Enter the Default Password 0000 To change the password select Set Password To Lock the system select Lock When locked Setup create zone create Scenes and long press edits are greyed out non functional Repeat the process to Unlock the system www Lumishore com Lumishore UK Unit 3 Technium 1 Kings Road Swansea SA1 8PH UK 44 0 208 144 1694 Info Lumishore com Lumishore USA 7137 24TH Court Eas...

Страница 9: ...ng example shows the Lumi link Command center connected to the MFD wifi Ensure the MFD wifi is switched on and the smart device is connected to it Using the MFD launch the Lumi link app Select Setup Icon Select preferences Select About Screen Make a note of the IP address Note it may be different to the example below Type the IP address into the browser on the smart device You can now control the ...

Отзывы: