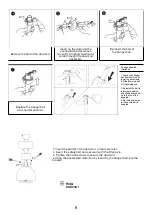
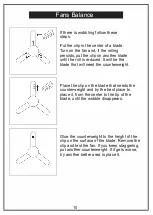
background image

■ 

Fans Balance 

If there is wobbling follow these 

steps

:

Put the clip in the center of a blade. 

Turn on the fan and, if the rolling 

persists, put the clip on another blade 

until the roll is reduced.  It will be the 

blade that will need the counterweight. 

Place the clip on the blade that needs the 

counterweight and try the best place to 

place it, from the center to the tip of the 

blade, until the wobble disappears. 

Glue the counterweight to the height of the 

clip on the surface of the blade.  Remove the 

clip and test the fan.  If you keep staggering, 

put another counterweight.  If it gets worse, 

try another better area to place it. 

1

0

Содержание 9633-01-BLK

Страница 1: ...I 9633 01 BLK 9703 01 SNWH ...

Страница 2: ...d state speed contrai device WARNING To avoid possible electrical shock turn the electricity off at the main fuse box before wiring It you feel you do not have enough electrical wiring knowledge or experience contact a licensed electrician WARNING Electrical diagrams are for reference only Optional use of any light kit shall be UL listed and marked suitable for use with this fan WARNING To reduce ...

Страница 3: ...h of this type give their longest useful lite when protected from varying weather conditions A certain amount of wobble is normal and should not be consiered a defect Servicing performed by unauthorized persans shall render the warranty invalid There is no other expressed warranty hereby disciaims any and all warranties including but not limited to those of merchantability and fitness for a partic...

Страница 4: ...ity Part Description A Slide on mounting bracket 1 inside canopy F Blade G Light kit fitter assembly B Canopy 1 C Ball downrod assembly 2 H Lamp Cover D Decorative cover 1 I Acrylic tablet E Fan motor assembly 1 J Remote Control D Ll H Quantity 3 1 1 1 1 K Remote Control Receiver 1 4 ...

Страница 5: ...rod SWITCH OFF THE ELECTRICAL MAIN AT THE CIRCUIT BREAKER FUSE BOX 1 With the screws provided with your junction box screw the bracket into place IMPORTANT SCREWS MUST BE TIGHTENED TILL SNUG Unscrew the screws of the hanger ball 5 SIide the ball down the downrod DOWN ROD ASSEMBLY ...

Страница 6: ...wnrod by removing set screws 2 Slide downrod ball off of downrod and 3 Reinstall the boit in to another downrod and slide downrod ball up to the top of the downrod 4 Re install set screw to the secure ball to downrod 1 Insert the bottom of the downrod in the motor slot 2 Insert the safety bolt and secure it with the R type pin 3 Tighten the head screws to secure the downrod 4 Hang the assembled mo...

Страница 7: ...Forward Reverse Yellow Color Temperature ...

Страница 8: ... Auto Scan 4 Turn on mobile phone location access wifi connection and Bluetooth connection functions 5 Power on the fan long press the button of remote for 5 seconds there have three sounds of beep 6 Press Next step when the APP found the Fan device select the WI FI and password of WI FI it will be connected successfully 7 Go to Home of APP you can control the Fan and light on APP The ceiling fan s...

Страница 9: ...ct wires together with regards to the color codes 2 Carefully slide the receiver in the designated area of the bracket 3 With the power off connect your black and white wires from the reciever to your power circuit wires in the junction box 4 Connect your grounds together green wire 5 Gather the loose wiring tightly together and pull up the canopy All wiring from the fan fits in the fan canopy 1 H...

Страница 10: ...ight Parts 9 1 lnstallation of the blades Total 3 blades 6 screws 2 lnstallation the light kit Total 3 screws 3 Connect the wires of the fan and light kit 4 lnstallation the lamp cover on the light kit EB Phillips screwdriver ...

Страница 11: ...ade that will need the counterweight Place the clip on the blade that needs the counterweight and try the best place to place it from the center to the tip of the blade until the wobble disappears Glue the counterweight to the height of the clip on the surface of the blade Remove the clip and test the fan If you keep staggering put another counterweight If it gets worse try another better area to ...

Страница 12: ...12 The fan will not start The fan makes noise rvice and a balancing kit will be sent to you ...

Отзывы: