PS753
Document Camera
[Important]
User Manual - English
To download the latest versions of the Quick Start
Guide, multilingual user manual, software, driver,
etc., please visit Lumens
https://www.MyLumens.com/support
Страница 1: ...S753 Document Camera Important User Manual English To download the latest versions of the Quick Start Guide multilingual user manual software driver etc please visit Lumens https www MyLumens com support ...
Страница 2: ...ages 15 6 8 Delete captured recorded images 15 6 9 Adjust the output volume 15 6 10 Automatically delete the stored images whenever it is turned off Auto Erase 15 6 11 Enlarge a part of the image PAN 15 6 12 I would like to use the MASK and Spotlight function 15 6 13 Play the slides Slide Show 16 6 14 Use a USB disk 16 6 15 Image comparison to compare live images with stored image files PIP 17 6 1...
Страница 3: ...ts PS753 Quick Installation Guide 4 Step Instruction Card Power Adapter Power Cord VGA cable HDMI cable 2 USB 2 0 cable Appearance may vary depending on country region Audio Cable Microscope Adapter Remote Control Holder Remote Control ...
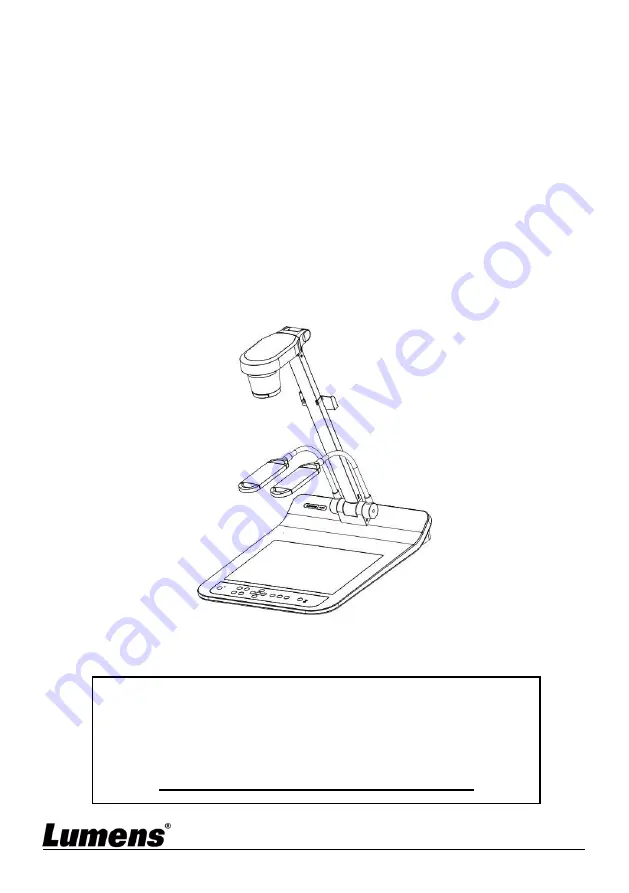
Страница 4: ...view 1 Remote sensor 2 Lens 3 Camera arm 4 Remote Control Holder 5 Auxiliary floodlight and lamp arm 6 DIP Switch Setting 7 Input output port 8 Backlight 9 Control panel 2 1 Relative Operation Position Projector PC 5 2 5 8 6 4 7 3 9 1 ...
Страница 5: ...English 4 Chapter 3 Installation and Connections 3 1 System diagram Press the SOURCE button to switch between PS753 real time image and HDMI IN image sources ...
Страница 6: ...ables you to Control the PS753 Capture and record images Annotate the image highlight important details and save it Support the full screen function Please refer to Ladibug software user manual for software installation steps and operation Windows Ladibug 4K Software User Manual MAC Ladibug 3 0 Software User Manual ...
Страница 7: ...OWER on the remote control or control panel to power on 6 Press control panel AUTO TUNE button to optimize the image You are ready to teach present 7 Each time the lens is moved press AUTO TUNE on the remote control or control panel to refocus According to your request you can adjust the camera head slightly to aim at the center of the documents when the anchor of lens was reached When using the r...
Страница 8: ... TUNE Automatically adjust the image to have the best brightness and focusing performance Remote control Control panel BRT Adjust the brightness of the image Remote control Control panel CAPTURE DEL Capture and save images to USB disk priority or internal memory card while displaying live images Delete files from the USB disk priority or internal memory card while reading the stored files in Playb...
Страница 9: ...es Remote Control PLAYBACK Read files in the USB disk priority or internal memory card Remote control Control panel RECORD Record motion images Remote Control ROTATE Rotate the image 0 180 Vertical flip Horizontal flip 90 270 Remote Control SOURCE Switch the input source between live image default or HDMI image Remote control Control panel ZOOM Increase or decrease the image size Remote control Co...
Страница 10: ...ble Disable the partial enlarged mode Manual Focus Manual Focus LAMP Lamp mode toggle switch Rotate Screen rotation 0 180 Vertical flip Horizontal flip 90 270 PIP Compare live images with stored images Settings Set up various functions Brightness Adjust the brightness of the image Photo Text Select Photo Text Gray Mode Mask Activate the mask mode Annotation Annotate or mark the image Zoom Increase...
Страница 11: ...recorded videos Date Time Set SNTP server and manually set system time Stream Select Ethernet or USB function Ethernet USB may only choose one because they cannot be output at the same time Storage Slide Show Show the photos or videos stored in the USB disk priority or internal memory card in slide mode Delay Use the left and right arrow keys to select the delay time The range is 0 5 seconds 10 se...
Страница 12: ...s not connected to a router the default IP is 192 168 100 100 Advanced Language Support multi language default is English Lock Down Enable Disable lock down Select Enable to set the password Auto Erase Enable Disable Auto Erase When On is selected the stored images will automatically be deleted when the system is turned off Preset Load Load the stored settings Use the left and right arrow keys to ...
Страница 13: ...ect the shape of the spotlight zone Transparency Use the left and right arrow keys to adjust the transparency of the border in the spotlight mode Step Use the left and right arrow keys to select the step of the spotlight zone V Size Use the left and right arrow keys to adjust the height of the spotlight zone H Size Use the left and right arrow keys to adjust the width of the spotlight zone Exit Pr...
Страница 14: ...se stays at the right side of the screen the mouse annotation menu can be activated Choose either USB screen or Mouse Annotation If you want to use Mouse Annotation function please remove the USB cable Icon Description Icon Description Custom tool 1 Clear all Custom tool 2 Open setting menu of the annotation tool Eraser Exit the annotation tool ...
Страница 15: ...will make the grayscale differentiation distinct 2 Press MENU to exit 6 4 Rotate Image Remote control Press ROTATE key to rotate the screen Control panel Go to the setting menu select Rotate to change the rotation method The following functions are not available when the image is rotated PAN PIP Recording 6 5 Capture Image Press CAPTURE DEL to capture and save images You cannot capture images when...
Страница 16: ...e 6 9 Adjust the output volume Volume control is intended to control the external audio output equipment only In PLAYBACK mode Press or to adjust the volume of the video 6 10 Automatically delete the stored images whenever it is turned off Auto Erase 1 Go to the setting menu select Settings Advanced Auto Erase On 2 Press MENU to exit 6 11 Enlarge a part of the image PAN 1 Enable the partial enlarg...
Страница 17: ...e Shape Transparency Step V Size H Size For details please refer to 5 2 Setting Menu 2 Press MENU to exit the Setting Menu and return to Mask Spotlight mode 6 13 Play the slides Slide Show 6 13 1 Setting delay time 1 Go to the setting menu select Settings Storage Delay and select the delay time 2 Press MENU to exit 6 13 2 Playing Pausing Stopping the slide show Upper limit The maximum size of sing...
Страница 18: ... Repeat the action again to unlock This function is only valid for the panel buttons the remote control can still operate normally When turning off with the remote control the lock function will be released automatically after rebooting 6 17 Change the power on image 1 Go to the setting menu select Settings Advanced Splash Screen Settings 2 Select Default Custom 2 1 If you select Custom you can se...
Страница 19: ...s of the computer should be changed so that it is on the same network segment as the camera E g The factory preset default IP address of PS753 is 192 168 100 100 The computer IP address must be set with the same network segment such as 192 168 100 101 so that the computer can be connected correctly with the camera Change network settings Network cable Network cable PS753 電腦 PS753 Computer Network ...
Страница 20: ...view the IP location from Menu Settings Control 2 Open the browser and enter the IP address in the address bar If it is not connected to a router the default IP is 192 168 100 100 3 Enter the account and password to view the images and control PS753 Account admin Password 9999 192 168 4 28 ...
Страница 21: ... be made using free software e g VLC Quick Time PotPlayer etc RTSP connection address formats are as follows rtsp camera IP 8557 h264 Example Open the VLC software select Media Open Network Streaming and enter the URL rtsp 192 168 4 28 8557 h264 rtsp 192 168 4 28 8557 h264 ...
Страница 22: ...admin 2 User Password Enter user password default 9999 For the first time login please refer to 7 4 4 System Settings to change the default password 3 Remember user account and password Save user login account and password to the browser When you log in next time there is no need to re enter them 4 Login Log into the administrator screen on the website ...
Страница 23: ... name 2 Mute Turn on off web audio output 3 Enlarge Switch the preview window to full screen 4 Preview window Display the screen currently captured by PS753 5 Zoom Zoom in out images 6 Brightness Brightness 7 Focus Tune the focus 8 Power Enable Disable PS753 9 Logout Log out of the web page ...
Страница 24: ...WB Execute Auto White Balance once 4 Preset Save Store the value of the current image mode 5 Preset Load Load the stored settings 6 Source Camera HDMI In screen switching 7 Rotate Rotate the image 0 90 270 Flip Mirror 8 Image Mode Normal Film Slide Microscope 9 Photo Text Select Photo Text Gray Mode 10 Zoom Limit Set the Zoom magnification 11 Auto Exposure Enable disable auto exposure 12 Pan Turn ...
Страница 25: ...ange the device name user account and password click Save to save the settings and click Cancel to cancel the changes The name is limited to 1 12 characters Please use a camera name by mixing uppercase and lowercase letters or numbers Do not use and space or special symbols 2 IP Address Ethernet Setting When it is set to Static IP the setting can be modified ...
Страница 26: ... current system time 2 Time Zone Set the Time Zone 3 Setting Mode Select NTP Service Manually Set Turn on Manually Set and choose to synchronize with the computer or set the date time manually 4 NTP Server URL NTP service to display this item Connect to a NTP server to correct time 5 Apply Apply your settings ...
Страница 27: ... one because they cannot be output at the same time 2 Video Resolution Show or set the RTSP output resolution and fps 3 Bitrate Display or set the bit rate of RTSP 4 Enable Audio Turn on off RTSP audio 5 Audio Source Select the audio source 6 Audio In Levels Adjust the volume 7 RTSP URL Display current RTSP URL 8 Edit Enter Edit mode ...
Страница 28: ... about 1 2 minutes Please do not operate or turn off the power of the device during the update to avoid firmware update failure 2 Factory Reset Restore the factory default software 3 Reboot Restart 4 Error Code Display system Error code When an error code appears the user may try to clear and confirm if the error will repeat itself 5 Clean Clear Error code ...
Страница 29: ...r the Service Menu and select Image Mode Microscope 4 If the image is not clear Please adjust the focus of microscope Press AUTO TUNE to activate the auto focus 5 Please reset to normal mode after using the microscope Press MENU to enter the Service Menu and select Image Mode Normal For eyepieces of Ø 33 mm or Ø 34 mm only one microscope adapter with the greatest diameter is needed For eyepieces o...
Страница 30: ... back to the holder 2 Fold back the camera head to align with the arm 3 Turn the two lamp arms and the arm of camera head down and adjust them to be parallel with the platform 4 Put the lens cap on the camera head 5 Finally fold the machine as in the following figure ...
Страница 31: ...Resolution 2 3 OFF Normal mode 30 fps applicable to general scene ON High speed mode 60 fps applicable to support rapidly changing scene 4K resolution not available 4 OFF 60 Hz ON 50 Hz 5 Reserved no function 6 Reserved no function 2 HDMI Resolution Resolution 60Hz 50Hz 1920 x 1080 3840 x 2160 1280 x 720 1024 x 768 For the corresponding resolution of RTSP UVC please refer to Appendix 2 Resolution ...
Страница 32: ...ted settings 3 No Ethernet USB Image Output Ethernet USB may only choose one because they cannot be output at the same time Please switch the streaming settings on the setting menu or web page Setting Menu Settings Capture Streaming Ethernet USB Web page Stream Stream Ethernet USB 4 Unable to focus Probably the document is too close Press the ZOOM button or pull away the distance between the lens ...
Страница 33: ...o date 1 Please go to Lumens official website to check whether the latest version is available for update https www MyLumens com support 2 Firmware version confirmation steps Go to the setting menu and select Settings Advanced Firmware Version 12 How to unlock the locked device 1 Go to the setting menu and select Settings Advanced Lock Down 2 Cancel the password setting function 13 When using the ...
Страница 34: ...or the product has been exposed to rain or water 2 Installation 2 1 For security considerations please make sure the standard hanging rack you bought is in line with UL or CE safety approbations and installed by technician personnel approved by agents 3 Storage 3 1 Do not place the product where the cord can be stepped on as this may result in fraying or damage to the lead or the plug 3 2 Remove t...
Страница 35: ... s authority to operate the equipment This equipment has been tested and found to comply with the limits for a Class A digital device pursuant to part 15 of the FCC Rules These limits are designed to provide reasonable protection against harmful interference when the equipment is operated in a commercial environment IC Warning This digital apparatus does not exceed the Class A limits for radio noi...
Страница 36: ...mation Supplier Lumens Integration Inc 4116 Clipper Court Fremont CA 94538 United States e mail support mylumens com FCC Compliance Statement This device complies with Part 15 of the FCC Rules Operation is subject to the following two conditions 1 This device may not cause harmful interference and 2 this device must accept any interference received including interference that may cause undesired o...
Страница 37: ...港 Hong Kong 50 巴 林 Bahrain 60 多 明 尼 加 Dominican 60 匈 牙 利 Hungary 50 孟 加 拉 Bangladesh 50 杜 貝 Dubai 50 冰 島 Ice land 50 巴 貝 多 Babados 50 厄 瓜 多 爾 Ecuador 60 印 度 India 50 比 利 時 Belgium 50 埃 及 Egypt 50 印 尼 Indonesin 50 百 慕 達 Bermuda 60 薩 爾 瓦 多 El Salvador 60 伊 朗 Iran 50 玻 利 維 亞 Bolivia 50 赤 道 幾 內 亞 Equatorial Guinea 50 伊 拉 克 Iraq 50 波 札 那 Botswana 50 衣 索 匹 亞 Ethiopia 50 愛 爾 蘭 Ireland 50 巴 西 Brazil 50 60...
Страница 38: ...哥 Tobago 60 馬 爾 他 Malta 50 科 托 Qatar 50 突 尼 西 亞 Tunisia 50 馬 丁 尼 克 島 Martinique 50 羅 德 西 亞 Rhodesia 50 土 耳 其 Turkey 50 茅 里 塔 尼 亞 Mauritania 50 羅 馬 尼 亞 Romania 50 烏 干 達 Uganda 50 模 里 西 斯 Mauritius 50 盧 安 達 Rwanda 50 美 國 USA 60 墨 西 哥 Mexico 60 沙 烏 地 阿 拉 伯 Saudi Arabia 50 60 蘇 聯 USSR 50 摩 那 哥 Monaco 50 蘇 格 蘭 Scotland 50 英 國 United Kingdom 50 蒙 特 色 納 島 Montserrat 60 塞 內 加 爾 Senegal 50 上 伏 塔 Upper Volt...
Страница 39: ...igh Speed 50 NA 1920x1080 NA NA 1280x720 25 1920x1080 1920x1080 1920x1080 NA 1280x720 1280x720 1280x720 640x360 NA 640x360 640x360 3840x2160 30 Hz Normal 30 1920x1080 1920x1080 1920x1080 NA 1280x720 1280x720 1280x720 640x360 NA 640x360 640x360 3840x2160 25 Hz Normal 25 1920x1080 1920x1080 1920x1080 NA 1280x720 1280x720 1280x720 640x360 NA 640x360 640x360 1920x1080 60Hz High Speed 60 NA 1920x1080 N...
Страница 40: ...0 NA 640x360 NA 640x360 640x360 1280x720 50 Hz High Speed 50 NA 1920x1080 NA NA 1280x720 NA 25 1920x1080 1920x1080 1920x1080 NA 1280x720 1280x720 1280x720 NA 640x360 NA 640x360 640x360 1024x768 60 Hz Normal 30 1024x768 1024x768 1024x768 NA 640x480 NA 640x480 640x480 1024x768 60 Hz Normal 25 1024x768 1024x768 1024x768 NA 640x480 NA 640x480 640x480 1024x768 60 Hz High Speed 60 NA 1024x768 NA NA NA 3...
Страница 41: ...e product Lumens Digital Optics Inc hereby reserves the right to make changes to product specifications without prior notice The information in this file is subject to change without prior notice To fully explain or describe how this product should be used this manual may refer to names of other products or companies without any intention of infringement Disclaimer of warranties Lumens Digital Opt...