


22
EN
1.2. Installation and Start
The installation of the SR11 system should be made by an authorized
operator.
The SR11 system should be situated in a place enabling a safe service
of the injection moulding press and an easy service and observation of
the controller indicator field.
In SR11 systems with 7 or 8 controllers, 3 controllers are connected to two
supply phases, and considering the load-carrying capacity of connections,
the power of heaters in the mould should be matched so as the current
of one supply phase does not exceed 32 A.
The simplified diagram of internal connections of the SR11-8XXXX is pre-
sented on the fig. 9 (page 43) for common thermocouple and heater wires,
and on the fig.10 (page 44) for separate thermocouple and heater wires.
Moulds with heated channels are connected with the SR11 system
by means of four types of cables. Cables are equipped in standard
with 6-plug 380 V connectors for the SR11.11X1X system or with
16-plug 380 V connectors for other systems.
The view of mounting holes and the mounting way of sockets in
moulds are shown on fig.11 and 12 (pages 45-46).
Connections of the SR11 system with the mould through the connecting
cable should be made in compliance with the version of the possessed
system, acc. to fig. 13 to 18 (pages 47-51). On this figures, contact num-
bers in connectors and occurring signals for them are presented. One
should connect heaters and mould thermocouples so as the heater and
thermocouples from one heating zone were connected to the pair of
signals marked
GRZ
x and
TC
x, passigned to the controller x.
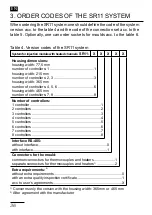
In the table A (page 52), connectors of the SR11 system with used pins
for versions with different numbers of controllers.


