background image

6.6 

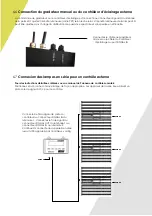
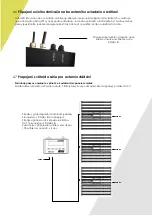
Připojení ručního stmívače nebo externího ovladače osvětlení

Ovládání stmívače nebo ovladače osvětlení je připojeno ke konektoru Signal IN na zařízení To umožňuje 

upravit intenzitu světla (PPF výstup) podle požadavku. Intenzita světla LED svítidla může být nastavena bez 

změny spektrálního rozložení energie nebo ztráty účinnosti s použitím ručního ovládání stmívače.

6.7 

Propojení světel do série pro externí ovládání

Podrobné pokyny naleznete v příručce k ovládacímu panelu Lumatek.

Každé zařízení umístěte a vhodně zavěste. Přístroje řady Zeus používají pro řízení signálový protokol 0-10V.

Připojte kabel ručního stmívače nebo 

kabel ovladače osvětlení k portu 

SIGNAL IN.

Připojte výstupní signální vodič řídicí jednotky 

k konektoru 1 SIGNAL IN pro připojení. 

Připojte signální vodič z konektoru SIGNAL 

OUT 1 k konektoru 2 SIGNAL IN.

Pokračujte v připojování svítidel v sérii až pro 

100 svítidel na ovladač, viz obr.

Содержание 1000W

Страница 1: ...LVD Plug Play CONTROL TECHNOLOGY YEAR WARRANTY PPF 2925 µmol s 2925 EFFICACY 2 9 µmol s J 2 9 MANUAL ...

Страница 2: ... 4 Replacing and changing light bars 6 5 Installing the fixture 6 6 Connecting the manual dimmer control 6 7 Connecting fixtures in series for external control 6 8 Connecting the LED fixture to the mains 2 Product Description 3 Product information and specifications 4 Safety recommendations and warnings 5 Contents 7 Precautions when using the LED fixture 8 Inspection maintenance and repair 9 Stora...

Страница 3: ...the plant canopy for very high PPFD levels which require supplemental carbon dioxide CO2 for crops to fully utilise for photosynthesis The Zeus Xtreme LED can be used without supplemental CO2 but should be positioned at a greater hanging height from plant canopy increasing the light footprint but reducing the PPFD level In this manual the Lumatek Zeus 1000W Extreme PPFD CO2 LED will be referred to...

Страница 4: ...3 3 Fixture Dimensions 3 4 Spectrum Graph wavelength nm Full Spectrum 1091mm 1182mm 106mm 300 500 600 700 800 ...

Страница 5: ...ad the warnings below before using or working with the product Always adhere to the local rules and regulations when installing or using the LED fixture Do not open or disassemble the LED fixture as it contains no serviceable parts inside Opening or modifying the LED fixture can be dangerous and will void the warranty Do not use the LED fixture when either the LED fixture or its power cable are da...

Страница 6: ...correct use or installation can lead to failure and damage to the LED fixture Damage to the LED fixture and electronic circuitry as a result of incorrect installation and use revokes the warranty Warning Mounting and installing the LED fixture must be in accordance with the applicable local laws and regulations Warning The installer is responsible for correct and safe installation Warning Ensure t...

Страница 7: ...f the light bars into the fixture frame as shown in the figure above 6 1 1 Assemble the frame Note the direction when installing the LED driver mounting bracket is on top when the fixture is hung 6 1 Fixture assembly installation Please take care when assembling fixture and ensure all connections are true and secure Connect Frame A and B to the support frame by pressing button on frame connector a...

Страница 8: ... 8m2 Individual 100W light bars are available to purchase as replacements or with different spectral ratios to adjust fixture spectral output The LED fixture s modular design uses an intelligent LED driver which can decrease or increase power to match the amount of 100W light bars installed on the fixture automatically If not all light bars are required the driver will only draw power required for...

Страница 9: ...y 6 7 Connecting fixtures in series for external control For detailed instructions please refer to the Lumatek Control Panel manual Position and hang each fixture appropriately Zeus series fixtures use 0 10V signal protocol for control Connect controller output signal wire to fixture 1 SIGNAL IN connector Connect signal wire from fixture 1 SIGNAL OUT connector to fixture 2 SIGNAL IN connector Cont...

Страница 10: ...e warranty Warning Always wait 20 30 minutes for the LED light bars to cool down Caution Do not clean the LED fixture with detergents abrasives or other aggressive substances Regularly check the LED fixture for dust or dirt build up Clean if necessary Contamination may cause overheating and decreased performance Clean the outside of the LED fixture using a dry or damp cloth Regularly check the cab...

Страница 11: ...cesorio 6 4 Conecte las barras de luz LED 6 5 Sustitución y cambio de barras de luz 6 6 Conexión del control de atenuación manual 6 7 Dispositivos de conexión en serie para control externo 6 8 Conexión de la luminaria LED a la red eléctrica 2 Descripción del producto 3 Información del producto y especificaciones 4 Recomendaciones de seguridad y advertencias 5 Contenido 7 Precauciones al usar el di...

Страница 12: ... muy altos de PPFD que requieren dióxido de carbono suplementario CO2 para que los cultivos se utilicen completamente para la fotosíntesis El LED Zeus Xtreme se puede utilizar sin suplemento CO2 pero debe colocarse a una mayor altura de suspen sión del dosel de la planta aumentando la huella de luz pero reduciendo el nivel de PPFD En este manual el Lumatek Zeus 1000W Extreme PPFD CO2 LED se le con...

Страница 13: ...3 3 Dimensiones del accesorio 3 4 Espectros longitud de onda nm Espectro Completo 300 500 600 700 800 1091mm 1182mm 106mm ...

Страница 14: ...tes advertencias antes de usar o trabajar con el producto Siempre siga las reglas y regulaciones locales al instalar o usar la luminaria LED No abra ni desmonte la luminaria LED ya que no contiene piezas reparables en su interior El abrir o modificar la luminaria LED puede ser peligroso y anulará la garantía No utilice el la luminaria LED cuando la luminaria LED o su cable de alimentación estén da...

Страница 15: ...ños en la luminaria LED El daño a la luminaria LED y a los circuitos electrónicos como resultado de una instalación y uso incorrecto revocará la garantía Advertencia El montaje e instalación de la luminaria LED debe realizarse de acuerdo con las leyes y regulaciones locales aplicables Advertencia El instalador tiene la responsabilidad de una instalación correcta y segura Advertencia Por favor aseg...

Страница 16: ...mo se muestra en la figura anterior 6 1 1 Montar el marco Tenga en cuenta la dirección al instalar el soporte de montaje del controlador LED se encuentra en la parte superior cuando se cuelga la luminaria 6 1 Montaje e instalación de accesorios Tenga cuidado al ensamblar el accesorio y asegúrese de que todas las conexiones sean verdaderas y seguras Conecte el Marco A y B al marco de soporte presio...

Страница 17: ... diseño modular de la lámpara LED utiliza un controlador LED inteligente que puede disminuir o aumentar la potencia para que coincida con la cantidad de barras de luz de 100 W instaladas en el dispositivo automáti camente Si no se requieren todas las barras de luz el conductor solo extraerá la energía necesaria para la cantidad de barras de luz conectadas por ejemplo si hay seis barras de luz cone...

Страница 18: ...trol externo Para obtener instrucciones detalladas por favor consulte el manual del panel de control de Lumatek Coloque y cuelgue cada accesorio adecuadamente Los dispositivos de la serie Zeus utilizan el protocolo de señal 0 10V para el control Conecte el cable del atenuador manual o el cable del controlador de iluminación al puerto SIGNAL IN Conecte el cable de señal de salida del controlador al...

Страница 19: ...aria LED ya que no contiene piezas reparables en su interior El abrir o modificar la luminaria LED puede ser peligroso y anulará la garantía Advertencia Siempre espere de 20 a 30 minutos para que las barras de luz LED se enfríen Precaución No limpie el dispositivo con detergentes abrasivos u otras sustancias agresivas Revise regularmente el dispositivo para detectar la presencia de polvo o sucieda...

Страница 20: ...ie die LED Lichtleisten an 6 4 Lichtleisten ersetzen und wechseln 6 5 Installation der Leuchte 6 6 Anschließen der manuellen Dimmersteuerung 6 7 Reihenschaltung von Geräten zur externen Steuerung 6 8 Anschließen der LED Leuchte an das Stromnetz 2 Produktbeschreibung 3 Produktinformationen und Spezifikationen 4 Sicherheitsempfehlungen und Warnungen 5 Contents 7 Vorsichtsmaßnahmen bei der Verwendung...

Страница 21: ...t werden um sehr hohe PPFD Werte zu erreichen die zusätzliches Kohlendioxid erfordern CO2 damit die Pflanzen es vollständig für die Photosynthese nutzen können Die Zeus Xtreme LED kann ohne Zusatzlicht verwendet werden CO2 Die Zeus Xtreme LED kann ohne Zusatzbe leuchtung verwendet werden sollte aber in einer größeren Höhe über dem Pflanzendach angebracht werden was die Lichtfläche vergrößert aber ...

Страница 22: ...3 3 Vorrichtungsmaße 3 4 Spektren Wellenlänge nm Vollspektrum 300 500 600 700 800 1091mm 1182mm 106mm ...

Страница 23: ...3 Warnung Lesen Sie die folgenden Warnhinweise sorgfältig durch bevor Sie das Produkt verwenden oder mit ihm arbeiten Beachten Sie bei der Installation oder Verwendung der LED Leuchte immer die örtlichen Bestimmungen und Vorschriften Öffnen oder demontieren Sie die LED Leuchte keinesfalls da sie keine wartungsfähigen Teile im Inneren enthält Das Öffnen oder Modifizieren des LED Leuchtmittels kann ...

Страница 24: ...fer oder Wasserzerstäuber Die Installation und Verwendung der LED Leuchte liegt in der Verantwortung des Endverbrauchers Unsach gemäße Verwendung oder Installation kann zu Ausfällen und Schäden an der LED Leuchte führen Schäden an der LED Leuchte und der elektronischen Schaltung durch unsachgemäße Installation und Verwendung führen zum Erlöschen der Garantie Warnung Die Montage und Installation de...

Страница 25: ...en wie in der Abbildung oben gezeigt in den Leuchtenrahmen ein 6 1 1 Montieren Sie den Rahmen Achten Sie bei der Montage auf die Richtung die LED Treiberhalterung befindet sich beim Aufhängen des Geräts oben 6 1 Montage und Installation der Vorrichtung Bitte seien Sie beim Zusammenbau der Vorrichtung vorsichtig und stellen Sie sicher dass alle Verbindungen wahr und sicher sind Verbinden Sie Rahmen...

Страница 26: ...elne 100W Lichtbalken sind als Ersatz oder mit unterschiedlichen Spektralverhältnissen erhältlich um die Spektralleistung der Vorrichtung anzupassen Das modulare Design der LED Leuchte verwendet einen intelligenten LED Treiber der die Leistung automatisch verringert oder erhöht um sie an die Anzahl der installierten 100 W Lichtleisten anzupassen Wenn nicht alle Lichtleisten benötigt werden nimmt d...

Страница 27: ...ngen finden Sie im Handbuch des Lumatek Control Panels Positionieren und hängen Sie jedes Gerät entsprechend Verbinden Sie die T Verbindungskomponente der Signalleitung mit der Dimmerleitung der Leuchte 1 Geräte der Zeus Serie verwenden zur Steuerung das 0 10 V Signalprotokoll Schließen Sie das manuelle Dimmerkabel oder das Lichtsteuerungskabel an den SIGNAL IN Anschluss an Schließen Sie das Contr...

Страница 28: ...sfähigen Teile im Inneren Das Öffnen der LED Leuchte kann gefährlich sein und führt zum Erlöschen der Garantie Warning Warten Sie immer 20 30 Minuten bis sich die LED Lichtbalken abgekühlt haben Vorsicht Reinigen Sie die LED Leuchte nicht mit Reinigungsmitteln Scheuermitteln oder anderen aggressiven Substanzen Überprüfen Sie die LED Leuchte regelmäßig auf Staub oder Schmutzablagerungen Bei Bedarf ...

Страница 29: ...nose 6 5 Installazione del dispositivo 6 6 Collegamento del controllo dimmer manuale 6 7 Collegamento di apparecchi in serie per controllo esterno 6 8 Collegamento dell apparecchio a LED alla rete elettrica 2 Descrizione del prodotto 3 Informazioni sul prodotto e specifiche 4 Consigli di sicurezza e avvertenze 5 Contenuto 7 Precauzioni quando si utilizza l apparecchiatura a LED 8 Inspection mainte...

Страница 30: ...r livelli molto elevati di PPFD che richiedono l aggiunta di anidride carbonica CO2 per le colture da utilizzare completamente per la fotosintesi Lo Zeus Xtreme LED può essere utilizzato senza supplemento CO2 ma dovrebbe essere posizionato ad una maggiore altezza di sospensione dal tettuccio dell impianto aumentando l ingombro della luce ma riducendo il livello di PPFD In questo manuale il Lumatek...

Страница 31: ...3 3 Dimensioni apparecchio 3 4 Spettri lunghezza d onda nm Spettro completo 300 500 600 700 800 1091mm 1182mm 106mm ...

Страница 32: ...eguito prima di utilizzare o lavorare con il prodotto Rispettare sempre le norme e i regolamenti locali durante l installazione o l utilizzo dell apparecchio a LED Non aprire o smontare l apparecchio a LED in quanto non contiene parti riparabili all interno L apertura o la modifica del dispositivo del LED può essere pericoloso e invalidare la garanzia Non utilizzare l apparecchio a LED se l appare...

Страница 33: ... Danni al supporto LED e alla circuiteria elettronica come conseguanza di installazione e utilizzo incorretti comporta la revoca della garanzia Avvertimento Montare e installallare l aparecchio a LED in conformità con le leggi locali e i regolamenti applicabili Avvertimento L installatore è responsabile per l installazione corretta e sicura Avvertimento Assicurarsi che il cablaggio locale possa su...

Страница 34: ... sopra 6 1 1 Assembla il telaio Notare la direzione durante l installazione la staffa di montaggio del conduttore LED si trova nella parte superiore quando l apparecchio è appeso 6 1 Assemblaggio e installazione del dispositivo Fare attenzione durante l assemblaggio dell attrezzatura e assicurarsi che tutti i collegamenti siano veri e sicuri Collegare il telaio A e B al telaio di supporto premendo...

Страница 35: ...sostituzioni o con differenti rapporti spettrali per regolare l uscita spettrale dell apparecchio Il design modulare dell apparecchio a LED utilizza un driver LED intelligente che può diminuire o aumentare la potenza per uguagliare automaticamente la quantità di barre luminose da 100W installate sull apparecchio Se non tutte le barre luminose sono necessarie il condut tore assorbirà solo la potenz...

Страница 36: ...ntrollo esterno Per istruzioni dettagliate fare riferimento al manuale Pannello di controllo Lumatek Posizionare e appendere ogni apparecchio in modo appropriato Gli apparecchi della serie Zeus utilizzano il protocollo di segnale 0 10 V per il controllo Collegare il cavo dimmer manuale o il cavo del controller di illuminazi one alla porta SIGNAL IN Collegare il cavo del segnale di uscita del contr...

Страница 37: ...pparecchio a LED non contiene parti riparabili L apertura del dispositi vo a LED può essere pericoloso e invalidare la garanzia Avvertimento Attendere sempre 20 30 minuti per consentire alle barre luminose a LED di raffreddarsi Attenzione Non pulire l apparecchio a LED con detergenti abrasivi o altre sostanze aggressive Regularly check the LED fixture for dust or dirt build up Clean if necessary C...

Страница 38: ...ment des barres lumineuses 6 5 Installer le luminaire 6 6 Raccordement du variateur manuel 6 7 Appareils de connexion en série pour le contrôle externe 6 8 Connexion du luminaire LED au secteur 2 Description du produit 3 Informations sur le produit et spécifications 4 Recommandations de sécurité et avertissements 5 Contenu 7 Précautions lors de l utilisation du luminaire LED 8 Inspection maintenan...

Страница 39: ...2 pour que les cultures puissent être pleinement utilisées pour la photosynthèse Le Zeus Xtreme LED peut être utilisé sans supplément de CO2 mais doit être positionné à une plus grande hauteur de suspension du couvert végétal ce qui augmente l empreinte lumineuse mais réduit le niveau de PPFD Dans ce manuel la LED Lumatek Zeus 1000W Extreme PPFD CO2 sera désignée par le terme Lumatek Zeus 1000W Ex...

Страница 40: ...3 3 Dimensions de la lampe 3 4 Spectre longueur d onde nm Spectre complet 300 500 600 700 800 1091mm 1182mm 106mm ...

Страница 41: ... ou de mettre en marche le produit Référez vous toujours aux règles et régulations locales avant d installer ou d utiliser cette lampe LED N ouvrez pas et ne démontez pas la lampe LED car elle contient des pièces non remplaçables à l intérieur L ouverture ou la modification de la lampe LED peut être dangereux et révoquera la garantie N utilisez pas cette lampe LED si celle ci ou le câble d aliment...

Страница 42: ...cette lampe LED peut engendrer sa défaillance ou son endommagement L endommage ment de la lampe LED et du circuit électronique résultant d une installation et ou d une utilisation incorrecte du produit révoquera sa garantie Attention Le montage et l installation de la lampe LED doivent respecter les règles et régulations locales Attention L installateur est responsable de l installation correcte e...

Страница 43: ...é sur la figure ci dessus 6 1 1 Assemblez le cadre Notez la direction lors de l installation le support de montage du pilote LED est en haut lorsque le luminaire est suspendu 6 1 Assemblage et installation de luminaires Veuillez faire attention lors de l assemblage du luminaire et assurez vous que toutes les connexions sont vraies et sécurisées Connectez les cadres A et B au cadre de support en ap...

Страница 44: ...einte lumineuse à 1 8m2 La conception modulaire du luminaire LED utilise un pilote LED intégré smart qui peut automatiquement diminuer ou augmenter la puissance pour correspondre à la quantité de barres lumineuses de 100W installées sur le luminaire Si toutes les barres lumineuses ne sont pas nécessaires le pilote ne consommera que la puissance nécessaire pour la quantité de barres lumineuses conn...

Страница 45: ...ontrôle externe Pour des instructions détaillées référez vous au manuel du Panneau de contrôle Lumatek Positionnez et accrochez chaque lampe de façon appropriée Les appareils de la série Zeus utilisent un protocole de signal 0 10 V pour le contrôle Connectez le câble du gradateur manuel ou le câble du contrôleur d éclairage au port SIGNAL IN Connectez le fil du signal de sortie du contrôleur au co...

Страница 46: ...ED car elle contient des pièces non remplaçables à l intérieur L ouverture ou la modification de la lampe LED peut être dangereux et révoquera sa garantie Attention Attendez toujours entre 20 et 30 minutes afin que les barres lumineuses LED refroidissent Avertissement Ne nettoyez pas la lampe LED avec des détergents produits abrasifs ou toute autre substance agressive Vérifiez régulièrement qu il ...

Страница 47: ... 2 Připojte ovladač 6 3 Připojte světelné lišty LED 6 4 Výměna a výměna světelných pruhů 6 5 Instalace příslušenství 6 6 Připojení ručního ovládání stmívače 6 7 Propojovací příslušenství v sérii pro externí ovládání 6 8 Připojení LED svítidla do sítě 2 Úvod 3 Informace o produktu a specifikace 4 Bezpečnostní doporučení a varování 5 Obsah 7 Opatření při používání LED svítidla 8 Inspekce údržba a op...

Страница 48: ... vrchlíku rostliny díky velice vysoké úrovni PPFD které si vyžadují doplňkový oxid uhličitý CO2 aby plodiny plně využily fotosyntézy Zeus Xtreme LED lze používat bez doplňků CO2 ale v tom případě by mělo být umístěno ve větší výšce od vrchlíku rostliny což zvyšuje stopu světla ale snižuje hladinu PPFD V této příručce Lumatek Zeus 1000W Extreme PPFD CO2 LED bude označována jako LED svítidlo 2 POPIS...

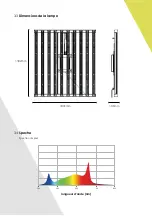
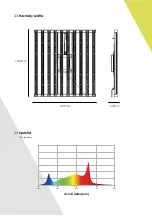
Страница 49: ...3 3 Rozměry světla 3 4 Spektra vlnová délka nm Celé spectrum 300 500 600 700 800 1091mm 1182mm 106mm ...

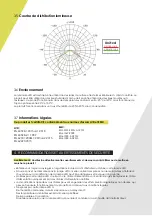
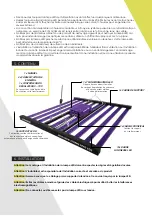
Страница 50: ...3 2 2014 EN 61000 3 3 2013 Varování Před použitím nebo prací s výrobkem si pozorně přečtěte níže uvedená varování Při instalaci nebo používání LED svítidla vždy dodržujte místní pravidla a předpisy Neotevírejte ani nerozebírejte LED svítidlo protože uvnitř nejsou žádné opravitelné díly Otevření nebo úprava svítidla LED může být nebezpečná a ruší platnost záruky Nepoužívejte LED svítidlo pokud je L...

Страница 51: ...lité de l utilisateur final L utilisation ou l installation incorrecte de cette lampe LED peut engendrer sa défaillance ou son endommagement L endommage ment de la lampe LED et du circuit électronique résultant d une installation et ou d une utilisation incorrecte du produit révoquera sa garantie Varování Montáž a instalace LED svítidla musí být v souladu s platnými místními zákony a předpisy Varo...

Страница 52: ...lných lišt do rámečku svítidla jak je znázorněno na obrázku výše 6 1 1 Sestavte rám Při instalaci berte v potaz směr když je zařízení zavěšeno je montážní držák LED nahoře 6 1 Montáž a instalace svítidel Při montáži přípravku buďte opatrní a ujistěte se že jsou všechna připojení správná a bezpečná Připojte rám A a B k nosnému rámu stisknutím tlačítka na konektoru rámu a zasunutím do objímky nosnéh...

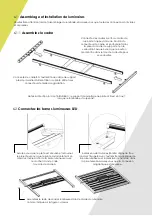
Страница 53: ...tní LED ovladač který může automaticky snížovat nebo zvyšovat výkon tak aby odpovídal množství 100W v závislosti na počtu instalovaných světelných lišt Pokud nejsou vyžadovány všechny světelné lišty ovladač bude čerpat pouze energii potřebnou pro množství připojených světelných lišt např pokud je připojeno šest světelných lišt bude k jejich napájení čerpat pouze 600 W Varování Před zapnutím musí b...

Страница 54: ...ání stmívače 6 7 Propojení světel do série pro externí ovládání Podrobné pokyny naleznete v příručce k ovládacímu panelu Lumatek Každé zařízení umístěte a vhodně zavěste Přístroje řady Zeus používají pro řízení signálový protokol 0 10V Připojte kabel ručního stmívače nebo kabel ovladače osvětlení k portu SIGNAL IN Připojte výstupní signální vodič řídicí jednotky k konektoru 1 SIGNAL IN pro připoje...

Страница 55: ...né díly Otevření LED svítidla může být nebezpečné a bude mít za následek ztrátu záruky Varování Vždy počkejte 20 30 minut než LED světelné lišty vychladnou Pozor LED svítidlo nečistěte čisticími prostředky abrazivy nebo jinými agresivními látkami Pravidelně kontrolujte zda se v LED zařízení nehromadí prach nebo nečistoty V případě potřeby jej vyčistěte Kontaminace může způsobit přehřátí a snížení ...

Страница 56: ......
Отзывы: