11
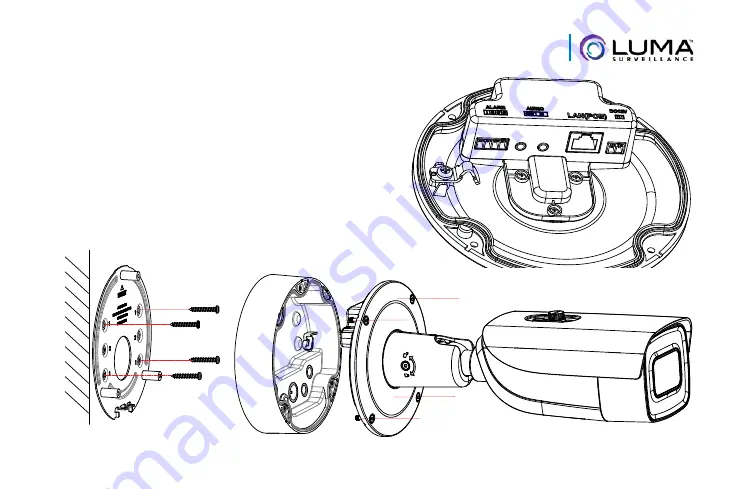
Luma 510/710 Series Bullet Camera
5. Plug the various cables into the appropriate
ports on the base of the camera.
6. Secure the base of the camera to the
waterproof housing.
7. Apply a caulk seal around the camera and
the conduit port.
Страница 1: ...710 Series Bullet 510 Series Bullet IP Surveillance Camera Quick Start Guide...
Страница 2: ...tional Required Equipment A network connection and an NVR if desired with admin rights to the network Mobile device with Luma Surveillance mobile app recommended or CCTV tester Power source PoE or 12V...
Страница 3: ...s local interface for installation See the NVR user s manual for details The web UI manual and other materials can be found on the product page at SnapAV com Ensure that the device is in good conditio...
Страница 4: ...registers stoves or other such heat generating equipment The performance and lifespan of the camera is affected by temperature For best results use this device in temperatures ranging from 14 140 F Cl...
Страница 5: ...s Bullet Camera Your Camera Before installing familiarize yourself with the parts of your camera Mounting Plate Lens and IR emitters Taillless Connector Sunscreen Adjustment Lock Waterproof Housing Ba...
Страница 6: ...6 Luma 510 710 Series Bullet Camera Your Camera s Utility Port Test Port Reset Button SD Card Slot...
Страница 7: ...e and activate your camera 2 Perform the physical installation of your camera by following the instructions given on pages 10 14 3 Plug your camera into your recorder The NVR autodetects your camera a...
Страница 8: ...rsions of the utility will not work Run the installer accepting all defaults Pre Installation Camera Configuration You ll find it easiest to connect the camera directly to your PC making most adjustme...
Страница 9: ...Luma utility window to activate the camera by creating a new secure password Passwords cannot be longer than 16 characters To ensure compatibility with the local interface only use numbers letters sp...
Страница 10: ...ugh it 3 Thread the cables through the waterproof housing as shown here Place your terminated category cable into the plastic needle and push the needle through one of the rubber nipples in the waterp...
Страница 11: ...eries Bullet Camera 5 Plug the various cables into the appropriate ports on the base of the camera 6 Secure the base of the camera to the waterproof housing 7 Apply a caulk seal around the camera and...
Страница 12: ...waterproof housing Depending on the size of your cable you can cut out the small portion in green to run a category cable or remove the plug entrely yellow to pass a cable bundle through Alternativel...
Страница 13: ...dows Install the LumaWebComponents plug in restart your browser and log in to your camera as admin using the password you created You may get a pop up that asks if you want to run the Luma Web Compone...
Страница 14: ...gles from 0 to 90 Finally the camera can rotate 360 within the elbow joint 1 Loosen the locking nut at the mounting base until the mount arm can rotate 2 Aim the camera as desired Ensure that it remai...
Страница 15: ...Setup Best Practices Be sure to complete customization of the camera using the NVR s web interface Set up DDNS Add additional users Calibrate the time settings Set up recording schedule Enable motion...
Страница 16: ...nd to be defective in material or workmanship under normal conditions of use This warranty shall not apply to products that have been abused modified or disassembled Products to be repaired under this...