9
LSL160
Calibration Check
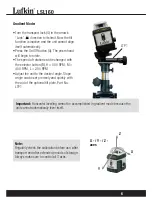
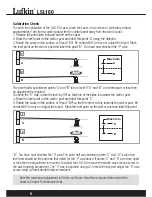
To check the calibration of the LSL160 Laser, place the Laser on a surface or preferably a tripod
approximately 10m from a wall or post with the control panel away from the wall or post.
1. Release the pendulum lock and switch on the Laser.
2. Mark the level point on the wall or post and label this point “A” using the detector.
3. Rotate the Laser on the surface or Tripod 180º. Be certain NOT to move or adjust the tripod. Mark
the level point on the wall or post and label this point “B”. You have now checked the “Y” axis.
The point half way between points “A” and “B” is true level. If “A” and “B” are 4mm apart or less then
no adjustment is required.
To check the “X” axis, rotate the level by 90º so that one of the sides is towards the wall or post.
4. Mark the level point on the wall or post and label this point “C”.
5. Rotate the Laser on the surface or Tripod 180º so that the other side is towards the wall or post. Be
certain NOT to move or adjust the tripod. Mark the level point on the wall or post and label this point
“D”. You have now checked the “X” axis. The point half way between points “C” and “D” is also true
level and should be the same as that noted for the “Y” axis above. If points “C” and “D” are 4mm apart
or less then no adjustment is required. To adjust the LSL160 remove the plastic cross recess screw in
the axis requiring adjustment. The “Y” axis is adjusted using a 2.5mm Allen key and adjust the “X” axis
screw using a 2mm straight blade screwdriver.
A
B
Max 4mm
1
A
2
B
C
D
Max 4mm
1
C
2
D
Note the maximum adjustment is 20mm so if more than this is required then return the
Laser to Cooper Tools service dept.


