background image

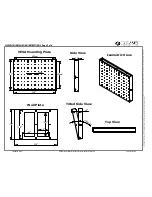
LC6X42WTM Back

Electrical and/or A/V

wiring plug box cutout

#14 X 2-1/2" Lag Screws

This end up.

Protected under one or more of these U.S. Patent numbers: 3,291,432  3,559,942  3,724,798  DES.270,689  4,613,109  4,878,645  4,852,842  DES.309,5624,973,023  5,169,114  5,255,884  5,310,152  5,522,576  5,621,614  Re.35,677   DES.398,834  5,826,384  5,941,492  5,964,068  6,060,661  6,102,398  6,158,704 6,454,116B1 6,761,276B2 6,806,425B1

Page 4 of 6

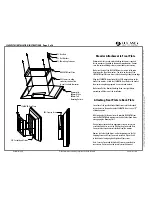
Determine the best possible viewing location for your

monitor taking into account the tilt angle to be used.

Locate a stud using a stud finder in the location

where the monitor is to be mounted.  

Follow the instructions that come with the toggle bolt

kit to install the toggle bolt plastic retainers at

each of the mounting hole locations.

Use the Screws provided with the toggle bolt kit 

to attach the LC6X4WTM Back to the wall.

(Using optional WMATB3 Toggle Bolt Kit)

Metal Stud Installation

Determine the best possible viewing location for your

monitor taking into account the tilt angle to be used.

Locate two wood studs 16" apart using a stud finder in

the location where the monitor is to be mounted.  

(Optional Toggle Bolts are required for metal stud

installations) 

Use the LC6X4WTM Back Plate as a template to mark

the locations for six pilot holes in the wood studs.

Drill 2-3/4" deep pilot holes using a 1/8" drill bit

in the six marked locations.

Use the provided #14 x 2-1/2" Lag Screws to attach

the LC6X4WTM Back Plate to the wall.

Wood Stud Installation

LC6X4WTM INSTALLATION INSTRUCTIONS

LC6X4WTM  (9/09)                                                                                                          ©2009 Lucasey Manufacturing Corporation, Oakland, California                                                                                            www.lucasey.com

Содержание LC6X4WTM

Страница 1: ...d installers only using construction methods prescribed by authorized architects or engineers that comply to all applicable codes and standards The maximum weight of monitor to be installed on the LC6X4WTM is 150 Lbs 68 2Kg Inspect all parts to make sure there is no shipping damage Do not install if any parts are damaged Please call 1 800 LUCASEY or 1 510 534 1435 if you have any questions about t...

Страница 2: ...ount and or damage to the electronic components inside the monitor Page 1 Title Page Product Description Page 2 Warnings Item List Tools Required Page 3 Dimensional Drawings Page 4 Installation Instructions for LC6X4WTM Wall Plate Page 5 Installation Instructions for Monitor Attachment Page 6 Tilt Adjustment Monitor Removal Warranty Table of Contents Stud Finder Drill with 1 8 Drill Bit Phillips S...

Страница 3: ...nt numbers 3 291 432 3 559 942 3 724 798 DES 270 689 4 613 109 4 878 645 4 852 842 DES 309 5624 973 023 5 169 114 5 255 884 5 310 152 5 522 576 5 621 614 Re 35 677 DES 398 834 5 826 384 5 941 492 5 964 068 6 060 661 6 102 398 6 158 704 6 454 116B1 6 761 276B2 6 806 425B1 Page 3 of 6 LC6X4WTM INSTALLATION INSTRUCTIONS LC6X4WTM 9 09 2009 Lucasey Manufacturing Corporation Oakland California www lucas...

Страница 4: ...bolt plastic retainers at each of the mounting hole locations Use the Screws provided with the toggle bolt kit to attach the LC6X4WTM Back to the wall Using optional WMATB3 Toggle Bolt Kit Metal Stud Installation Determine the best possible viewing location for your monitor taking into account the tilt angle to be used Locate two wood studs 16 apart using a stud finder in the location where the mo...

Страница 5: ...into the threaded inserts farthest from the monitor Remove the Socket Head Screws only after making sure the Tilt Adjusting Screws and Pivot Screws are installed Adjust the tilt to the desired viewing angle and tighten all four screws Note Security Screws and Socket Head Screws are provided for convenience Either can be used to safely install the mount Attaching Front Plate to Back Plate Determine...

Страница 6: ...lowance for outside labor charges are implied within the terms of this limited warranty Under no circumstances will Lucasey Manufacturing Corporation be responsible for special indirect or consequential damages The remedies set forth in this Limited Warranty are exclusive and the liability of Lucasey Manufacturing Corporation with respect to any contract of sale or anything done in connection ther...

Отзывы: