00P677280ZSEB3
Integrated High Speed Dome Camera
Outdoor Dome
Installation Guide
Version 1.3
Страница 1: ...00P677280ZSEB3 Integrated High Speed Dome Camera Outdoor Dome Installation Guide Version 1 3...
Страница 2: ...be copied photocopied translated reproduced or reduced to any electronic medium or machine readable format in whole or in part without prior written permission of the company Important Information Bef...
Страница 3: ...vironment and human health which could otherwise be caused if this product is thrown into the garbage bin The recycling of materials will help to conserve natural resources For more details informatio...
Страница 4: ...s or covers There are no user serviceable parts inside Ask a qualified service person for servicing Do not block cooling holes on the bracket This camera has a cooling fan inside Blocking the cooling...
Страница 5: ...ection 15 4 Dome Installation 17 4 1 Dome Dimension 17 4 2 Optional Accessories 17 4 3 Ceiling Mounting with Straight Tube 23 4 4 Wall Mount 25 4 4 1 Wall Mounting with Gooseneck Tube 25 4 4 2 Mini Pe...
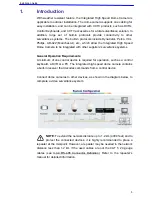
Страница 6: ...with other suppliers surveillance systems General Operation Requirements A minimum of one control device is required for operation such as a control keyboard a DVR or a PC The integrated high speed d...
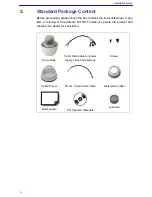
Страница 7: ...ems listed here If any item is missing or has defects DO NOT install or operate the product and contact your dealer for assistance Dome Body 50 cm Data Cable for power supply video and telemetry Screw...
Страница 8: ...s switch settings 3 1 Preparations for Dome Setups The following installation procedure is for the outdoor dome equipped with the sunshield housing Please follow the steps below to complete dome housi...
Страница 9: ...he installation process smoother Note that the tiny protrusion on the dome cover must align with one of the four holes on the dome body STEP 5 Gently pressure the dome cover downward with two hands on...
Страница 10: ...other devices of CCTV system please complete the dome ID and communication switch settings These switches are located on the bottom of the dome camera 3 2 1 Switch Definition Please refer to the follo...
Страница 11: ...lows Please do not change the default setting without qualified specialist or supplier s notice As for the SW 3 and SW 4 they are used for termination and Line Lock adjustment respectively The SW 5 is...
Страница 12: ...ifferent manufacturers Use the switch to set your dome control protocol and the baud rate Refer to the table below and turn the arrow to choose a protocol for your speed dome Switch No Protocol Baud R...
Страница 13: ...ice 3 3 1 Cable Requirements For operation the integrated high speed dome cameras require video and data cables as described below The video cable sends video signals to a remote viewing site Using a...
Страница 14: ...Furthermore when wiring the power cable make sure the G Y wire Ground inserted into the mid pin of the terminal block 3 3 3 22 Pin Connector Definition With the 22 pin connector installers can simply...
Страница 15: ...to section 3 3 5 Cable Wiring and Connection 3 3 4 RS 485 Connector Definition RS 485 is the interface that communicates the dome camera and its control device Please connect the control keyboard to t...
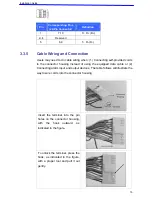
Страница 16: ...input and output devices The table follows will illustrate the way to wire cords into the connector housing Insert the terminal into the pin holes on the connector housing with the hook outward as ind...
Страница 17: ...Installation Guide 16 Connect the 22 pin connector to the dome camera...
Страница 18: ...es will be described in detail 4 1 Dome Dimension The dome dimension is 172 x 302 5mm 6 7x11 9 Inches and 190 x 302 5mm 7 5x11 9 Inches with sunshield The diagrams below show detailed dimension for th...
Страница 19: ...wire Ground inserted into the mid pin of the terminal block Mounting Accessories Gooseneck Tube White Iron 298 385 mm 11 73 15 56 inches 2 1 kg 4 6 lbs Supplied with rubber washer 8 1 pendant tube wa...
Страница 20: ...washer 8 1 and waterproof rubber 1 M8 12 screw 1 Corner Standard Mounting Plate White 222 L 204 W 117 D mm 8 7 8 4 6 inches 2 kg 4 4 lbs Supplied with washer 8 4 spring washer 4 M8 20 screw 4 M8 nut...
Страница 21: ...screw 4 washer 4 spring washer 4 Corner Thin Box White Ivory 300 L 164 W 222 D mm 11 8 6 5 8 7 inches 3 kg 6 7 lbs Supplied with washer 4 M8 16 screw 4 and spring washer 4 Power Box can be set inside...
Страница 22: ...side the thin box Pole Wide Box White Ivory 270 L 166 W 155 D mm 10 6 6 5 6 1 inches 3 2 kg 7 1 lbs Supplied with M8 16 screw 4 washer 4 spring washer 4 stainless steel straps 4 Power Box can be set i...
Страница 23: ...Box Mounting White Ivory 270 L 166 W 95 D 10 6 6 5 3 7 inches 2 2 kg 4 84 lbs Supplied with M8 16 screw 4 washer 4 spring washer 4 Power Box can be set inside the wall box Stainless Steel Straps For f...
Страница 24: ...VAC 72VA P2030 Input 220 230VAC Output 24VAC 72VA Signal Distribution Unit Relay control codes to speed dome cameras Dimension 432 44 90 mm 17 17 32 35 43 inches Coaxial Box Transmit video and RS 485...
Страница 25: ...x the Straight Tube to the ceiling with proper screws and screw anchors not supplied Please replace the rubber equipped with the gooseneck straight tube with the waterproof rubber packed in the standa...
Страница 26: ...ow the steps to mount the dome with the gooseneck tube 1 Make a cable entry hole on the wall to recess the cables Otherwise cables can be threaded through the cable entry hole on the tube 2 Fix the Go...
Страница 27: ...for fixing the Mini Pendant Mount not supplied Tools Needed Tool for drilling Tool for screwing Follow the steps to mount the dome with the Mini Pendant Mount 1 Make a cable entry hole on the wall to...
Страница 28: ...the cables to the dome camera Then attach the dome to the top holder and fix them with the supplied screw 4 4 3 Wall Box Mounting Items Needed Dome Camera Gooseneck Tube and other equipped items opti...
Страница 29: ...the top holder to the gooseneck tube with the supplied screws and washers Then adjust the waterproof rubber to the junction of straight tube and top holder 5 Connect the cables to the dome camera The...
Страница 30: ...nd screw anchors not supplied 3 Attach the gooseneck tube to the fixed mounting plate with the supplied screws and washers Please replace the rubber equipped with the gooseneck straight tube with the...
Страница 31: ...wise cables can be threaded through the cable entry hole on the tube 2 Fix the Corner Thin Wide Box on corner wall with proper screws and screw anchors not supplied 3 Attach the gooseneck tube to the...
Страница 32: ...ube and other equipped items optional accessory Waterproof Rubber standard accessory Pole Thin Wide Direct Mounting optional accessory Stainless Steel Straps optional accessory Tools Needed Stainless...
Страница 33: ...hen attach the dome to the top holder and fix them with the supplied screw Pole Direct Mount Pole Thin Wide Direct Mounting Gooseneck Tube Waterproof Rubber 4 6 2 Pole Thin Wide Box Mounting Items Nee...
Страница 34: ...3 Thread the cables through the gooseneck tube and the top holder 4 Fix the top holder to the gooseneck tube with the supplied screws and washers Then adjust the waterproof rubber to the junction of s...
Страница 35: ...ly users can either connect one dome camera to one power box and to Internet or to other control devices DVR Control Keyboard and monitors as shown in the diagrams below For more detailed information...
Страница 36: ...ity The exiting network can be protected by the repeaters converters Up to 10 devices are allowed to connect to one repeater converter For detailed information please refer to the repeater converter u...
Страница 37: ...with cameras up to 1 0 kilometers away Additionally the SDU can be installed in either star or daisy chain configuration with up to 160 cameras see the diagrams below Its versatile installation config...
Страница 38: ...as and controlling devices e g DVR and keyboard It simplifies the work of wiring by transmitting video and RS 485 control signals via one BNC line so that to bring users economical benefits The follow...
Страница 39: ...our speed dome by a keyboard with D and P protocols Function Instruction Set Preset Number key press and hold Preset button for three seonds Go Preset Number key Preset to command a dome camera to go...
Страница 40: ...stems Symbol Definition shot Command dome cameras to go to specific preset position set Set preset position Special Function 7 6 set Exit OSD menu directly 7 7 set 1 Display or hide OSD menu 2 Virtual...
Страница 41: ...French German Italian Japanese Polish Portuguese Russian Spanish Pan Travel 360 endless Tilt Travel 10 100 10 190 Manual Speed 1 70 s Presets 64 Pan 0 45 Preset Accuracy Tilt 0 45 Pan 5 250 s Preset...