background image

L7C Series AC Servo Drives Quick Start Guide

Page 45 of 60

L7C Servo Drives Quick Start Guide – 1st Ed. Rev A, 11/29/2021

Velocity Mode

Velocity Mode (Speed Command) using the Setup Wizard for Simple Motion Commissioning

Below is a simple walk through of minimal settings to establish a speed application with a variable 

torque limit.  Other object configuration settings may be required for your specific needs.  See the user 

manual for details. The example below will allow the application to select between 8 preset speeds 

(saved in the drive) and/or the analog speed input.  The changes are made by toggling 3 digital inputs:  

SPD1, SPD2, SPD3

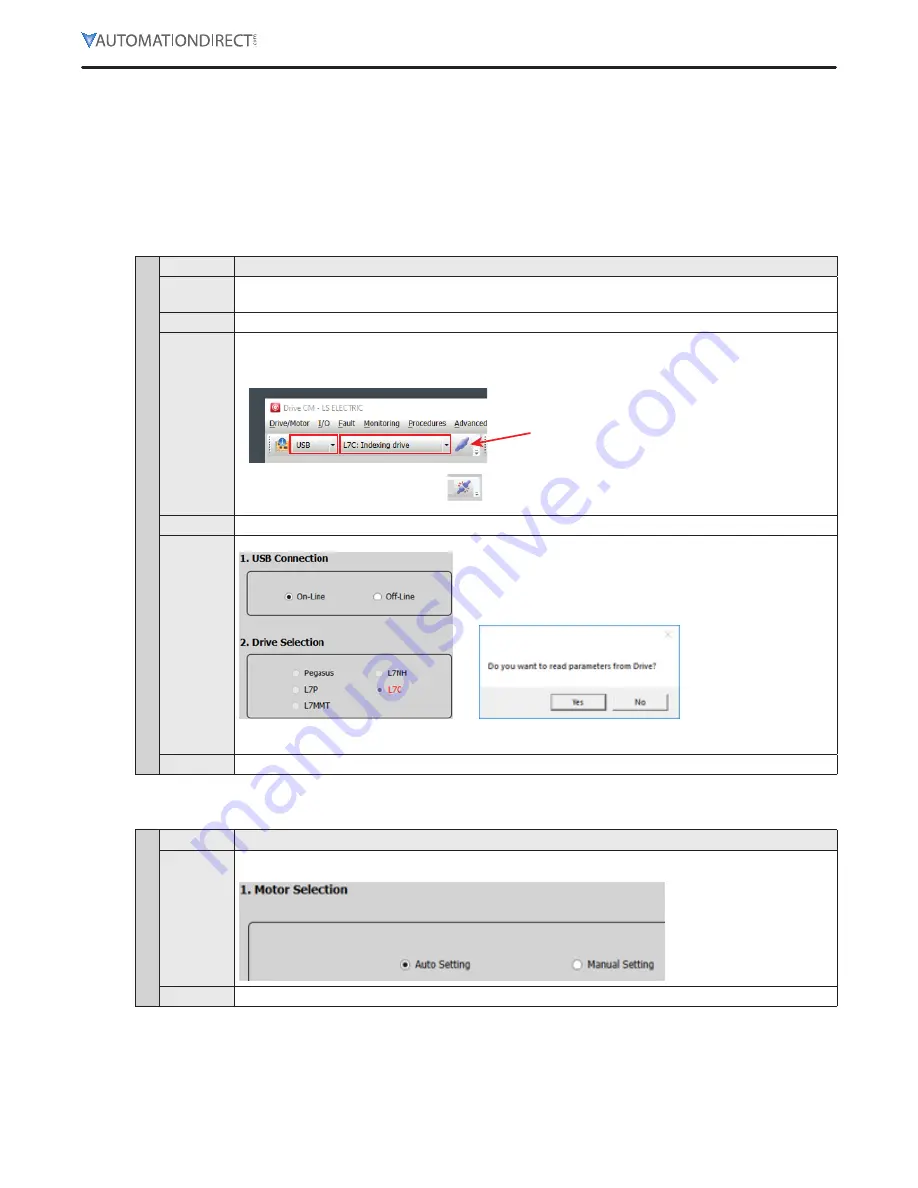
Step 1: Drive Selection

Velocity Mode S

tep 1

Substep

Task

A

Using a standard USB A to USB mini-B cable (such as SV2-PGM-USB15, MOSAIC-CSU, etc), connect the 

PC to the Drive

B

Start Drive CM software

C

Select 

L7C: Indexing Drive

 and press the 

Connect

 button The software should begin to communicate 

with the drive A green flashing square should appear in the bottom right corner of the screen indicating 

comms traffic

Push to 

connect

After connecting, icon 

will change to this. Push 

to disconnect

D

Click on 

Setup Wizard

E

In the USB Connection window, choose 

On-Line

 and click 

Yes

 to read parameters from the drive


If the 

On-Line

 radio button is not available and greyed out, click on 

Setup Wizard

 again This should 

restart the Setup Wizard and enable the button Click 

On-Line

 and 

Yes

 to read drive parameters 

F

Click 

Next

Step 2: Motor/Encoder Selection

Velocity Mode S

tep 2

Substep

Task

A

Select 

Auto Setting

 for motor selection 

B

Click 

Next

Содержание L7C Series

Страница 1: ...kStart Guide and the L7C User Manual when commissioning an L7C servo system A note on Part Numbers LS Electric servo parts sold by AutomationDirect have part numbers that end with a AD This suffix signifies special packaging and labeling for AutomationDirect All the LS servo products with the AD function and behave exactly the same as the standard LS Electric parts Please note that when reading th...

Страница 2: ...ng and Option Details 17 LED Display 19 Alarms 19 Warnings 19 Drive CM Software 20 AutomationDirect Foreword 20 Getting Started 20 Using the Drive CM Software 22 I O Configuration 24 Digital Inputs 24 Digital Outputs 26 I O Connection Analog Torque Input 28 I O Connection Analog Velocity Input 28 Index Position Mode 29 Indexing Position Mode using the Setup Wizard for Simple Motion Commissioning 2...

Страница 3: ...ly qualified and trained technicians may perform wiring on this product WARNING Do not operate the servo system with wet hands WARNING Do not open the servo drive cover during operation WARNING Do not operate the servo system with the servo drive cover removed WARNING Do not touch the heat sink of the servo drive when it is connected to power and operating This component gets very hot and will sca...

Страница 4: ...2 5G or lower Excessive vibration can cause malfunctions and reduces the lifespan of the drive Ambient Conditions Do not expose the drive to direct sunlight Do not expose the drive to corrosive or combustible gases Do not expose the drive to oil or dust Ensure that the drive receives sufficient ventilation even if installed in a confined place Motor Condition Requirement Notes Operating Temperatur...

Страница 5: ... are connected At the very least make sure the E Stop circuit is connected Refer to I O Connection Wiring Diagram with Default Functions on page 15 C Ensure the Motor Encoder cable is connected Do not simply plug the connector into the motor Use the captive screws to ensure the connector is secure Intermittent encoder connection can wreak havoc with the system D Ensure the Motor Brake cable is con...

Страница 6: ...lick on Setup Wizard again This should restart the Setup Wizard and enable the button C Follow the steps in the Setup Wizard to define your application 1 For initial setup and system testing allow the Setup Wizard to choose the default selections After completing this hardware test verification you can go through the rest of this guide and refer to the User Manual if you want to customize your con...

Страница 7: ...e drive is different than the value in the software Click in that field and press Enter to send the updated value to the drive G Press Drive ON to enable the drive from the software The drive s LED should read S run servo is in run mode H Press Negative or Positive to jog the motor Once the motor jogs you have verified the power wiring servo drive motor and motor cables are connected properly Step...

Страница 8: ...tch 3 Operation Switch Up Down 4 Main Power Terminal L1 L2 5 External Regenerative Resistor Terminals B B 6 Servo Motor Connecting Terminal U V W 7 Ground separate terminals for incoming ground and motor cable ground 8 Setup Switch 9 USB Connector for software config only 10 Control Signal Connector CN1 I O 11 Encoder Connector CN2 ENCODER APMC Servo Motor Part Number Explanation The meaning of th...

Страница 9: ...connecting the servo drive from the power supply or discharge the electricity with a discharge device Isolate the wires at the wiring terminal Make sure the wiring is correct to avoid damage or any abnormal operation Check for and remove any electrically conductive objects including metal sheet and screws or flammable objects inside or near the servo drive Make sure the emergency stop switch is OF...

Страница 10: ...N10LSC AD 10m 32 8 ft APCS PN20LSC AD 20m 65 6 ft APCS PF03LSC AD Y 3m 9 8 ft LS Electric flexing power cable for use with FBL FCL series motors APCS PF05LSC AD 5m 16 4 ft APCS PF10LSC AD 10m 32 8 ft APCS PF20LSC AD 20m 65 6 ft Motor Encoder Cable 1 7 8 14 Pin No Encoder Signal 1 2 3 MA 4 MA 5 SLO 6 SLO 7 0V Pin No Encoder Signal 8 9 10 11 12 13 14 5V Plate SHIELD Pin No Encoder Signal Pin No Enco...

Страница 11: ...c flexing brake cable for use with FBL FCL series motors APCS BF05QS AD 5m 16 4 ft APCS BF10QS AD 10m 32 8 ft APCS BF20QS AD 20m 65 6 ft Drive I O Cables Drive Connec on I O You can download a printable terminal label at https www automationdirect com pn APC VSCN1T AD See terminal assignments table on the following page Part Number Length Description APC VSCN1T AD 0 5 m 1 6 ft LS Electric CN1 feed...

Страница 12: ...low Red 3 A9 17 DI 5 Yellow Black 4 B9 18 DI 9 Yellow Red 4 A10 19 DI 8 Yellow Black 5 B10 20 DI 7 Yellow Red 5 A11 21 DI 4 Gray Black 1 B11 22 DI 3 Gray Red 1 A12 23 DI 2 Gray Black 2 B12 24 DO GND24 Gray Red 2 A13 25 DO GND24 Gray Black 3 B13 26 N C Gray Red 3 A14 27 AI 2 SPDCOM Gray Black 4 B14 28 N C Gray Red 4 A15 29 N C Gray Black 5 B15 30 B0 Gray Red 5 A16 31 B0 White Black 1 B16 32 AO Whit...

Страница 13: ...er to Section 10 11 Regenerative Resistance External Regenerative Resistor Connection POT NOT HOME Motor Cable Encoder Cable Input Output Cables Servo Motor Servo Drive 3 RS 422 Communication and I O RS 422 Communication Cable compatible with RS485 PLCs such as Click Productivity and Do More NOTE Do not use APC VSCN1T xx AD or APC VPCN1T AD if using PLC Drive serial communication Communication may...

Страница 14: ... 5A max 10A max Fuse 15A max 30A max Noise Filter NF TB6 B010LBEI MC 11A 240V 18A 240V L1 L2 B B U V W 1 12 16 AWG Screw Terminal Ferrule 16AWG 6mm Strip Twist Connector LS Electric p n BCP 508F 7 BK Phoenix AutomationDirect p n 5452573 1 Select and use 600V PVC insulated wires To comply with UL CSA standards use UL certified wires that have a heat resistant temperature of 75 C or above To comply ...

Страница 15: ... ALO1 15 TGON ALO2 14 TLMT ISEL5 H START INHIBIT MODE PAUSE ABS_RQ JSTART JDIR IOUT3 IOUT4 IOUT5 DI9 DIA AGND 8 1 TRQCOM AGND 8 27 SPDCOM Analog input 10V 10V Encoder output AO 32 AO 33 BO 30 BO 31 ZO 4 ZO 5 Upper level controller 49 PULCOM Line drive Open collector Upper level controller Analog torque input Command limit Analog velocity input Command override TXD 3 10V 10V PCLR AOVR LVSF1 LVSF2 G...

Страница 16: ...VDC 24V IN R1 3 3KΩ R2 680Ω Digital Outputs 1 You can set the output to contact A normally open or Contact B normally closed 2 You can assign each output contact to one of 19 output functions 3 For more information on signal assignment and change of the output contact refer to the User Manual section 10 2 Input Output Signals Setting The Drive CM software makes setting the I O signals very quick a...

Страница 17: ...is 10V to 10V 3 The impedance for input signals is approximately 10KΩ Servo drive DC 24V AGND 8 1 AGND 8 27 SPDCOM R2 R1 TRQCOM R2 R1 DC 24V 4 Example of resistance selection for use of 24V for input voltage No R1 R2 1 5KΩ 6KΩ 2 10KΩ 12KΩ 5 Examples of using internal 12V and 12V power sources AGND 8 1 27 R2 R1 Analog Input 34 12 V 12 V 35 R2 0 1 uF AGND 8 1 27 R2 R1 34 12 V Analog Input 6 Example ...

Страница 18: ... 12 12V or 5V NPN Open Collector Pulse Command PR PF PF PR Servo drive 12V or 5V Upper level controller FG GND NPN Power note 1 NOTE When using 5V power Resistance R 100 150 Ω 1 2 W When using 12V power R 560 680 Ω 1 2 W When using 24V power R 1 5 kΩ 1 2 W Pulse Format Signal Pulse Direction CW CCW Quad L7C Label and Pin Productivity PLC HSO Terminals Productivity PLC AMC Motion Line Driver A or A...

Страница 19: ...L 11 IPM Temperature IPM Overheat AL 15 Current offset abnormality AL 21 Continuous Overload Abnormality AL 22 Drive Temperature Overheat 1 AL 23 Regeneration Overload AL 24 Motor Cable Open AL 25 Drive Temperature Overheat 2 AL 26 Encoder Temperature Reserved AL 30 Encoder Communication Error AL 31 Encoder Cable Open AL 32 Encoder Data Error AL 38 Encoder Setting Error AL 33 Motor ID Setting AL 3...

Страница 20: ...rong with this approach but it may be more direct than most software packages that are in use today Getting Started Drive CM software provides the fastest and easiest way to set up the LS Electric L7C drive The following steps show how to get started with the software and a few key features Before starting you will need PC with Windows 8 or later PC USB port USB Type A to miniB cable SV2 PGM USB15...

Страница 21: ...and L7C drive 2 Then press the Cable icon to connect and establish communications with the drive Push to connect After connecting icon will change to this Push to disconnect NOTE The icon does not show the current comms state it shows what will happen if you push the button The comms status is displayed at the bottom left corner of the software screen A green blinking square indicates active commu...

Страница 22: ...sed to run the Setup Wizard The Setup Wizard will walk you step by step through setting up the basic parameters of the system NOTE If you exit the Setup Wizard before completing the process you will have to restart the wizard from the beginning The Setup Wizard will not update the drive s parameters or the parameters in the object dictionary until they are written to the drive NOTE In the About dr...

Страница 23: ...tion needed for auto identifiable FBL FCL motors General Configuration Setup Fault Configuration Controls Loop Manual Tuning Object Dictionary Parameters Index Edit configure point to point moves indexes Indexer Test Auxiliary Window PTP Move Jog Manual Torque Control Homing Tuning Digital Input Analog Input Digital Output Analog Monitor Save to Drive Memory n a Command only Reset Servo Alarm Soft...

Страница 24: ...y icon NOTE When making these changes while the software is connected to the drive the change will take affect immediately there is no Are you sure warning Example Changing an SVON digital input from NO to NC by pressing the Edge button will cause the drive to change state immediately This feature of immediate changes from NO NC can be used for forcing a digital input for testing and troubleshooti...

Страница 25: ...0011 PAUSE Pause index 0x8012 0x0012 REGT Registration input 0x8013 0x0013 HSTART Start homing 0x8014 0x0014 ISEL0 Selection position 0 0x8015 0x0015 ISEL1 Selection position 1 0x8016 0x0016 ISEL2 Selection position 2 0x8017 0x0017 ISEL3 Selection position 3 0x8018 0x0018 ISEL4 Selection position 4 0x8019 0x0019 ISEL5 Selection position 5 0x801A 0x001A ABSRQ Request absolute position data 0x801b 0...

Страница 26: ...output check box Alternatively you can open the parameter object dictionary using the Object Dictionary menu button or the Object Dictionary icon NOTE When making these changes while the software is connected to the drive the change will take affect immediately there is no Are you sure warning Example Changing an SVON digital input from NO to NC by pressing the Edge button will cause the drive to ...

Страница 27: ...0x08 INSPD Velocity is reached 0x800b 0x09 WARN Servo warning 0x800C 0x0A TGON Output rotation detection 0x800F 0x0B INPOS2 Complete position reach 2 0x8010 0x10 ORG Complete homing 0x8011 0x11 EOS Complete drive coordinate 0x8012 0x12 IOUT0 Complete drive coordinates 0 0x8013 0x13 IOUT1 Complete drive coordinates 1 0x8014 0x14 IOUT2 Complete drive coordinates 2 0x8015 0x15 IOUT3 Complete drive co...

Страница 28: ...eter from AutomationDirect is a good option for providing a 10 to 10 volt supply and control signal See page 53 for Analog Torque configuration settings I O Connection Analog Velocity Input The L7C drive has an analog 10V 10V analog velocity signal This signal can be used as an analog velocity command in Analog Velocity Command Mode or can be used as an analog velocity override in Index Position m...

Страница 29: ... Drive B Start Drive CM software C Select L7C Indexing Drive and press the Connect button The software should begin to communicate with the drive A green flashing square should appear in the bottom right corner of the screen indicating comms traffic Push to connect After connecting icon will change to this Push to disconnect D Click on Setup Wizard E In the USB Connection window choose On Line and...

Страница 30: ... a maximum of 19 200 baud D Set Start Index Number Object 0x3008 This allows you to select index numbers 0 63 for which index number will be called when the START signal is applied Setting this parameter to a value of 64 allows you to use the digital inputs for index selection using a binary pattern ISEL0 ISEL5 Option 64 is selected for this example E Set Index Buffer Mode Object 0x3009 allows you...

Страница 31: ...ect the Analog Velocity Override Function only available in Index Mode This will allow the 10V to 10V analog velocity input scale to override the commanded velocity 0 to 200 See Section 4 5 in the User Manual for more details about 0x2215 0x220F 0x221E and 0x221E B Click Next to set the Rotation Direction This sets which motor direction is considered positive or negative If this isn t known it can...

Страница 32: ... will be used later in the Index example To do this set the Electronic Gear numerator to the 17 bit encoder value encoder pulses per motor rev and set the denominator to your desired User Units rev Set Electronic Gear Numerator 1 0x300C 131072 encoder pulses per motor rev Set Electronic Gear Denominator 1 0x3010 360 user units per motor rev Now all Index positions speeds accelerations and decelera...

Страница 33: ...and Dynamic Brake Control Mode screen More information can be found in the User Manual under Dynamic Brake Control Mode 0x2012 and Emergency Stop Configuration 0x2013 B Click Next Step 7 Set Brake Signal Setting Index Mode Step 7 Substep Task A For initial setup and testing choose the defaults for these settings on the Brake Signal Setting screen More information can be found in the User Manual un...

Страница 34: ...Uses the value of 0x3023 as the Rev direction torque limit Internal Torque Limit 2 1 Uses a constant 300 of rated motor torque as the Fwd and Rev torque limits External Torque Limit 2 Uses the value of 0x2111 as the Fwd direction torque limit Uses the value of 0x2112 as the Rev direction torque limit Internal and External Torque Limit 3 Uses the value of 0x3022 when Digital Input P_CL is on and th...

Страница 35: ...gital Output in the Setup Wizard C Configure Outputs 1 through 3 as shown below Configure additional outputs as needed for your application The IOUT outputs will signal the Index that is currently in operation in binary code D Click Next Step 11 Set Homing Method Setting Index Mode Step 11 Substep Task A On the Homing Method Setting screen select the Homing method appropriate for your application ...

Страница 36: ...ite to Drive to download the configuration to the drive The drive MUST NOT be enabled during download The software will not acknowledge that certain parameters were not changed so ensure that the drive is not enabled before pressing Write to Drive This Write to Drive button also saves the settings to memory C After download is complete either power cycle the drive ensuring the LED display turns of...

Страница 37: ...atile memory You must still press the Write to Drive button in the Setup Wizard or Save to Memory button in the toolbar for the settings to survive a power cycle C Click the Indexer Test button on the toolbar The Indexer Test window will open D Switch SVON DI1 to ON E Switch START DI3 to ON Sometimes the START button must be pressed twice to initiate an index F Index 0 will begin executing if not ...

Страница 38: ...he PC to the Drive B Start Drive CM software C Select L7C Indexing Drive and press the Connect button The software should begin to communicate with the drive A green flashing square should appear in the bottom right corner of the screen indicating comms traffic Push to connect After connecting icon will change to this Push to disconnect D Click on Setup Wizard E In the USB Connection window choose...

Страница 39: ...e as follows Pulse or CW signal will terminate to pin 9 PF A5 and pin 10 PF B5 Sign or CCW signal will terminate to pin 11 PR A6 and pin 12 PR B6 See section 2 5 6 of the User Manual for more details and how to connect Open Collector high speed pulses Note The pin numbers in the image in the software are for a different LS Electric drive Be sure to use pins 9 10 11 and 12 C For Pulse Input Filter ...

Страница 40: ...p C C If desired set the Electronic Gear ratio so that one motor revolution 360 user units 360 user units rev will be used later in the Index example To do this set the Electronic Gear numerator to the 17 bit encoder value encoder pulses per motor rev and set the denominator to your desired User Units rev Set Electronic Gear Numerator 1 0x300C 131072 encoder pulses per motor rev Set Electronic Gea...

Страница 41: ...and Dynamic Brake Control Mode screen More information can be found in the User Manual under Dynamic Brake Control Mode 0x2012 and Emergency Stop Configuration 0x2013 B Click Next Step 7 Set Brake Signal Setting Pulse Mode Step 7 Substep Task A For initial setup and testing choose the defaults for these settings on the Brake Signal Setting screen More information can be found in the User Manual un...

Страница 42: ...00 300 Option Description Internal Torque Limit 1 0 Uses the value of 0x3022 as the Fwd direction torque limit Uses the value of 0x3023 as the Rev direction torque limit Internal Torque Limit 2 1 Uses a constant 300 of rated motor torque as the Fwd and Rev torque limits External Torque Limit 2 Uses the value of 0x2111 as the Fwd direction torque limit Uses the value of 0x2112 as the Rev direction ...

Страница 43: ...e In Position signals if you will use Digital Outputs INPOS1 and INPOS2 B Click Next Step 10 Set the I O Signal Setting Pulse Mode Step 10 Substep Task A On the Digital Input screen configure Inputs 1 through 5 as shown below Configure additional inputs as needed for your application B Click Next to go to Digital Output in the Setup Wizard C Configure Outputs 1 through 3 as shown below Configure a...

Страница 44: ...ur Configuration Pulse Mode Step 12 Substep Task A Select Save to File to save the configuration file to your PC B Select Write to Drive to download the configuration to the drive The drive MUST NOT be enabled during download The software will not acknowledge that certain parameters were not changed so ensure that the drive is not enabled before pressing Write to Drive This Write to Drive button a...

Страница 45: ...p Task A Using a standard USB A to USB mini B cable such as SV2 PGM USB15 MOSAIC CSU etc connect the PC to the Drive B Start Drive CM software C Select L7C Indexing Drive and press the Connect button The software should begin to communicate with the drive A green flashing square should appear in the bottom right corner of the screen indicating comms traffic Push to connect After connecting icon wi...

Страница 46: ...ween SPD1 SPD2 SPD3 Analog Input SPDCOM and the command velocity Setting Values Setting Details SPD1 SPD2 SPD3 Speed Command 0 Use analog velocity commands n a n a n a Analog Input 1 Use SPD1 SPD2 contact and analog velocity commands OFF OFF n a Speed 1 0x2312 ON OFF n a Speed 2 0x2313 OFF ON n a Speed 3 0x2314 ON ON n a Analog input 2 Use SPD1 SPD2 and SPD3 contact and analog velocity commands OF...

Страница 47: ...fferent scaling adjust these settings For more information see 0x2214 0x2217 in the User Manual C Set the Analog Velocity Command Clamp Level Object 0x2216 This is the same as a deadband The value entered here will cause the shaft speed to remain at 0 RPMs until the analog speed command is above 20 RPMs D Click Next Step 5 Set Rotation Direction Velocity Mode Step 5 Substep Task A Set rotation dir...

Страница 48: ...er revolution and Output Mode Logic For initial test and setup leave these settings at default For more information see section 10 12 Encoder Output Signal in the User Manual C Click Next Step 7 Set Emergency Stop and Dynamic Brake Control Velocity Mode Step 7 Substep Task A For initial setup and testing choose the defaults for these settings on the Emergency Stop Configuration and Dynamic Brake C...

Страница 49: ... Set Brake Signal Setting Velocity Mode Step 8 Substep Task A For initial setup and testing choose the defaults for these settings on the Brake Signal Setting screen More information can be found in the User Manual under Brake Output Speed 0x2407 Brake Output Delay Time 0x2408 and PWM Brake Delay Off Time 0x2012 B Click Next ...

Страница 50: ...ption Description Internal Torque Limit 1 0 Uses the value of 0x3022 as the Fwd direction torque limit Uses the value of 0x3023 as the Rev direction torque limit Internal Torque Limit 2 1 Uses a constant 300 of rated motor torque as the Fwd and Rev torque limits External Torque Limit 2 Uses the value of 0x2111 as the Fwd direction torque limit Uses the value of 0x2112 as the Rev direction torque l...

Страница 51: ...ection 10 4 4 Velocity Control Signals in the User Manual To adjust these values later see ZSPD 0x2404 TGON 0x2405 and INSPD 0x2406 in the Object Dictionary Misc tab B Click Next Step 11 Set the I O Signal Setting Velocity Mode Step 11 Substep Task A On the Digital Input screen configure Inputs 1 through 4 as shown below Configure additional inputs and outputs as needed for your application B Clic...

Страница 52: ...oad the configuration to the drive The drive MUST NOT be enabled during download The software will not acknowledge that certain parameters were not changed so ensure that the drive is not enabled before pressing Write to Drive This Write to Drive button also saves the settings to memory C After download is complete either power cycle the drive ensuring the LED display turns off or click on the Sof...

Страница 53: ...PC to the Drive B Start Drive CM software C Select L7C Indexing Drive and press the Connect button The software should begin to communicate with the drive A green flashing square should appear in the bottom right corner of the screen indicating comms traffic Push to connect After connecting icon will change to this Push to disconnect D Click on Setup Wizard E In the USB Connection window choose On...

Страница 54: ...o Speed Limit Value D Enter a Speed Limit Value at Torque Control Mode Object 0x230E In torque mode the motor will continue to spin faster and faster until the commanded torque is reached Without a proper speed limit the motor may reach dangerous speeds depending on your application The default value is 1000RPM For initial testing and setup a smaller value is recommended 100RPM The 0x230E value ca...

Страница 55: ...er revolution and Output Mode Logic For initial test and setup leave these settings at default For more information see section 10 12 Encoder Output Signal in the User Manual C Click Next Step 6 Set Emergency Stop and Dynamic Brake Control Torque Mode Step 6 Substep Task A For initial setup and testing choose the defaults for these settings on the Emergency Stop Configuration and Dynamic Brake Con...

Страница 56: ...7 Set Brake Signal Setting Torque Mode Step 7 Substep Task A For initial setup and testing choose the defaults for these settings on the Brake Signal Setting screen More information can be found in the User Manual under Brake Output Speed 0x2407 Brake Output Delay Time 0x2408 and PWM Brake Delay Off Time 0x2012 B Click Next ...

Страница 57: ...ter initial commissioning by adjusting 0x3022 and 0x3023 in the Object Dictionary Index tab Default values are 3000 300 Option Description Internal Torque Limit 1 0 Uses the value of 0x3022 as the Fwd direction torque limit Uses the value of 0x3023 as the Rev direction torque limit Internal Torque Limit 2 1 Uses a constant 300 of rated motor torque as the Fwd and Rev torque limits External Torque ...

Страница 58: ...g and setup these can be left as default For more information see section 10 4 4 Velocity Control Signals in the User Manual To adjust these values later see ZSPD 0x2404 TGON 0x2405 and INSPD 0x2406 in the Object Dictionary Misc tab B Click Next Step 10 Set the I O Signal Setting Torque Mode Step 10 Substep Task A On the Digital Input screen configure Inputs 1 through 3 as shown below Configure ad...

Страница 59: ...rite to Drive to download the configuration to the drive The drive MUST NOT be enabled during download The software will not acknowledge that certain parameters were not changed so ensure that the drive is not enabled before pressing Write to Drive This Write to Drive button also saves the settings to memory C After download is complete either power cycle the drive ensuring the LED display turns o...

Страница 60: ...ep Task A Go to the Object Dictionary in the Drive CM software B Find Analog Torque Command Clamp Level Object 0x2212 This parameter is the same as a deadband C Enter a value to avoid undesired motion as a result of signal noise The value entered here will cause the shaft speed to remain at 0 RPMs until the analog voltage is above a set mV value D Torque Mode Commissioning is now complete ...

Отзывы: