background image

7

COMPILER TECO/ATI

ENDORSED

DATE

23.06.2003

REG. CODE

1-5302-607

MODEL N°

 50889

DATE OF ISSUE

06-03

REVISION    

00

I

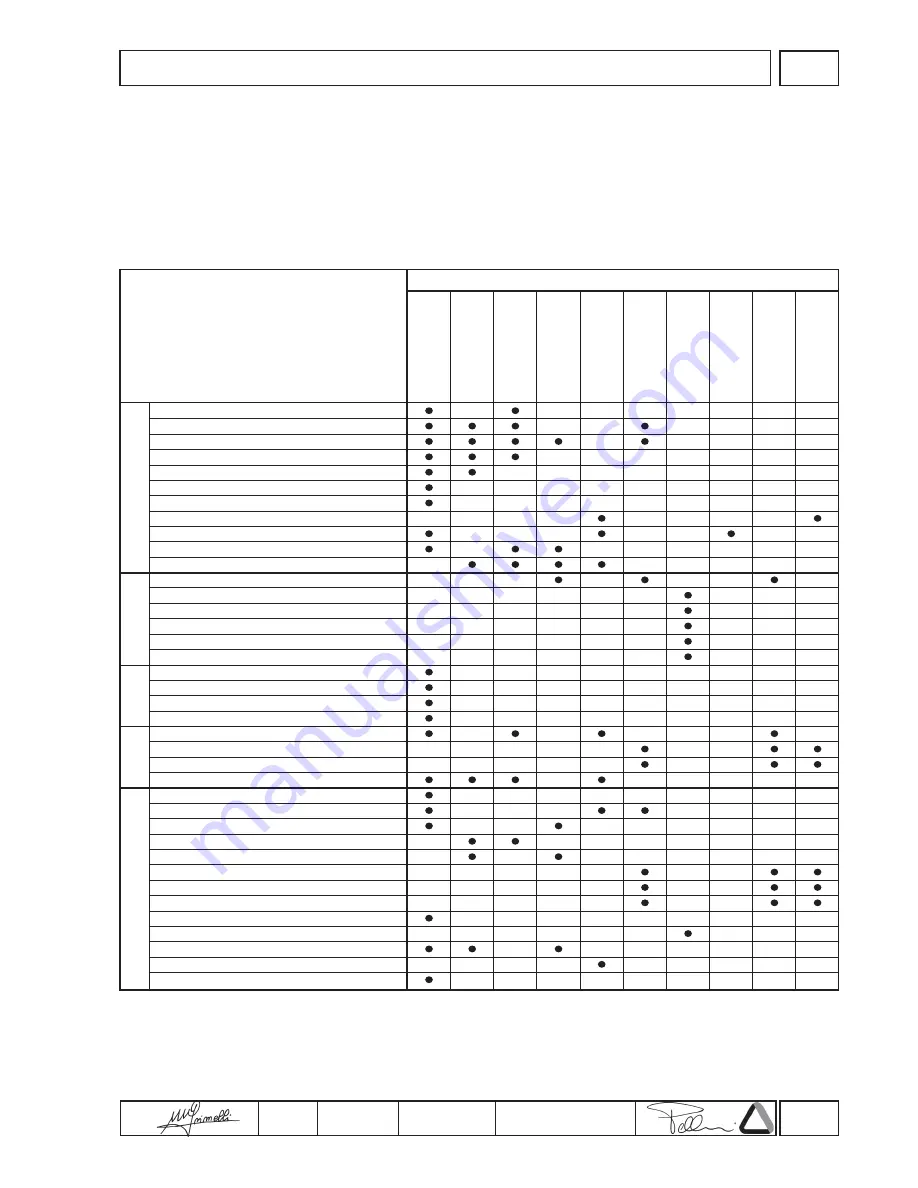
TROUBLE SHOOTING

Clogged pipes
Clogged fuel filter
Air inside fuel circuit
Clogged tank breather hole
Faulty fuel pump
Injector jammed
Jammed injection pump delivery valve
Wrong injector setting
Excessive plunger blow-by
Jammed injection pump delivery control
Wrong injection pump setting
Oil level too high
Jammed pressure relief valve
Worn oil pump
Air inside oil suction pipe
Faulty pressure gauge or switch
Clogged oil suction pipe
Battery discharged
Wrong or inefficient cable connection
Defective ignition switch
Defective starter motor
Clogged air filter
Excessive idle operation
Incomplete running-in
Engine overloaded
Advanced injection
Delayed injection
Incorrect governor linkage adjustment
Broken or loose governor spring
Idle speed too low
Worn or jammed piston rings
Worn or scored cylinders
Worn valve guides
Jammed valves
Worn bearings
Governor linkage not free to slide
Drive shaft not free to slide
Damaged cylinder head gasket

TROUBLE

LUBRICATION

 POSSIBLE CAUSE

FUEL CIRCUIT

ELECTRIC

SYSTEM

MAINTE- NANCE

SETTINGS/REPAIRS

POSSIBLE CAUSES AND TROUBLE SHOOTING

The following table contains the possible causes of some failures which may occur during operation. Always perform these
simple checks before removing or replacing any part.

Engine does not

start

No acceleration

Black smoke

Excessive oil

consumption

Too low oil

pressure

Engine starts but

stops

Non-uniform speed

White smoke

Oil and fuel

dripping from

exhaust

Increase oil level

Содержание 25LD330-2

Страница 1: ...MPILERTECO ATI ENDORSED DATE 23 06 2003 REG CODE 1 5302 607 MODEL N 50889 DATE OF ISSUE 06 03 REVISION 00 25 LD 330 2 25 LD 425 2 1st Edition WORK SHOP MANUAL 25LD330 2 425 2 series engines p no 1 5302 607 ...

Страница 2: ...gines have been adequately trained and outfitted to safely and professionally carry out the necessary tasks 2 the persons who service Lombardini engines possess the necessary skills and special Lombardini tools to safely and professionally carry out the necessary tasks 3 the persons who service Lombardini engines have read the specific information concerning the above mentioned Service operations ...

Страница 3: ...cial written warranty agreements Within the above stated periods Lombardini Srl directly or through its authorized network will repair and or replace free of charge any own part or component that upon examination by Lombardini or by an authorized Lombardini agent is found to be defective in conformity workmanship or materials Any other responsibility obligation for different expenses damages and d...

Страница 4: ..._____________________ 15 16 IX DISASSEMBLY OF THE ENGINE ___________________________________________________ 17 Extracting crankcase bushes 18 Extracting fuel injectors 17 Extracting the oil pressure indicator plug 18 Extraction of crankshaft gear 17 Extraction of flywheel side main bearing 17 Extraction of the camshaft gear 18 Removing the flywheel 17 X CHECKS AND OVERHAUL _______________________...

Страница 5: ...__________________________________________________ Page 30 Checking electrical equipment 30 Checking the alternator 30 Plant specifications 30 XIII ENGINEASSEMBLY ___________________________________________________________ Page 31 Camshaft 33 Central main bearings 31 Checking injector protrusion 36 Connecting rods 35 Crankshaft 32 Crankshaft end float 32 Cylinder heads 36 Cylinders 35 Electric shu...

Страница 6: ... pressure 39 Dyno testing of engine 39 Speed adjustment 39 XV STORAGE ___________________________________________________________________ Page 41 How to prepare the engine for operation 41 Permanent protection over 6 months 41 Storage 41 Temporary protection 1 6 months 41 XVI QUICKREFERENCECHARTS ____________________________________________________ Page 42 Adjustments 42 Couplings 42 Standard scre...

Страница 7: ...e idle operation Incomplete running in Engine overloaded Advanced injection Delayed injection Incorrect governor linkage adjustment Broken or loose governor spring Idle speed too low Worn or jammed piston rings Worn or scored cylinders Worn valve guides Jammed valves Worn bearings Governor linkage not free to slide Drive shaft not free to slide Damaged cylinder head gasket TROUBLE LUBRICATION POSS...

Страница 8: ...ious danger for his personal safety and health and that of any persons who may be in the vicinity of the machine Theenginemayonlybeusedorassembledonamachinebytechnicianswhoareadequatelytrainedaboutitsoperation and the deriving dangers This condition is also essential when it comes to routine and above all extraordinary maintenanceoperationswhich inthelattercase mustonlybecarriedoutbypersonsspecifi...

Страница 9: ...ever carry out any operation whilst the engine is running The coolant fluid circuit is under pressure Never carry out any inspections until the engine has cooled and even in this case only open the radiator plug or expansion chamber with the utmost caution wearing protective garments and goggles If there is an electric fan do not approach the engine whilst it is still hot as the fan could also sta...

Страница 10: ...E 1 5302 607 MODEL N 50889 DATE OF ISSUE 06 03 REVISION 00 III MODEL NUMBER AND IDENTIFICATION ENGINE IDENTIFICATION R P M Customer s code Approval code Engine Serial Number MODEL NUMBER Nr Cylinders Displacement cc Diesel LOMBARDINI Engine group number ...

Страница 11: ...246 0 8 1 8 66 300 53 75 750 100 300 25 30 25 35 25 40 25LD330 2 25LD425 2 TECHNICAL DATA Referred to N power Consumption at max torque CHARACTERISTICS ENGINE TYPE Number of cylinders Bore Stroke Swept volume Compression ratio 3000 RPM 3600 RPM 3000 RPM 3600 RPM 3000 RPM 3600 RPM Max torque Fuel consumption Oil consumption Capacity of standard oil sump Recommended battery 12V Dry weight Combustion...

Страница 12: ...TINUOS RATING WITH OVERLOAD CAPABILITY continuos heavy duty with constant speed and constant load Mt N Torque at N power C Specific fuel consumption at N power U1 Standard utilization range of engines rated at 3000 rpm U2 Standard utilization range of engines rated at 3600 rpm The above power values refer to an engine fitted with air cleaner and standard muffler after testing and at the environmen...

Страница 13: ...13 COMPILERTECO ATI ENDORSED DATE 23 06 2003 REG CODE 1 5302 607 MODEL N 50889 DATE OF ISSUE 06 03 REVISION 00 VI 25LD330 2 25LD425 2 25LD330 2 25LD425 2 OVERALL DIMENSIONS Note Dimensions in mm ...

Страница 14: ... 00365R0010 00365R0900 00365R0890 00365R0910 00365R0930 00365R0770 00365R0940 00365R0430 Flywheelpuller Universalpuller Mainbearingextractor Gearextractor Central bearing assembly tool Valve guide rubber fitting tool Cylinder collar Ø 80 85 mm Injectionadvancecontroltool Injector test bench SPECIAL TOOLS TOOL CODE DESCRIPTION ...

Страница 15: ... outdoors or in a well ventilated place Keep your face well away from the plug to prevent harmful vapours from being inhaled Dispose of fuel in the correct way and do not litter as it is highly polluting FUEL When refuelling it is advisable to use a funnel to prevent fuel from spilling out The fuel should also be filtered to prevent dust or dirt from entering the tank Use the same type of diesel f...

Страница 16: ... The risk of piston seizure jammed piston rings and rapid wear of the cylinder liner the bearings and all moving parts increases if oil whose characteristics differ from the recommended type is used or if the oil is not regularly changed All this notably reduces engine life Oil viscosity must suit the ambient temperature in which the engine operates Old oil can cause skin cancer if repeatedly left...

Страница 17: ...he flywheel from dropping as this could seriously injure the operator Wear protective goggles when removing the flywheel ring IMPORTANT Do not tap the end of the extractor when removing the flywheel Extraction of flywheel side main bearing Withdraw the bearing using two M8 screws taking care to tighten them evenly alternatively use a commercial extractor as shown in figure 3 Extraction of cranksha...

Страница 18: ...shaft gear Use the extractor number 00365R0010 fig 5 Extracting crankcase bushes From crankcase fig 6 From main bearing fig 7 Use extractor number 00365R0900 Extracting the oil pressure indicator plug Loosen the plug securing screw and remove circlip spring and ball Cut a thread on the inside of the plug body and then withdraw it using a commercial extractor tool fig 8 ...

Страница 19: ...e is hot to avoid deformation Clean heads of carbon deposits and check the cylinder mating surfaces if they are deformed they must be ground to a maximum of 0 3 mm Check that there are no cracks or other imperfections in the heads If defects are encountered the heads must be renewed In this case consult the spare parts catalogue Valves Guides Seats Clean the valves with a wire brush and renew them...

Страница 20: ...es indicated in the following table fig 10 Fitting mm Max wearmm In the case of lower values the valve may strike the piston In the case of values in excess of 1 3 mm the valve seat rings must be replaced Fitting of new seats or valves always requires preparatory grinding Valves are available with the external diameter increased by 0 5 mm After grinding wash the valve and seat carefully with petro...

Страница 21: ...irt Cylinders Air cooled with cylinder barrels in special cast iron with integral liners Use a dial gauge to check internal diameters C D at three different heights fig 18 Maximum permitted taper A B and ovality C D is 0 06mm Diameter of cylinders fig 18 If the diameter of the cylinder does not exceed said values or if there are slight surface scores on the cylinder it will be sufficient to change...

Страница 22: ...s be renewed after dismantling the piston Piston diameter check The diameter of the piston must be measured at approximately 18 mm from the base fig 22 Fitting mm Max wearmm Piston ring 1stCompression 2ndCompression 3rd Oil scrapper Max wearmm Engine Diametermm Check the clearance between cylinder and piston if it is greater than 0 120 mm both cylinder and piston must be replaced Assembly clearanc...

Страница 23: ...t the necessary sizes without requiring any adjustment by boring Dimensions Crankshaft Whenever the engine is dismantled particularly for the replacement of cylinders and pistons due to wear caused by the aspiration of dust it is good practice to check the condition of the crankshaft 1 Remove the plugs A from the oil passages fig 25 2 Use an appropriately shaped steel punch to clean the inside of ...

Страница 24: ...m Timing Injection Fuel pump Measurement E F aluminium crankcase F cast iron crankcase Clearancemm Oil seal rings Check that the rings have not hardened around the internal contact edge and that they show no signs of cracks or wear Camshaft Check the cams and bearing journals for scoring and wear Measure the dimensions and compare them to the values in the table below and shown if figures 30 31 Ca...

Страница 25: ... and with the spherical surfaces at either end in good condition fig 32 Make sure that the lubrication holes inside the tappets and push rods are free of dirt Injection pump plug nuts and control rods Renew the parts if the surface wear is greater than 0 10mm fig 33 Assembly clearance between control rods and their housings in the crankcase Fuel pump push rod Check that the surfaces of the fuel pu...

Страница 26: ...nd the cover facing surface must be End float of rotors fig 36 Governor lever and spring Check that the shoes S fig 37 are level and that the springs have not lost their elasticity Renew any excessively worn parts after consulting the spare parts catalogue Supplement and governor spring dimensions fig 37 Load kg Nr of windings Lenght under load mm Lenght mm Governor N Supplement H Spring Fitting m...

Страница 27: ...for BOSCH pump type PF30 Checking injection pumps Before dismantling the injection pumps check for pressure leak of the pumping unit plunger and valve as follows 1 Connect a pressure gauge with 600 Kg cm full scale to the diesel delivery line fig 40 2 Set the control sleeve nr 12 fig 39 to a mid point delivery position 3 Turn the flywheel slowly until the plunger has completed a full compression s...

Страница 28: ...en the delivery connection 3 Insert plunger with helical profile A fig 43 on the opposite side of the sleeve pin B fig 43 into the internal groove of the control sleeve make sure the helical profile is turned towards the fuel inlet and eccentric pin C fig 43 4 Complete pump assembly with plunger a fig 44 control sleeve b upper washer c retaining ring d spring f and secure all with the spring holde...

Страница 29: ...s 20 Kg cm below the opening pressure of the needle valve The nozzle can be considered well sealed if there no Diesel fuel accumulates at the nozzle tip after 10 seconds Disassembly and re assembly of injectors Unscrew the ring nut on the injector nozzle using a ring wrench and a special tool as illustrated in figure 49 serving to release the pressure exerted by the spring on the ring nut 1 Visual...

Страница 30: ...er than the value indicated above proceed by checking the alternator and if necessary renewing the voltage regulator Checking the alternator Check 1 with motor stopped the continuity of the windings fig 53 by connecting an ohmmeter and ensuring that resistance is zero and the insulation between the windings and ground fig 54 by ensuring that the ohmmeter gives a reading of infinite resistance If t...

Страница 31: ...pring taking care to protect the oil seal O ring from damage Complete the external assembly with plate spring lever etc as shown in figure 55 3 Mount the bearing bush gear train side using either a standard press or a made to measure punch as shown in figure 56 Fit the bush by matching the hole with the passage on the crankcase Bushes with standard or smaller internal diameters can be ordered as r...

Страница 32: ... that it is facing the internal side of the bearing and positioned vertically Fit the oil seal ring to the bearing using a suitable diameter tubular punch Fit the bearing into the crankcase after having first interposed an O ring between the contact surfaces fig 63 Torque the screws to Crankshaft end float Install an 0 15 mm feeler gauge betwen the crankshaft shoulder and the crankcase flywheel si...

Страница 33: ...he injection pumps Spring N placed under tension by speed control lever C contrasts the action of the centrifugal force of the governor The balance between the two forces keeps the engine speed virtually constant with respect to load variations Governor tie rod adjustment The length of the tie rod measured between the centredistance of holes X fig 67 must be The accuracy of this setting will serve...

Страница 34: ...f the cover fig 70 Torque the bolts to It is good practive to fill the oil suction pipe in order to aid pump priming when the engine is started up for the first time Timing cover Check that the timing markeson the camshaft and crankshaft gears are aligned fig 69 Fit the oil seal onto the cover using a normal tubular punch of appropriate diameter Mount the cover to the crankcase fig 71 after first ...

Страница 35: ...e Mount the connecting rod big end cap ensuring that the reference numbers are aligned with those punched on the connecting rod itself fig 74 Torque the bolts to Now fit the oil pan after first inserting the appropriate gasket between the facing surfaces Cylinders Before fitting the cylinders turn the piston rings so that the end gaps are arranged at intervals of 120 with the end gap of the first ...

Страница 36: ...cross pattern tighten the head nuts fig 78 in increments of 1 kgm until you reach the value This value is adjusted by inserting copper washers between the injectors and the injector supporting faces on the heads fig 77 Valve clearance The clearance between valves and rockers with the engine cold fig 79 is This clearance is to be adjusted with the pistons at their respective TDC compression positio...

Страница 37: ...od A fig 81 to a position mid way between minimum and maximum 4 Fit the special tool p n 00365R0940 to the delivery valve holder timing case side as shown in figure 82 5 Turn the flywheel slowly until the column of diesel fuel inside the special tool starts to move This indicates the start of static injection For variable advance pumps the reference mark on the flange bell fig 85 must match the in...

Страница 38: ...s equipped with an electric shut off insert the electro magnet into the crankcase taking care to position the engine shut off lever in the STOP position make sure that the injection pump connection lever moves freely along its entire stroke Make the electrical connections as shown in diagram 90 Feed pump 1 Insert the fuel feed pump tappet into its housing and make sure that it moves freely 2 Fit t...

Страница 39: ...g for oil leaks 1 Remove the exhaust gas collection pipe from the inlet manifold and close the connection with a plug fig 93 2 Start the engine and let it run for a few minutes The high pressure generated in the crankcase will show up any oil leaks 3 Reconnect the exhaust gas collection pipe to the inlet manifold Dyno testing of engine After you have placed the engine on the brake fig 94 perform t...

Страница 40: ...3600 ENGINE TESTING Running in table Load Time min RPM In order to check that the setting is correct without tools accelerate the engine a few times with no load and check the exhaust fumes Delivery of diesel fuel is correctly calibrated when the exhaust gas is slightly coloured by smoke change the adjustment if necessary by turning the adjustment screw fig 96 Engine power curves are reported at p...

Страница 41: ... Spray oil type SAE 10W into exhaust and intake manifolds rocker arms valves tappet etc Grease all unpainted parts Loosen belt Wrap the engine in a plastic film Store in a dry place if possible not directly on the soil and far from high voltage electric lines Permanent protection over 6 months The following is recommended apart from the above instructions For the lubrication and injection system a...

Страница 42: ...0 2 Couplings Camshaft and central bearings aluminium crankcase Camshaft and central bearings cast iron crankcase Camshaft and flywheel side bearing End gap of compression rings End gap of oil scraper rings Connecting rod and wrist pin Rocker arm and pin Fuel pump push rod and housing Injection pump tappets and housing Tappets and housings Oil pump rotor and housing Pistons and wrist pin Inlet val...

Страница 43: ... 37 0 72 1 23 2 02 3 02 3 88 5 36 9 09 13 80 21 00 26 30 36 60 44 40 56 90 4 x 0 70 5 x 0 80 6 x 1 00 7 x 1 00 8 x 1 25 9 x 1 25 10 x 1 50 13 x 1 75 14 x 2 00 16 x 2 00 18 x 2 50 20 x 2 50 22 x 2 50 24 x 3 00 kgm 3 6 3 8 2 2 2 4 3 5 2 2 3 2 2 3 0 5 0 6 4 5 5 2 2 2 2 2 2 2 4 4 1 5 2 5 18 22 Nm 35 3 37 3 21 6 23 5 34 3 19 6 22 6 19 6 22 6 4 9 5 9 44 1 49 21 6 21 6 21 6 23 5 39 2 14 7 24 5 176 5 215 ...

Страница 44: ...ation Data reported in this issue can be modified at any time by Lombardini Lombardini vorbehält alle Rechte diese Angabe jederzeit verändern La Lombardini se reserva el derecho de modificar sin previo aviso los datos de esta publicación 42100 Reggio Emilia Italia ITALY Via Cav del Lavoro Adelmo Lombardini 2 Cas Post 1074 Tel 39 0522 3891 Telex 530003 Motlom I Telegr Lombarmotor R E A 227083 Reg I...

Отзывы: