background image

GB-5

Pr

epar

ation

Connec

tions

Initial 

Setup

U

sing 

the 

Fea

tur

es

DVR 

(Dig

ital 


Video 

Rec

or

der)

U

sing 

the 

Fea

tur

es


via 

USB 

por

t

U

sing 

the 

DVD 

Fea

tur

es

H

in

ts 

and 

Tips

, Specifica

tion 


and 

Saf

et

W

ar

nings

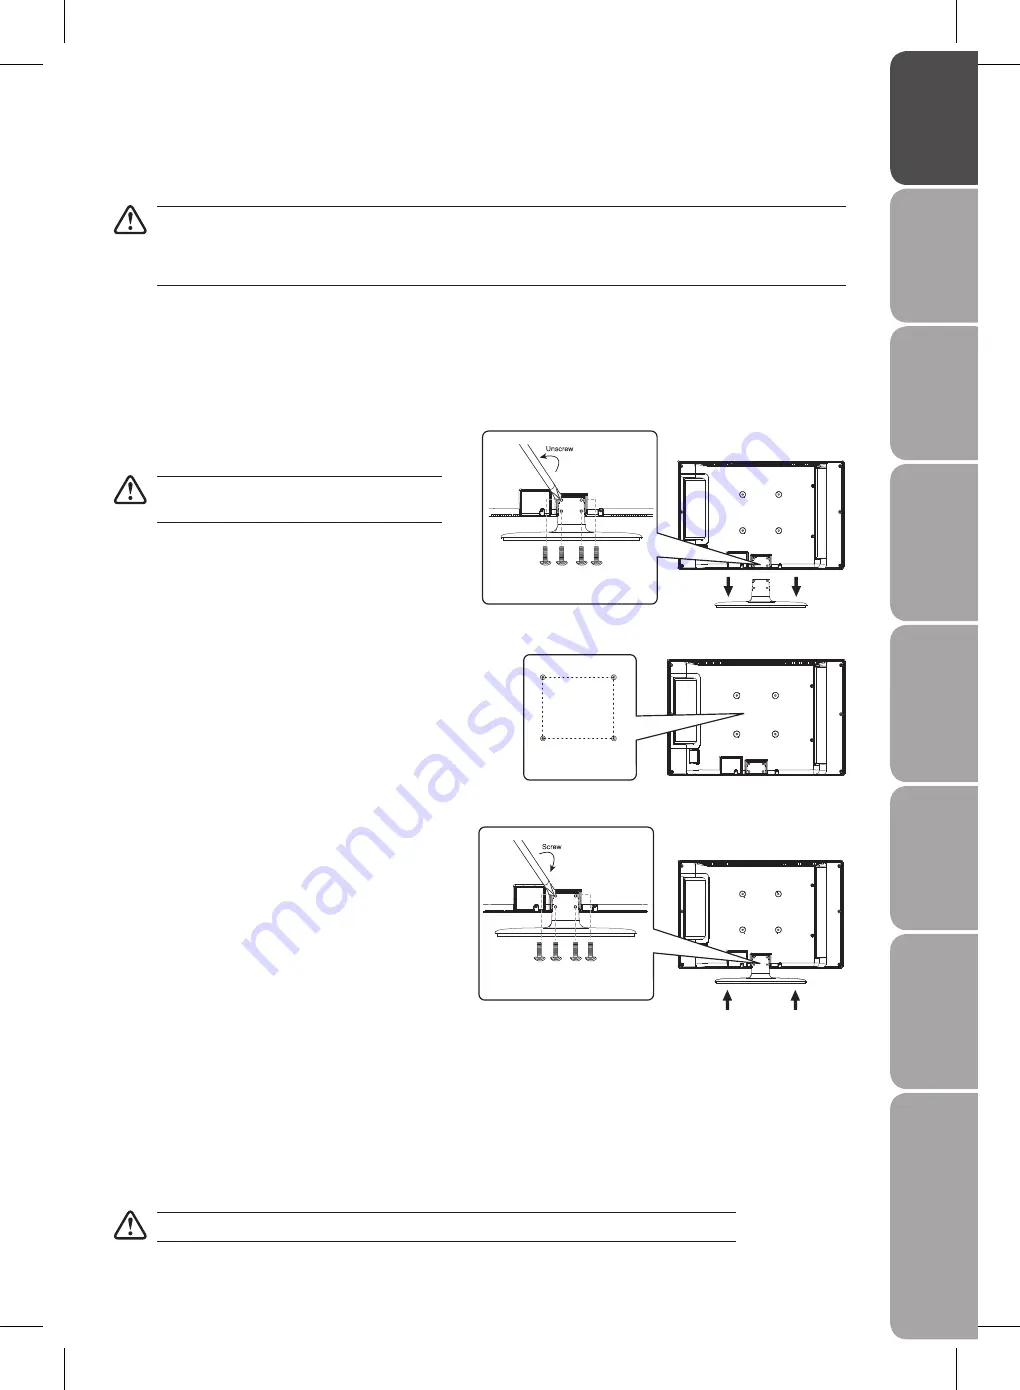
Mounting on the wall. This TV is designed to be wall-

4. 

mounted with a standard 100 mm x 100 mm mounting 
kit designed for flat-panel TVs (sold separately). 
Mount this TV according to the instructions included 
in the mounting kit. Due to the space restriction, we 
recommend you to make all connections (refer to page 
12-17 for details) before final mounting on the wall. 

If items are missing, or damaged please contact Partmaster (UK only). Tel: 0870 6001 338 for assistance.


Installing / Removing the Base Stand

Remove the base stand before mounting the TV onto the wall.
The LCD display is very fragile, and must be protected at all times when installing and removing the base stand. Be sure 
that no hard or sharp object, or anything that could scratch or damage the LCD display, comes into contact with it. DO 
NOT exert pressure on the front of the TV at any time because the screen could crack.

Disconnect all cables connected to the TV.

1. 

Lay the TV down on a flat surface with the back side 

2. 

facing up. Please make sure to place a soft cushioned 
material (such as a pillow or thick piece of foam) 
beneath the screen.

To remove the base stand, untighten the 4 screws that 

3. 

hold the base stand to the rear of the TV.

Keep all the spare screws should you want to use 
the base stand option.

To re-install the base stand, reattach the base stand 

5. 

with the 4 screws.

100 mm

100 mm

Four mounting holes

(size M4 screw)

Screws x 4

(P.N. I.03.MP4010001)

Screws x 4

(P.N. I.03.MP4010001)

Содержание L22DVDB10

Страница 1: ...22 HD Ready 1080p Digital LCD TV With DVD Player Instruction Manual L22DVDB10...

Страница 2: ...ting Earphones 16 Connecting a USB Storage Device 16 Connecting the Aerial 17 Initial Setup 17 Turning the TV On for the First Time 17 Selecting the Input Source 18 Channel Selection 18 Volume Adjustm...

Страница 3: ...uilt in DVD Player 43 Compatible Disc Types 43 Supported Formats 43 Region Code 43 Using the DVD Features 43 Basic DVD Playback Functions 44 Playing the DVD 44 Menu Playback for DVD 44 Stopping Playba...

Страница 4: ...ide part number I 08 035229002 Video Video R R L L Congratulationson the purchase of your new Logik TV Your new TV has many features and incorporates the latest technology to enhance your viewing expe...

Страница 5: ...ounting the TV onto the wall The LCD display is very fragile and must be protected at all times when installing and removing the base stand Be sure that no hard or sharp object or anything that could...

Страница 6: ...put anything near the sensor as its function may be affected 3 Press to insert and eject disc DVD mode 4 Press to start playback or pause DVD mode 5 VOL Adjust the volume Select and adjust a setting...

Страница 7: ...face between this TV and any HDMI device such as a set top box Blu ray player and AV receiver 5 VGA PC AUDIO Connect to a computer or other devices with a VGA interface 6 SCART Connect to a VCR DVD Pl...

Страница 8: ...cause fire personal injury or damage to property Only use the battery type indicated in this manual When the batteries are exhausted the remote will not function Replace both batteries at the same ti...

Страница 9: ...dio languages only applicable when the TV programme has this feature 7 FAV Display the Favourite Channel List FAV Switch between your favourite channels 8 0 9 Number Button Select a programme Select n...

Страница 10: ...nus Display a list of channels saved in the TV tuner memory 20 EPG Display the EPG Electronic Programme Guide DTV mode 21 DISPLAY Display the present screen information such as the current channel and...

Страница 11: ...a segment between A and B DVD mode 28 SUBPAGE Display the subpage on the teletext screen TV mode AUDIO Change the audio language or audio channel DVD mode 29 HOLD Freeze a multi page passage on scree...

Страница 12: ...Cable This TV can accept High Definition Multimedia Interface HDMI supports HDCP High Bandwidth Digital Content Protection Protocol When you connect to the output of an HD ready player blu ray disc p...

Страница 13: ...de View of TV Component Cable not included L R COMPONENT OUT Y Pr Pb Pb Cb Pb Cb Pr Cr Pr Cr Y Y Satellite Receiver Video Camera Blu ray Player DVD Player Recorder Set top Box Game Console Yellow Vide...

Страница 14: ...n your TV Press the 5 SOURCE button to display the Source List Use the buttons to select S VIDEO and then press the OK button or the button to confirm Right Rear Side View of TV S Video Cable not incl...

Страница 15: ...ons to select DVD and then press the OK button or the button to confirm The TV s volume control will have no effect You may control the audio level via the Audio Receiver Right Rear Side View of TV Au...

Страница 16: ...ed you may refer to the Recording Device on page 38 for details on selecting the active device when several USB storage devices are connected The maximum supported storage space of the hard disk is 1...

Страница 17: ...not in use for a long period of time The I button on the top panel of the TV or the button on the remote control is only used for switching the TV into standby it does not disconnect the TV from the...

Страница 18: ...to highlight and select the channel Press the OK button to view the selected channel If a blocked channel is selected the password screen will be displayed Press the 0 9 buttons to enter the password...

Страница 19: ...change the following settings Picture Mode Cycles among display types Personal Standard Movie Mild Game Alternative Press the P MODE button to select the display type directly Brightness Increase or d...

Страница 20: ...ents tend to be louder than the programmes Press the 4 MENU button to save the settings and return back to the previous menu Press the 5 EXIT button to exit the menu Stereo Dual Sound Reception TV Mod...

Страница 21: ...ll This selection will allow you to view the picture in full screen Zoom This selection will allow you to view the picture without any alteration while filling the entire screen However the top and bo...

Страница 22: ...be set automatically when receiving a digital signal Time must be set before using Sleep Timer OSD Timer function Press the 1 MENU button and then use the buttons to select the FUNCTION menu and then...

Страница 23: ...d to turn On or Off during weak or no signal conditions Press the 1 MENU button and then use the buttons to select the FUNCTION menu and then press the button Press the 2 buttons to select BLUE SCREEN...

Страница 24: ...6 Press the 7 MENU button to save the setting and return back to the previous menu Press the 8 EXIT button to exit the menu Key Locked Key Locked is designed to prevent children from pressing the but...

Страница 25: ...d change the settings Country Select the country where you will operate the TV Delete Program Select to delete the tuned channels in the TV Search Program Select to search automatically for analogue a...

Страница 26: ...ng is carried out Customising the TV Setting TV Mode Country Allows you to select the country where you are using the TV Press the 1 MENU button and then use the buttons to select the TV menu and then...

Страница 27: ...to Fine Tune AFT To fine tune the channel automatically when the signal is weak Manual Tuning Performs manual search for analogue TV programmes Press and hold the buttons to adjust the channel frequen...

Страница 28: ...lect OK displayed on the screen when finished Press the 4 MENU button to save and return back to the previous menu Press the 5 EXIT button to exit the menu Customising the TV Settings DTV Mode Auto Tu...

Страница 29: ...Channel Edit Allows you to edit DTV programmes in the Channel List Press the 1 MENU button and then use the buttons to select the DTV menu and then press the button Press the 2 buttons to select CHAN...

Страница 30: ...ng the password window When recording a locked or rated programme the recorded programme will be locked unless you enter the password before the recording is finished If you wish to play the locked pr...

Страница 31: ...rt or remove the Common Access Module as this may damage the interface and cause a malfunction This feature is not available in all countries To insert the Common Access Module Before you insert the C...

Страница 32: ...based on the PC mode Clock Control the signal clock which can improve the image stability based on the PC mode Auto Adjust Allows you to synchronise PC signal automatically Press the 4 MENU button to...

Страница 33: ...DEX button Mix To view a page of text whilst watching a TV programme press the TEXT button twice The text will be superimposed over the TV programme Page search while watching TV Press the CANCEL butt...

Страница 34: ...tion such as programme listings start and end times for all available services In addition detailed information about the programme is often available in the EPG the availability and amount of program...

Страница 35: ...ideshow press the 7 DISPLAY button to display the function bar Press the RED button to pause and press the RED button again to resume the slideshow Press the GREEN button to display the music folder s...

Страница 36: ...lay it Some audio file formats will not be supported Press the 4 RED button to pause the music playback and press again to resume the playback Press the GREEN button to stop the music playback Press t...

Страница 37: ...utton to return to the previous menu Press the 7 EXIT button to exit the menu If more than one USB storage device is connected press the 3 DISPLAY button to switch to the device type menu Press the bu...

Страница 38: ...ous or next movie 1 Preview window for the recorded video selected 2 Information of the recorded video selected 3 Recorded video list 2 3 1 The DVR Playback Progress Bar 1 Indicates the programme s na...

Страница 39: ...evice type 2 Storage capacity of the active USB storage device 3 Format 4 Format disk 1 2 3 4 Press the 2 buttons to adjust the settings Time Shift Size The minimum USB s time shift size is 768MB The...

Страница 40: ...e During the normal TV viewing you may press the button to virtually pause the live viewing broadcast programme if you want to go out for a while e g going to the bathroom kitchen When you have return...

Страница 41: ...record duration The Record Duration menu will be displayed The longest record duration is 8 hours the shortest record duration is 15 minutes Press the 3 OK button to confirm and start recording The c...

Страница 42: ...tails menu for recording setting CN Input Select the channel no Date Set the recording date Time Set the starting time of recording Duration Set the duration of recording DVR Set YES for programme rec...

Страница 43: ...les DVD ReWritable AUDIO VIDEO JPEG DVD R DVD Recordable Audio Video format or JPEG files DVD R AUDIO VIDEO JPEG CD R CD Recordable Audio Video format or JPEG files AUDIO VIDEO JPEG CD RW CD Rewritabl...

Страница 44: ...e Chapter Track Press the button to play the next Title Chapter Track If the current track is the first one pressing the button will stop the playback If the current track is the last one pressing the...

Страница 45: ...input is invalid it will not function Audio for DVD CD Press the AUDIO button once to display current audio mode Press again to toggle between different audio modes in sequence For CD discs Stereo Mo...

Страница 46: ...his format is used by some other countries e g USA PAL This is the format used in UK AUTO This format can be used if your TV DVD is capable of both PAL and NTSC formats and this is the default setting...

Страница 47: ...an the level set will not be played The parental lock can only be changed after inputting the correct password This function is available only when the discs have ratings encoded on them DEFAULT DEFAU...

Страница 48: ...sc playback function will not be available Option Description AUDIO OUT SPDIF OFF Set as default there will be no digital audio signal output SPDIF RAW Set as default the digital audio signal output w...

Страница 49: ...left channel and right channel audio MONO L It means that the player will output left channel audio only MONO R The player will output right channel audio only MIX MONO The player will output the ave...

Страница 50: ...alcohol benzine paint thinner cleaning fluid or other chemicals Do not use compressed air to remove dust Handling Discs Do not touch the playback side of the disc Do not attach paper or tape to the d...

Страница 51: ...are connected properly Horizontal Vertical bar or picture shaking Check for local interference such as an electrical appliance or power tool Poor reception on some channels Station or cable channel ma...

Страница 52: ...to get your aerial checked Talk to your retailer or contact your local aerial installer Why do I get blocking on my digital picture In most cases blocking is caused by a reception problem either the...

Страница 53: ...0 60 Full 4 3 480P 720 x 480 Full 4 3 576I 720 x 576 50 Full 4 3 576P 720 x 576 Full 4 3 720P 1280 x 720 50 Full 4 3 60 1080I 1920 x 1080 50 Full 4 3 60 Full 4 3 1080P 1920 x 1080 50 Full 4 3 60 Full...

Страница 54: ...1920 pixels horizontal x 1080 pixels vertical Television System PAL I BG DK SECAM L BG DK Brightness 200 280 cd m2 Contrast Ratio 700 1000 1 Inputs Output SCART 1 HDMI 1 VGA 1 PC AUDIO 1 S VIDEO 1 YPb...

Страница 55: ...at the top Safety Always disconnect the unit from the mains supply before connecting disconnecting other devices or moving the unit Unplug the unit from the mains socket during a lightning storm Mains...

Страница 56: ...Never let anyone especially children push anything into the holes slots or any other openings in the case this could result in a fatal electric shock DVD Class 1 Laser Product This unit utilises a la...

Страница 57: ......

Страница 58: ......

Страница 59: ......

Страница 60: ...ul to the environment To preserve our environment dispose of used batteries according to your local laws or regulations Do not dispose of batteries with normal household waste For more information ple...

Отзывы: