background image

3

INSTALLATION

PRECAUTIONS

•  Choose the mounting  location  carefully so that the unit will not interfere  with normal driving 

functions.

•  Avoid installing the unit where it would be subject to high temperatures, such as from direct sunlight 

or hot air from the heater, or where it would be subject to dust, dirt or excessive vibration.

•  Use only the supplied mounting hardware for a safe and secure installation.

•  Be sure to remove the front panel before installing the unit.

NOTE: Inclination angle for car radio installation must not exceed 30˚ otherwise the front panel will 

not open.

NOTE: Keep the release key in a safe place as you may need it in future to remove the unit from 

the car.
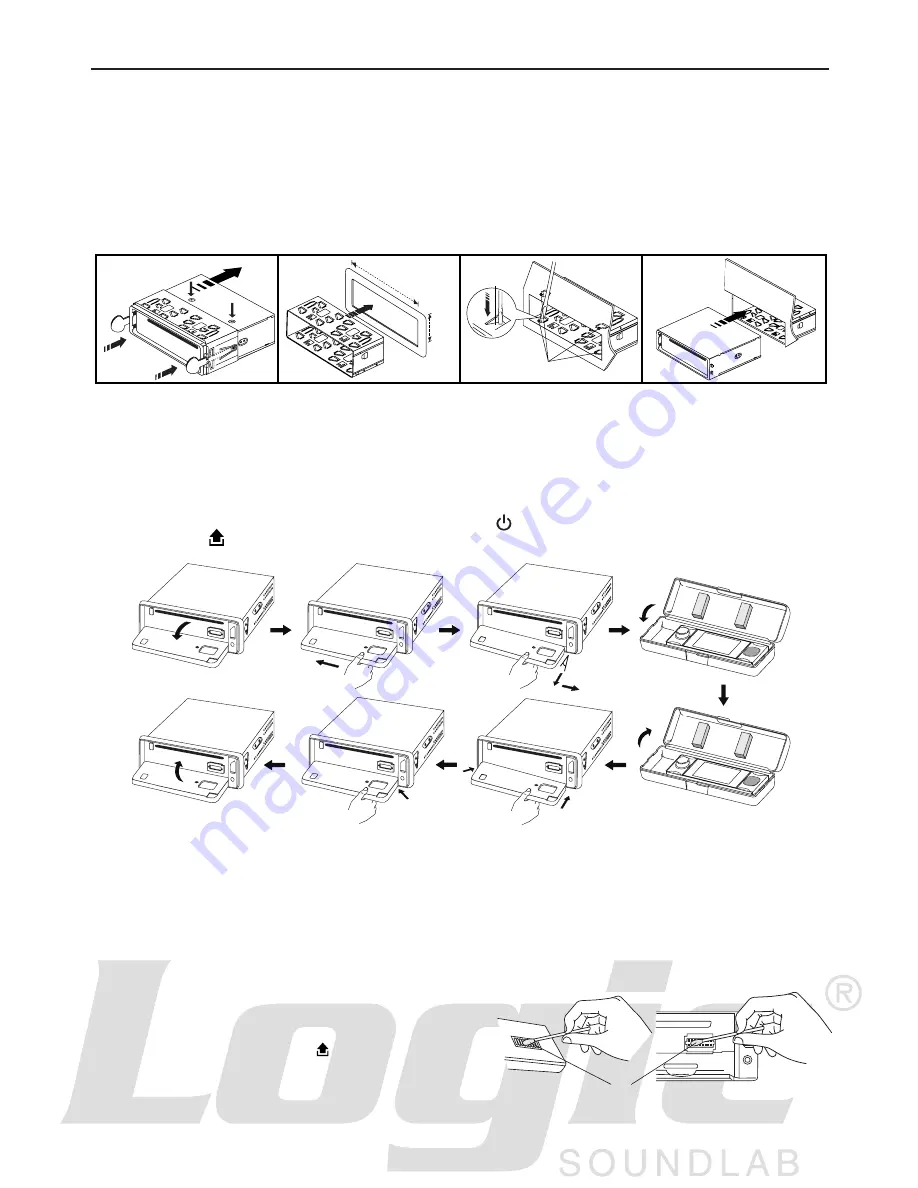
Detaching and attaching the front panel

The front panel of this unit can be detached to prevent theft.
FOLDING DOWN AND DETACHING/ATTACHING THE FRONT PANEL

Before detaching the front panel, be sure to press the   button (1) OFF first.

Then press the

button and detach the panel by pulling it towards you as illustrated.

Notes:

•  Do not press the front panel hard against the unit when attaching it. It can be easily attached by 

pressing it lightly against the unit.

•  When you carry the front panel with you, put it in the supplied front panel case.

•  Do not press hard or apply excessive pressure to the display window of the front panel when 

attaching it to the unit.

CLEANING THE CONNECTOR

The unit may not function properly if the connectors 

between the unit and the front panel are contaminated 

with dirt. In order to prevent this from happening, detach 

the front panel by pressing 

the

button and clean the 

connectors from time to time.

Clean the connectors with a cotton swab and contact 

cleaner as illustrated. Clean each pin carefully and make 

sure not to damage the connecting points.

2

182mm

53mm

3

4

TAP

1

2

3

Bend these

claws, if necessary

Release screw and      

bracket

1

2

1

Cotton Swab

Rear of 

front panel

Main unit

Содержание TS825i

Страница 1: ... INSTRUCTION MANUAL DVD MP3 AM FM CD Receiver 4 TFT LCD Touchscreen Display with 3 2 View Area Flip Down Full Detachable Front Panel DVD DVD R DVD RW SVCD VCD MP4 MP3 WMA CD R CD RW Compatible SD MMC USB Compatible Front AUX Input 24 13 5 1 11 14 12 4 9 10 TS825i iContact 60 FL FL ...

Страница 2: ...is unit features next generation Advanced SMART USB technology SD MMC compatible memory card reader and AUX IN input to enhance your car audio experience Included with this unit you will find two iContact cables IC 110 and IC 120 IC 110 is used for direct connection of your portable media player such as iPod and other digital MP3 Players IC 120 is used for next generation MP3 cellular phones iPod ...

Страница 3: ...peration 6 Locations of Controls Main Unit 6 Locations of Controls Remote Control 7 General Operations 8 Listening to Radio 9 Operations Common for CD MP3 WMA VCD DVD MP4 10 Listening to CD MP3 WMA 11 Playing DVD VIDEO CD MP4 12 Customizing Audio Video Settings 13 Setting Up the DVD Player 14 Troubleshooting 15 Problem During DVD VCD Playback 16 Specifications 17 ...

Страница 4: ... featuring PBC Playback Control CD playback This unit plays Music CD CD R CD RW MP3 WMA file playback This unit plays MP3 WMA files recorded on CD ROM CD R CD RW MP4 file playback This unit plays MP4 files PAL NTSC compatibility This unit is PAL NTSC system compatible When connecting other components to this unit be sure components are compatible with the same video system or else images will not ...

Страница 5: ...detaching the front panel be sure to press the button 1 OFF first Then press the button and detach the panel by pulling it towards you as illustrated Notes Do not press the front panel hard against the unit when attaching it It can be easily attached by pressing it lightly against the unit When you carry the front panel with you put it in the supplied front panel case Do not press hard or apply ex...

Страница 6: ...er the audio level is automatically restored To use this feature you must have a cellular phone handsfree kit with a muting output that can be connected to the Tel Mute control wire Please see the installation instructions for the cellular telephone to identify the correct connection for the TEL MUTE wire Rear camera Red Connect to vehicle back up light circuit In order to activate REAR camera inp...

Страница 7: ...FT SPEAKER 6 FRONT LEFT SPEAKER 7 REAR LEFT SPEAKER 8 REAR LEFT SPEAKER Maintenance FUSE REPLACEMENT If the fuse blows check the power connection and replace the fuse If the fuse blows again after the replacement there may be an internal malfunction In this case consult your nearest repair center Warning Use the specified amperage fuse for each lead Use of a higher amperage fuse may cause serious ...

Страница 8: ... PAUSE BUTTON 17 INTRO BUTTON 18 REPEAT BUTTON 19 RANDOM BUTTON 20 PREVIOUS NEXT FOLDER 21 RESET BUTTON 22 CD SLOT 23 SD MMC COMPATIBLE MEMORY CARD SLOT 24 USB COMPATIBLE PORT 25 FRONT AUX IN TS825i iContact 60 FL FL 24 13 5 1 11 14 12 4 9 10 25 7 8 2 18 17 16 20 19 6 3 1 3 3 4 6 RESET 21 15 22 AUX IN 23 TS825i iContact 60 FL FL 60 FL FL 13 5 1 11 14 12 4 7 8 2 18 17 16 20 19 3 1 3 3 4 6 RESET 21 ...

Страница 9: ...ol Point the remote control in the direction of the front panel to operate IMPORTANT Do not store the remote control in high temperatures or direct sunlight Do not let the remote control fall onto the floor where it may become jammed under the brake or accelerator pedal OPERATION LOCATIONS OF CONTROLS REMOTE CONTROL 1 POWER ON OFF 2 MODE 3 PLAY PAUSE 4 TITLE PLAYBACK CONTROL 5 SELECT 6 SEEK SEEK C...

Страница 10: ...emote Control Press VOL or VOL to increase or decrease volume Mute Button Head Unit Press button to mute the sound at once Press again to return to previous volume level Remote Control Press button Loud Button LD Press LOUD button to turn on off LOUD feature Equalizer EQ Remote Press EQ button Under DSP preset select the desired EQ by pressing Subwoofer On Main menu touch SETTINGS EQ SETTINGS Subw...

Страница 11: ... control to exit photo playback Press MENU on remote control will also go back one level or return to previous menu RESET The reset button is placed on the housing behind the faceplate To reset use a sharp pointed object Press and hold the RESET button for 2 seconds The reset button is to be activated for the following reasons Initial installation of the unit when all wiring is completed None of t...

Страница 12: ...ed point press Note No sound is played during fast forward fast reverse Finding the Beginning of Tracks During playback press or Press to start playback from the beginning of the previous chapter or track Press to start playback from the beginning of the following chapter or track Pause Playback During playback press Press again to resume playback A B Repeat Playback This feature allows you to loo...

Страница 13: ... compatible card input Support MP3 WMA ID3 format music only 1 Press button and the the front panel will open 2 Detach the panel by pulling it towards you 3 Carefully insert the SD MMC card into the disc slot attach back the panel Unit starts playback automatically AUX IN Memory Card New Generation iContact Smart USB Port Enhanced control of connected Portable Media Such as Flash Drives and digita...

Страница 14: ... functions Repeat Playback FOR VCD 1 Press RPT on the remote control during playback 2 Every time you press this button the unit switches to the following settings Repeat 1 Repeat the current playback track Repeat All Repeat all folders and tracks Repeat Off Turn OFF repeat function Note PBC feature in VCD disc needs to be stopped in order to use Repeat playback FOR DVD You can choose between repe...

Страница 15: ...2 1 3 1 4 1 5 1 6 1 7 Note To resume normal playback press PLAY PAUSE There is no sound during slow motion playback With some discs the image may be unclear during slow motion playback Zooming in During Playback You can zoom into the picture during playback 1 Press ZOOM on the remote control during playback 2 Every time you press this button the unit will zoom 2 3 4 1 2 1 3 1 4 times and OFF Frame...

Страница 16: ...er The unlock logo will switch to lock indicating a password has been set Note The default password is 0000 In case you forgot your password you can use the master password 0000 to unlock and reset the password Master password will only work while SETUP button is pressed during playback Settings System Setup Language Setup Video Setup Category TV System Auto Play TV Type Password Rating Default OS...

Страница 17: ... accessory circuits but the engine is not running switch the ignition key to ACC Replace with a new fuse of equal rating Remove the disc in the player then insert a new one Insert the CD with the label facing up Clean the disc or try to play a new one Allow the ambient temperature to cool to normal level Leave the player off for an hour or so then try again Adjust volume to a desired level Check w...

Страница 18: ...ing the viewing angle is not possible SOLUTION Replace the disc with one featuring the same region number as this unit Turn parental lock off or change the level You cannot switch among multiple languages if they aren t recorded on the disc Switch using the system settings Subtitles are not displayed if they are not recorded on the disc Switch using the system settings You cannot switch between mu...

Страница 19: ...7 9 MHz Sensitivity 2 8 µV Stereo Separation 30 dB Signal to Noise Ratio 50 dB Channel Step 200 kHz TUNER AM Frequency Range 530 1710 KHz Usable Sensitivity 32 dBµV LINE OUT Output 5 V max Impedance 10k Ohm GENERAL Power Supply 12V DC 10 8 15 6V allowable Speaker Impedance 4 or 8 Ohm Output Power 60 Watts x 4 Channels TS825i MP3 Compatible AM FM DVD Receiver 17 ...

Отзывы: