33 -
In the
station selection
you can determine for which
station in the programme guide information is to be
displayed. Only stations with
are shown in the EPG.
With the coloured buttons you can select or remove sta-
tions or only select the stations from the favourites lists.
Because of the large number of receivable DVB-S stations
you should restrict the station selection. This reduces
the data entry time and increases the clarity in the EPG.
Marking the stations according to reception ranges:
®
Analogue stations via antenna/cable, for which the
current provider supplies data.
Digital terrestrial stations DVB-T.
6
Digital cable stations DVB-C.
Digital satellite stations DVB-S
(1
.
on (for DVB + analogue):
Data capture for DVB and ana-
logue stations
on (only for DVB):
Data capture only for DVB stations.
off:
No data capture.
After changes in the EPG menu or after switching off at
the mains switch the EPG data must be collected first.
To do this, switch on the set and select the station from
the analogue stations which you want defined as a pro-
vider and let the TV set run for about 1 hour with the
selected station. Or:
Switch the TV set into standby mode. The display on the
TV set glows orange after 2 minutes and the EPG data
entry begins.
The data capture normally takes place at night between
2 and 5 o’clock if the TV set is in the standby mode.
When
yes
is set, the switched off TV switches on auto-
matically from the standby mode at the beginning of a
set programme. A screen message appears when switch-
ing on. If this is not confirmed within 5 minutes with the
OK button
, the TV switches back off automatically for
safety reasons.
The programmes can be sorted either according to their
start times (
chronologically
) or according to stations (
cor-
responding to station list
).
Calling additional information about the programmes
➠
Brief information about many programmes is displayed
below the programme list of the broadcasts.
You can call detailed information with the
TEXT button
if
this function is offered by the TEXT icon in the lower left.
The symbol explanations are described on page 24.
Programming a recording for a recorder
➠
The selection is in the lower programme list,
if not, press the
blue button
.
Mark the desired programme.
RECORD button:
Starts recording wizard.
Change or confirm timer data if necessary (see page 54,
"The direct way to record").
Then a
red dot
will be displayed in front of this programme
as an identification.
RECORD button:
Deletes the already programmed
recording of the red marked programme from the
timer.
If the timer data have been transferred to an external
recorder, then the timer must also be deleted there.
Configuring EPG
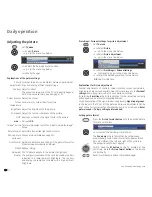
Start the EPG menu
➠
EPG mode is started,
if not, press the
EPG button
.
Call the
EPG menu
.
Settings in the EPG menu:
Select provider
(only for analogue stations),
Station selec-
tion, Data capture
,
Switch on TV when marked
,
Sorting
.
Explanations of setting possibilities in the EPG menu:
In
analogue TV reception
there may be different providers
who transmit the EPG data for certain station packages.
You can have the
list
of providers created
automatically
with the
yellow button
in the
provider selection
. You can
select the desired provider at the end of the provider
search. You can create the
list
of providers
manually
with
the
blue button
.
Station
selection
Data capture
Switch on TV
when marked
Sorting
Electronic Programme Guide
Select provider
END
INFO
OK
rovider
Sortin
Station selection
EPG menu
Data capture
Switch on TV when marked
(1
if upgraded


