background image

Here’s what you’ll need:

4 AA Batteries
Phillips Screwdriver

OPTIONAL: 

Power Drill

1/8

” Hole Saw

1” Drill Bit

Measuring Tape
Adhesive Tape

Содержание RemoteLock openEDGE RG

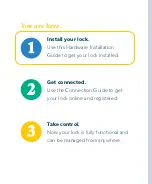
Страница 1: ...Do this first Hardware Installation 1...

Страница 2: ...rdware Installation Guide to get your lock installed Get connected Use the Connection Guide to get your lock online and registered Take control Now your lock is fully functional and can be managed fro...

Страница 3: ...Prefer to watch a video An instructional video of the OpenEdge RG Deadbolt installation and the removal of a preexisting deadbolt can be found at remotelock com RG deadbolt...

Страница 4: ...Need some help Visit us online support remotelock com We re here to help 1 877 254 5625 support remotelock com...

Страница 5: ...Here s what you ll need 4 AA Batteries Phillips Screwdriver OPTIONAL Power Drill 2 1 8 Hole Saw 1 Drill Bit Measuring Tape Adhesive Tape...

Страница 6: ...What s in the box Let s make sure you have everything you need If you re missing anything contact support remotelock com Exterior Lock Interior Lock...

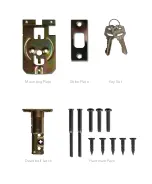
Страница 7: ...Mounting Plate Strike Plate Deadbolt Latch Key Set Hardware Pack...

Страница 8: ...Let s get started First things first let s get your new lock installed...

Страница 9: ...ed for a deadbolt installation If your door needs to be drilled you ll need to drill a 2 54mm face bore hole for the lockset on the face of the door as well as a 1 inch edge bore hole for the latch on...

Страница 10: ...ace bore hole please proceed to step 3 Use the template to the right to mark the center of each hole precisely Once the template is aligned tape the template in place The backset is the distance from...

Страница 11: ...MPLATE 1 3 4 1 9 16 1 3 8 2 45mm 40mm 35mm 51mm Fold and fit door edge on this line Drill a 1 in diameter latch hole at the exact center of your door s edge Drill a 2 in 54mm diameter hole for either...

Страница 12: ...MPLATE 1 3 4 1 9 16 1 3 8 2 45mm 40mm 35mm 51mm Fold and fit door edge on this line Drill a 1 in diameter latch hole at the exact center of your door s edge Drill a 2 in 54mm diameter hole for either...

Страница 13: ...Interior of Door Exterior of Door...

Страница 14: ...t to mark the center of each hole you will drill Mark the exterior of the door then apply the template to the interior of the door Make sure the holes are aligned precisely from one side of the door t...

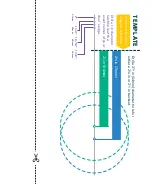
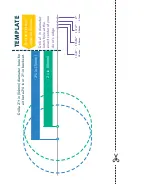
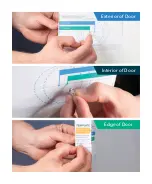
Страница 15: ...Exterior of Door Interior of Door Edge of Door...

Страница 16: ...nd straight Drill the 2 1 8 face bore halfway through on the first side Then drill the remaining half from the other side of the door This prevents damage to the door and improves accuracy Finally use...

Страница 17: ...Exterior of Door Interior of Door Edge of Door...

Страница 18: ...ace bore hole to the edge of the door The deadbolt latch has two positions for either a 2 3 8 60mm or 2 70mm backset Rotate the latch case clockwise for 2 Rotate the latch counter clockwise for 2 3 8...

Страница 19: ...Exterior of Door Interior of Door...

Страница 20: ...ted up Hand tighten with two of the included wood screws STEP 4 Install latch Make sure the latch plate lays flush with the door If the latch plate is not flush with the door draw an outline around th...

Страница 21: ......

Страница 22: ...that the deadbolt latch is retracted and pass the power cable under the latch Insert the tailpiece into the hub of the latch making sure it is in the horizontal position Make sure the power cable is...

Страница 23: ...Exterior of Door Interior of Door...

Страница 24: ...te up to the interior of the door making sure the prongs are facing up and outward Pass the power cable through the bottom center hole in the mounting plate Secure the mounting plate to the exterior h...

Страница 25: ...BOTTOM CENTER HOLE...

Страница 26: ...it off Ensure the thumb turn knob is still in the unlocked position by turning it to face away from the edge of the door Take a picture of the serial number sticker on the back of the lock The serial...

Страница 27: ......

Страница 28: ...late Secure to the mounting plate using the 3 included short bolts Ensure the thumb turn moves freely extending and retracting the latch OPTIONAL STEP A wood screw is provided and can be used to screw...

Страница 29: ...OPTIONAL...

Страница 30: ...ium batteries into the battery compartment Slide the battery cover back onto the lock Rechargeable batteries should never be used in this device because they do not support the necessary voltage Pleas...

Страница 31: ......

Страница 32: ...en handing is correctly set you will see two green flashes and hear two beeps IMPORTANT DO NOT MISS THIS STEP If the 0 button sequence does not work enter the lock s Programming Code button 140 button...

Страница 33: ...more at remotelock com deadbolt handing Deadbolt Door Handing Handing provides directional instructions to the deadbolt so that it will correctly lock and unlock Handing is required during initial se...

Страница 34: ...lock the lock press the button Please note that for security purposes the default access code and Programming Code will be deleted after 24 hours or when your first access user is created If you do no...

Страница 35: ...Congratulations Your lock is now installed Next Use the Connection Guide to finish setup...

Страница 36: ...oor by entering a user code followed by the button on the keypad by interior thumb turn or with the included keys Once your lock is installed and connected to WiFi you can easily control your lock add...

Страница 37: ...button NUMBER BUTTONS Input buttons for codes and function programming CYLINDER Lock Unlock the lock from exterior GASKET Prevent water permeating into lock BATTERY LID Slide the lid to change the ba...

Страница 38: ...Default Settings By default and after a factory reset your lock has the following settings Programming Code User Code 1234 Auto Lock Mode Disabled Keypad Sound Enabled Heartbeat Interval 1 Hour...

Страница 39: ...tely from the RemoteLock app None of the following functions are required for setup All keypad programming functions follow the same general steps 1 Enter your followed by the button 2 Enter the for t...

Страница 40: ...s reached 30 we will send additional low power notifications once per week until the device is dead Programming Code The default programming code is 123456 Please change this code for your security Pr...

Страница 41: ...0 digits Auto Lock When disabled the lock will remain unlocked after a code is entered This mode is disabled by default on all OpenEdge RG Deadbolt models When Auto Lock is enabled the lock will autom...

Страница 42: ...ming error 4 red flashes 4 25V low battery warning 8 red flashes 3 75V low battery warning Orange flashes lock is in a programming sequence Audio Indications 1 beep indicates successful operation or a...

Страница 43: ...g Handing provides directional instructions to the deadbolt so that it will correctly lock and unlock Handing is required during initial setup and after a factory reset Visit remotelock com deadbolt h...

Страница 44: ...default the code is 123456 You can change this code to any anything 4 8 digits in length To set a new programming code enter the following on the lock s keypad Enter your current followed by the butto...

Страница 45: ...rom the lock Note that schedules cannot be applied to a Local Code Local Codes can be 4 8 digits in length To Add a Local Code enter the following on the lock s keypad Enter your followed by the butto...

Страница 46: ...he following on the lock s keypad Enter your followed by the button followed by and then enter the existing followed by 130 Erase ALL Local Codes If you would like to remove ALL of your existing Local...

Страница 47: ...by 320 Enter 320 followed by to beacon the lock s network to connect Wi Fi or connect to a new network 131 Erase all user codes except 1234 default 135 Perform a factory reset Careful this will delete...

Страница 48: ...11 Enter 411 followed by to force Wi Fi to wake up if the lock is currently set to not wake up when keypad is pressed Changes or modifications not expressly approved by the party responsible for compl...

Страница 49: ...Notes...

Страница 50: ...Visit us online support remotelock com We re here to help 1 877 254 5625 support remotelock com...

Отзывы: