


SECTION 3.6
18
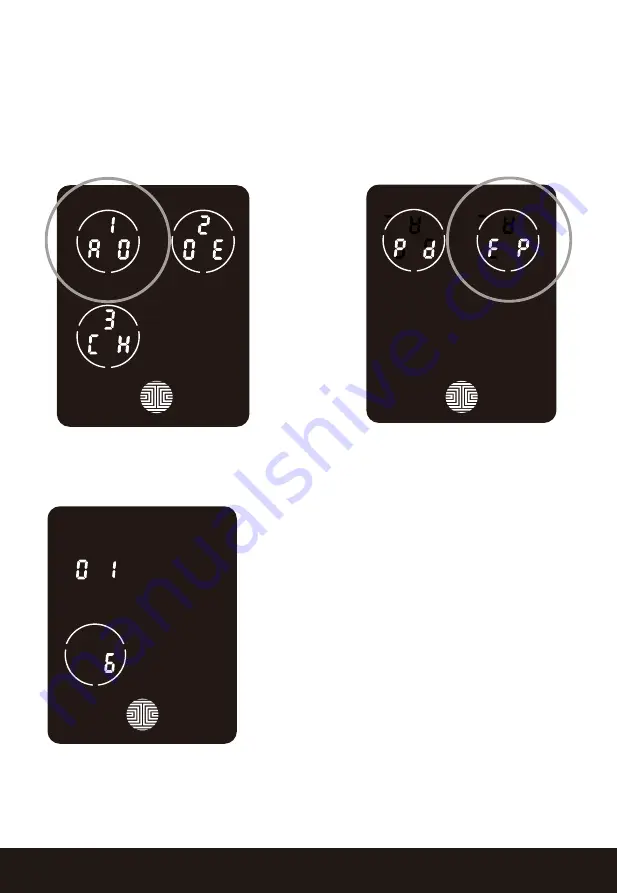
While in
Programming Mode
, select
“1AD”
to add an
Access Code.
If you are
not in
Programming Mode,
please see
Section 3.2
to enter
Programming Mode.
After pressing
“1AD”
press
“FP”
to register a
Fingerprint.
Upon pressing “FP”, you will enter Fingerprint Registration Mode and you will see
a green LED ring light up on the fingerprint panel on the exterior of Lockly™.
3.6 Adding a Fingerprint (Continued)
Once you’re in
Fingerprint Registration Mode
you will see two numbers displayed on keypad.
The top number is your
Fingerprint Registration
number, in this example to the left,
“1”.
The
bottom number will always start with a
“6”.
You must successfully scan your fingerprint six (6)
times for it to properly register. Every time you
scan your fingerprint, the number on the bottom
will change, starting from 6 - then 5, 4, 3, 2, 1, until
the fingerprint is successfully registered.
Note:
For reference, please keep a record of your
fingerprint registration number
to distinguish
whom it was registered to.
Содержание Secure LUX
Страница 1: ...MORTISE EDITION USER MANUAL LUX MORTISE LOCK SECURE...
Страница 23: ...SECTION 3 7 21 Top View Side View 3 7 Fingerprint Scanning Directions Continued OK OK X X X X Correct Incorrect...
Страница 43: ...UMPGD82920190429 We re here to help help lockly com https lockly com help SECURE...


