background image

21

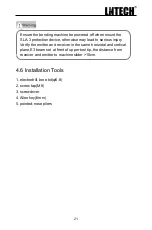
Ensure the bending machine be powered off when mount the 

SLA-3 protection device, otherwise may lead to serious injury.

Verify the emitter and receiver in the same horizotal and vertical 

plane,E3 beam set at front of upper tool tip, the distance from 

receiver and emitter to machine slider >10cm.

4.6 Installation Tools

1. electrodrill, bore bit(φ6.8)

2. screw tap(M8)            
3. screwdriver
4. Allen key(6mm)      
5. pointed-nose pliers

Содержание SLA-3

Страница 1: ...SLA 3 Bending Machine Protection Device Instruction Manual SHANDONG LAIEN OPTIC ELECTRONIC TECHNOLOGY CO LTD...

Страница 2: ......

Страница 3: ...ions 2 1 6 Application Guide 3 2 Important Information 2 1 Terminology 5 2 2 Usage 6 2 3 Technical Parameters 7 2 4 Characteristics 8 2 5 Working Modes 8 3 Components 3 1 External Size 11 3 2 Parts In...

Страница 4: ...tion 18 4 6 Installation Tools 21 5 Wiring 5 1 Cautions 22 5 2 Wiring with Safety Relay 23 5 3 I O Wiring 24 5 4 Signal Cable 25 6 Debugging 6 1 Debug 26 6 2 Safety Test 27 7 Checkout and Maintenance...

Страница 5: ...wing and terminology technical parameter data and specification of the SLA 3 device Cautions for installation of the SLA 3 device contains calculating determination of placement position and attention...

Страница 6: ...materials or components parts through the defined area and can t prevent the materials ejected leading to the injury Also can t provide the protection for below situation Failure to follow the instruc...

Страница 7: ...15mm as per bending machine overstroke control system should send out the muting signal to SLA 3 receiver and ensure the closing speed 10mm s according to the type 4 standards SLA 3 offers complete pr...

Страница 8: ...d connection follow the instruction manual complte the safety regulations to ensure safety operation not any change allowed to circuit which will cause protection failure 4 SLA 3 special mode enables...

Страница 9: ...pment ESPE All output signal switching devices OSSDs and where applicable all secondary switching devices SSDs are signalled to go to the OFF state Muting Temporary automatic suspension of a safety fu...

Страница 10: ...ion For longer range please get in contact with us Overrun Distance The distance covered during the overrun e g by the ram of a press Start Interlock After initial operation or after a power supply in...

Страница 11: ...ort protection Switch capability 200mA Response time 5ms Safety level Cat4 PL e Anti vibration EN 60068 2 6 Frequency 10 55Hz Amplitude 0 35mm Protection level IP65 Protection category III Electrical...

Страница 12: ...process Operate at high speed max safety at maximum productivity Samll size simple easy adjustment Comply with EN 61496 1 2 EN ISO13849 2 5 Working Modes When power up the protector keep the foot peda...

Страница 13: ...t aimed at the receiver properly E1 E2 E3 indicators ON otherwise the indicators are OFF and no flashing means promper alignment Flat Bending Mode Process the flat material in the mode E1 E2 E3 beams...

Страница 14: ...fast speed closing output OSSD1 OSSD2 OFF release and step the pedal again if the beam is still interrupted output OSSD1 OSSD2 keep OFF the sensor outputs the complusory slow speed signal PNP control...

Страница 15: ...11 3 Components 3 1 External Size Fig 3 1 External Size Fig 2 3 Time Diagram of Special Mode Note Emitter external size is same as the receiver...

Страница 16: ...2 Fig 3 2 SLA 3 Parts 1 2 3 4 5 6 3 3 Receiver Indicators 3 2 Parts Instruction 1 Emitter Front Cover 2 Receiver Front Cover 3 Emitter Back Cover 4 Receiver Back Cover 5 Emitter Panel 6 Receiver Panel...

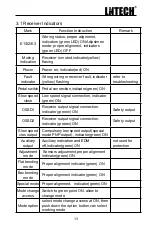
Страница 17: ...tor greeen ON Safety output OSSD2 Receiver output signal connection indicator greeen ON Safety output Slow speed clos output Compulsory low speed output special mode PNP output indicator green ON Auxi...

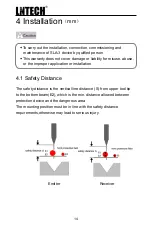
Страница 18: ...improper application or installation 4 1 Safety Distance The safety distance is the vertical line distance S from upper tool tip to the bottom beam E2 which is the min distance allowed between protect...

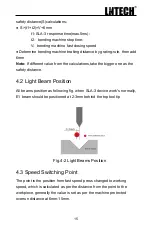
Страница 19: ...igger one as the safety distance 4 2 Light Beam Position All beams position as following fig when SLA 3 device work s normally E1 beam should be positioned at 2 3mm behind the top tool tip Fig 4 2 Lig...

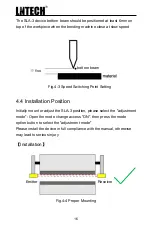
Страница 20: ...t mode Please install the device in full compliance with the manual otherwise may lead to serious injury Fig 4 4 Proper Mounting Installation The SLA 3 device bottom beam should be positioned at least...

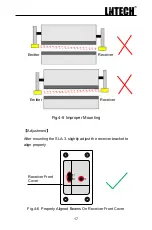
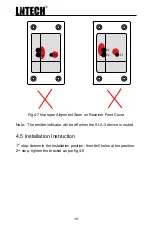
Страница 21: ...oper Mounting After mounting the SLA 3 slightly adjust the receiver bracket to align properly Fig 4 6 Properly Aligned Beams On Receiver Front Cover Receiver Front Cover Emitter Receiver Emitter Recei...

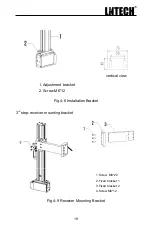
Страница 22: ...eceiver Front Cover 1st step determin the installation position then drill holes at the position 2nd step tighten the bracket as per fig 4 8 Note The emitter indicator will be off when the SLA 3 devic...

Страница 23: ...8 Installation Bracket 1 Adjustment bracket 2 Screw M6 12 vertical view 3rd step receiver mounting bracket 1 Screw M8 20 2 Fixed bracket 1 3 Fixed bracket 2 4 Screw M6 12 Fig 4 9 Receiver Mounting Br...

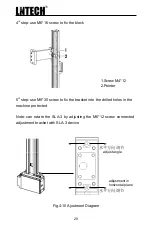
Страница 24: ...r 5th step use M8 30 screw to fix the bracket into the drilled holes in the machine protected Note can rotate the SLA 3 by adjusting the M6 12 screw connected adjustment bracket with SLA 3 device Fig...

Страница 25: ...serious injury Verify the emitter and receiver in the same horizotal and vertical plane E3 beam set at front of upper tool tip the distance from receiver and emitter to machine slider 10cm 4 6 Install...

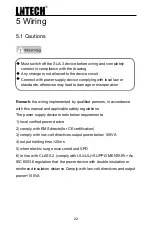
Страница 26: ...sons in accordance with this manual and applicable safety regulations The power supply device meets below requirements 1 local verified power device 2 comply with EMS directs for CE certification 3 co...

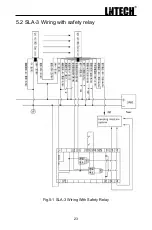
Страница 27: ...23 5 2 SLA 3 Wiring with safety relay Fig 5 1 SLA 3 Wiring With Safety Relay...

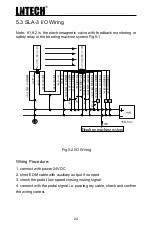
Страница 28: ...e bending machine system Fig 5 1 Fig 5 2 I O Wiring Wiring Procedure 1 connect with power 24VDC 2 short EDM cable with auxiliary output if no need 3 check the pedal low speed closing muting signal 4 c...

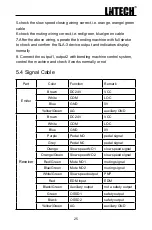
Страница 29: ...works normally or not 5 4 Signal Cable Part Color Function Remark Emiter Brown DC24V VCC White COM LOC Blue GND 0V Yellow Green AG auxiliary GND Receiver Brown DC24V VCC White COM LOC Blue GND 0V Pur...

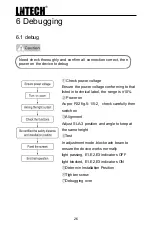
Страница 30: ...chnical label the range is 10 Power on As per P22 fig 5 1 5 2 check carefully then switch on Alignment Adjust SLA 3 position and angle to keep at the same height Test In adjustment mode block each bea...

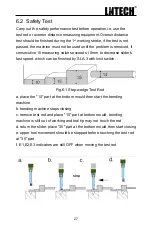
Страница 31: ...e slider s fast speed which can be finished by SLA 3 with limit switch Fig 6 1 Step wedge Test Rod a place the 10 part at the bottom mould then start the bending machine b bending machine stops closin...

Страница 32: ...28 Fig 6 2 Test Procedure Diagram upper mould STOP...

Страница 33: ...loosen screws tightly replace the damaged ones according to the situation Need check the device before operation apart from the periodic checkout Before operation check to ensure the SLA 3 device wor...

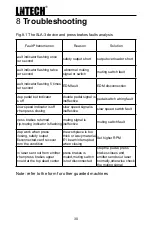
Страница 34: ...switch fault press brakes returned trip muting indicator is flashing muting signal is ineffective muting switch fault stop work when press closing safety output disconnected can t recover from the co...

Страница 35: ......
Страница 36: ...LECTRONIC TECHNOLOGY CO LTD Add west shanbo road high tech zone jining shandong china Tel 0537 3169707 0537 3169808 Fax 0537 3166661 E mail ln100 laien cn Http www laien cn 2017 12 Content subject to...

Отзывы: