background image

  www.lmicorporation.com                                                                                             15 

8.7 

SETTING/CHANGING TOLERANCES LIMITS


To enter the mode that changes the tolerance value, Press and hold the TOL button for 3 seconds. 
The previously set value will display. The default values are +2.00mm and -2.00 mm.  Press and 
hold the TOL button until the underscore is below the digit you would like to change. Press and 
release the TOL button to change the value of the digit to the desired value. When you are finished, 
press and hold the TOL button until none of the digits are underscored and SET is flashing. Press 
and release the TOL button and the new values will be set. Be aware that there are two values, the 
first value to be displayed is the Upper Limit and the second value to be displayed is the Lower 
Limit.  
 

NOTE

: the Lower Limit cannot be greater than or equal to the Upper Limit. (an error will be 

displayed if attempted) 


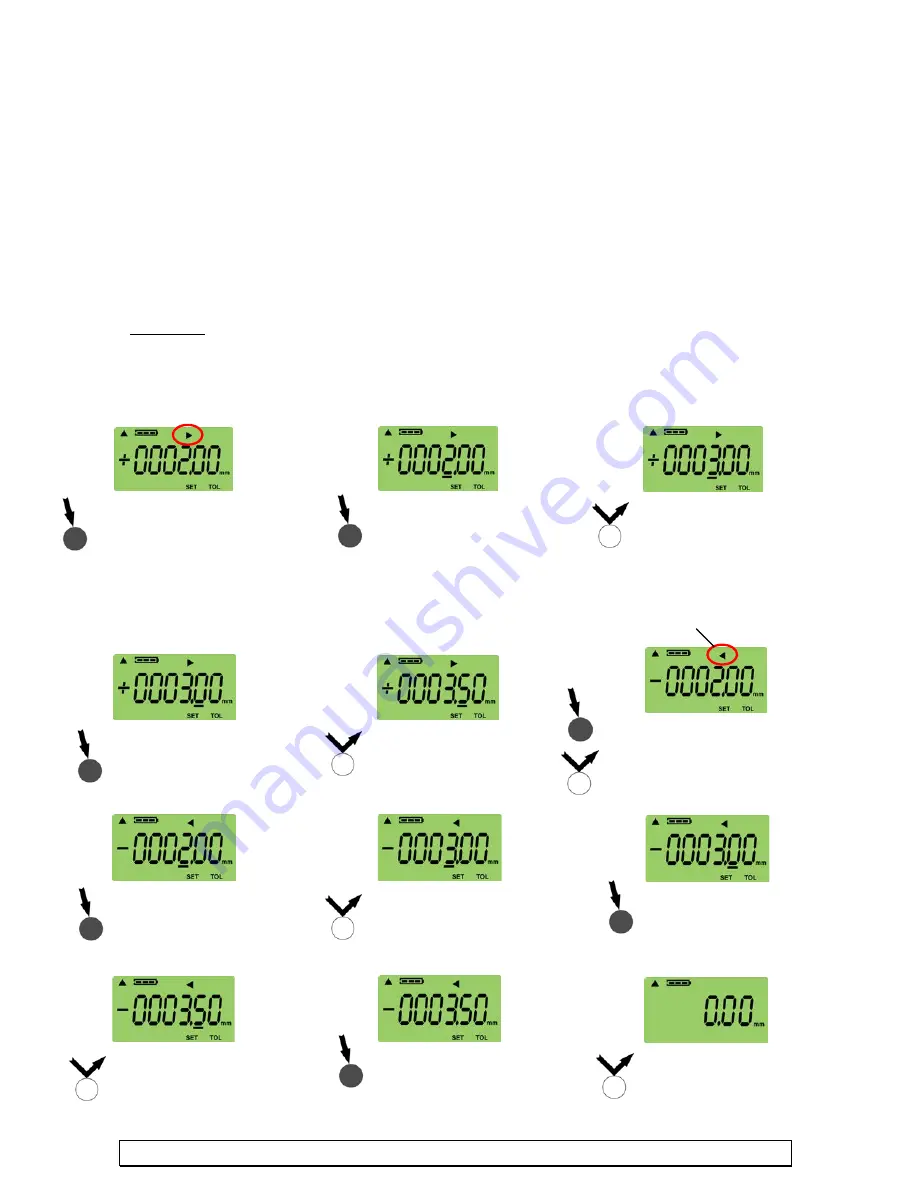
EXAMPLE: 
 
For this example, we are going to change from the default values of +2.00mm and -2.00mm so that the Upper 
Limit is +3.50mm and the Lower Limit is -3.50mm. 


Note: 

Arrow pointing to the right indicates setting the Upper Limit 


Note: 

Arrow pointing to the 

left indicates setting the 
Lower Limit 


Press and hold TOL for 3 

seconds. The previous Upper 

Limit will be displayed and 

SET will flash. 

Press and hold TOL 

until the underscore 

is under the fourth 


Press and release TOL 

until the fourth digit reads 

three. 

Press and hold TOL 

until the underscore 

appears under the fifth 

digit. 

Press and release TOL 

until the fifth digit reads 

five. 

1. Press and hold TOL until the 

underscore is gone. SET will flash. 

2. Press and release TOL and the Lower 

Limit and arrow icon will display 

Press and hold TOL 

until the underscore is 

under the fourth digit. 

Press and release TOL 

until the fourth digit reads 

three. 

Press and hold TOL until 

the underscore is under 

the fifth digit. 

Press and release TOL 

until the fifth digit reads 

five. 

Press and hold TOL 

until the underscore is 

gone. SET will flash. 

Press and release TOL 

and the new Upper and 

Lower Limits are set 

Содержание Diamonback

Страница 1: ...www lmicorporation com 1 DIGITAL INDICATOR USER MANUAL LMI Corporation Linear Measurement Instruments 101 N Alloy Drive Fenton MI 48430 810 714 5811 www lmicorporation com...

Страница 2: ...ONTACT TIPS 10 5 INSTALLING LUG 10 6 MOUNTING THE DIGITAL INDICATOR 10 7 PROTECTIVE BOOT 11 7 1 REMOVING THE PROTECTIVE BOOT 11 7 2 RE INSTALLING THE RUBBER CONNECTOR PLUGS 11 8 OPERATING PROCEDURES 1...

Страница 3: ...ctive workmanship or material it will be covered under the warranty up to one year from date of original purchase During the warranty period we will repair or at our option replace at no charge the pr...

Страница 4: ...nt of the spindle Safety and Precautions on LCD and Battery Disposal A Liquid Crystal Display LCD is used in this product When disposing follow the ordinances or regulations of the respective local go...

Страница 5: ...NS 1 Top Cap 7 Contact Point 2 LCD Screen 8 Battery Cover 2 3 Function Keys 9 Mounting Lug optional 4 Protective Boot 10 USB Port 5 Stem 11 Serial Port and Digimatic Port 6 Spindle 12 Product Label 13...

Страница 6: ...USB connector is plugged in and the indicator is powered by USB port PWR USB 24 Tolerance Symbols only visible in TOL mode displays greater than less than or equal to the set tolerance limits 25 DATA...

Страница 7: ...D Back 5335 12 7mm 0005 01mm 0004 01mm 1 0N or less 31 0 3 8 5 77 146 6mm LMI D Back 5355 12 7mm 0005 01mm 0004 01mm 1 0N or less 50 0 3 8 6 52 165 6mm LMI D Back 5835 12 7mm 0005 01mm 0004 01mm 1 0N...

Страница 8: ...01mm 0008 02mm 1 9N or less 31 0 3 8 6 27 159 3mm 53 13 3mm LMI D Back 1355 1 0 25 4 mm 0005 01mm 0008 02mm 1 9N or less 50 0 3 8 7 02 178 3mm 75 19 0mm LMI D Back 1835 1 0 25 4 mm 0005 01mm 0008 02m...

Страница 9: ...limits preset values and the mode the digital indicator was in before the batteries were replaced 1 Verify that the unit is turned off 2 Flip the digital indicator over so the LCD is facing down 3 Us...

Страница 10: ...TION 5 INSTALLING THE LUG An optional mounting lug Part no LMI D Back Lug can be purchased for the indicator To install the lug turn the indicator so that the LCD is facing down Align the lug on the r...

Страница 11: ...installed to keep the connectors clean The rubber plugs were designed to be a tight fit to keep out dirt and grime to give you years of shop floor use But there is a simple technique to re install the...

Страница 12: ...ANGING SIGN AND COUNTING DIRECTION To change the positive and negative value press and release the button and the sign will change to the left of the value This will also change the counting direction...

Страница 13: ...ING THE PRESET VALUE To change the PRESET value press and hold the PRESET button for 3 seconds The previous value will be displayed Press and hold the PRESET button to select the digit you want to cha...

Страница 14: ...ITH NUMERICAL VALUES To display the tolerance judgment with numerical values press and release the TOL button The tolerance symbols will appear in the upper middle section of the LCD DISPLAYING TOLERA...

Страница 15: ...change from the default values of 2 00mm and 2 00mm so that the Upper Limit is 3 50mm and the Lower Limit is 3 50mm Note Arrow pointing to the right indicates setting the Upper Limit Note Arrow pointi...

Страница 16: ...s entered into a part To Flip Invert the LCD hold the button down for 3 5 seconds until the screen has Flipped To Flip the screen back again hold the button for 3 5 seconds When the screen is flipped...

Страница 17: ...tal indicator Click on the Install Drivers tab and click on Install Drivers again Once the drivers are loaded the digital indicator will be able to communicate via USB The drivers will emulate a virtu...

Страница 18: ...ill remain changed even after the unit is powered off Press and hold the SEND button again until the LCD highlights to change the baud rate back to 57600 Data format Reading followed by Carriage Retur...

Страница 19: ...owing the protocol outlined below All commands must have around the command string All commands are case sensitive REQ The REQ command will request a reading from the Digital Indicator at its current...

Страница 20: ...rance arrows will continue to flash 5 Once the Diamondback is in SETUP mode press and release the in mm button again to send the indicator parameters to the base You should see the data fields such as...

Отзывы: