background image

– 16 –

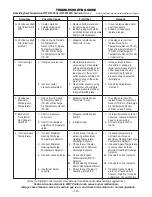
  1. Install properly.

  1.  Prove the power source.

  2.  Correct the wiring.

  3.  If item B1 checks out and 

modulating voltages are 
still not obtained, ampli

fi

 er 

(RE-26) may be assumed 
faulty. Replace.

  4.  Contact Factory.

  1.  Replace modulator head 

if not approximately 45-55 
ohms for M611 Valve and 
60-80 ohms for MR212 

 Valve.
  2.  Clean or replace plunger if 

necessary. 

  1.  Adjust to proper minimum  

fi

 re.

  2.  If reading is greater than 1.5" 

negative pressure, check 
for clogged 

fi

 lters or other 

inlet air restrictions. Consult 
factory for other solutions.

  1.  Replace Outside Air 

Temperature Sensor (TS-01) 
or Discharge Air Temperature 
Sensor (TS-03

  1.  Clean seat. Clean valve or 

replace if necessary.

  2.  Clean, or if necessary, 

replace plunger.

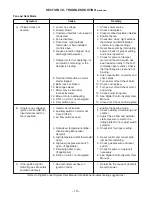
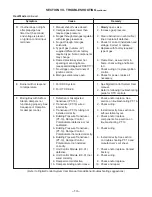
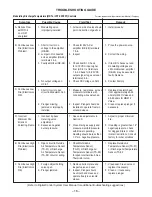
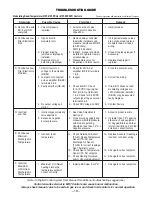
TROUBLESHOOTING GUIDE

Modulating Discharge Temperature (MDT or VDT EXPERT) Controls


Portions reproduced with permission from Maxitrol

®

 Company


Symptom  

Possible Cause  

Field Test 

Remedy

A.  No Gas Flow 

with DO-2 
on UC-01 
energized.

B. Continuous Low 

Fire (Electronics 
Problem).

C. Continuous Low 

Fire (Electronics 
OK).

D. Incorrect 

Minimum Fire 
Erratic or 
Pulsating Flame.

E. Continuous High 

Fire (Electronics 
Problem).

F. Continuous High 

Fire (Electronics 
OK).

  1.  Arrow on side of valve should 

point in direction of gas 

fl

 ow.

  1.  Check for 24V AC at 

ampli

fi

 er (RE-26) terminals  

7 & 8.

  2.  Inspect.

  3.  Check item B1. Check 

for 2-10 VDC input signal 
from (UC-01) at terminals 
1 & 2. Check for 0-20 VDC 
output signal to gas valve at 
terminals 5 & 6.

  4.  Check DC Voltage on AO-1.

  1.  Measure  resistance  across 

modulator terminals with

       connecting wires detached.

  2.  Inspect. Plunger should be 

installed to operate freely in 
solenoid sleeve.

  1.  See valve adjustments in 

Section X.

  2.  Close main gas supply and  

measure manifold pressure 
with blower operating. 
Reading should be less than 
1.5" w.c. negative pressure.

  1.  Check Outside Air 

Temperature Sensor 
(TS-01) or Discharge Air 
Temperature Sensor (TS-03) 
for open internal circuit. See 
Thermistor curve.

  1.  Remove bottom plate and 

inspect valve and seat.

  2.  Inspect. Plunger should 

be smooth and clean and 
operate freely in solenoid 
sleeve.

(Refer to Digital Control System User Manual for additional troubleshooting suggestions)

  1. Modulating valve 

improperly installed. 

  1.  Short circuit or no 

voltage to the ampli

fi

 er 

(RE-26).

  2.  Jumper not connected 

across ampli

fi

 er (RE-26) 

terminals 3 & 4.

  3.  Faulty ampli

fi

 er (RE-26).

  4.  No output voltage on 

UC-01.

  1.  Short circuit or open 

circuit in Modulator Coil.

  2.  Plunger missing, 

jammed or improperly 
installed.

  1.  Incorrect by-pass 

metering valve 
adjustment.

  2.  Excessive negative 

burner pressure.

  1.  Open circuit in Outside 

Air Temperature Sensor 
(TS-01) or Discharge 
Air Temperature Sensor 
(TS-03) circuit or wiring.


  1. Foreign object holding 

valve open.

  2.  Plunger jammed.

Содержание WDF

Страница 1: ...res 2 Ne pas actionner d interrupteur 3 Éteindre toute flamme ouverte 4 Appelez immédiatement votre fournisseur de gaz AVERTISSEMENT Une installation déficiente de même qu un mauvais réglage modification entretien ou maintenance peuvent occasionner des dommages matéri els corporels voire causer la mort Lire attentivement les instructions d installation d utilisation et d entretien avant d installe...

Страница 2: ...on company when the claim is filed They will give you disposition instructions Packing We comply with the packing requirements of the transportation companies and your bill of lading proved that everything was in good condition when shipped That bill of lading contract requires them to deliver in perfect condition SECTION I FOREWARD As is the case with any fine piece of equipment care must be take...

Страница 3: ... and critical components Rotate the fan s monthly Prior to beginning installation of a unit that has been in storage for weeks or months the unit and its compo nents should be closely inspected Shipments are made F O B Dallas Texas by flat bed truck The unit is securely strapped tied and blocked to prevent shipping damage All shipments are checked by an inspector before they are accepted by the ca...

Страница 4: ...writers National Electrical Code and local governing bodies The following recommendations are not intended to supplant any requirements of federal state or local codes having jurisdiction Authorities having jurisdiction should be consulted before instal lations are made Local codes may require additional safety controls and or interlocks All installations in airplane hangers must be in ac cordance...

Страница 5: ...g and positioning will assure a water tight curb unit installation Re check approval prints prior to installation Be sure that there are no obstructions to ducting and that proper planning has been exercised in connection of piping and or electrical services The curb assembly may be bolted or welded to either trusses or roof decking however connection to roof trusses is recommended The curb is des...

Страница 6: ...les prévus pour résister à une chaleur d au moins 105 C F Field Piping Gas Piping All gas piping must be in accordance with the require ments outlined in the National Fuel Gas Code ANSI Z223 1 It is required that a ground union be installed adjacent to the manifold for easy servicing A drip leg and or filter should be provided upstream of the unit s inlet gas connection An additional shut off must...

Страница 7: ...voltage drop Check the VA rating of control circuit transformer to determine maximum load 3 Mount and wire remote control panel thermostats temperature sensors and any other field installed controls as indicated on the unit control wiring diagram 4 Connect all wires to the appropriate field wiring terminals and any shielded or twisted wires as indicated on the unit control diagram 5 Field wiring s...

Страница 8: ...m duct work is installed and free from obstructions 11 Check that fans turn free in housing 12 Check that the area around the unit is clear of flammable vapors or containers of flammable liquids 13 Check that all piping connections particularly unions are tight Check all gas piping for leaks using a soap bubble solution The most common types of problems found relative to the gas train itself is fo...

Страница 9: ...will enable the fans To also enable the fans go to Unit Modes and enter AUTO this mode has four different functions that control the fans and unit operation They are a Time Clock Heating and Cooling Night Setbacks and signal from an external source to an auxiliary digital input To disable the fans go to Unit Modes and enter OFF NOTE A BACview or PC is required to change Unit Modes For a more detai...

Страница 10: ...ire for approximately 10 seconds before modulating up The reading should be at least 0 5 microamps If the read ing is too low slowly turn the low fire adjustment on the modulating valve in or out until satisfactory readings are obtained When adjusting low fire there should be a continuous flame along the entire burner length without any blowout spots Install manometer at test port on the last tee ...

Страница 11: ...s to a lower temperature setting while the unit is operating on high fire and observing cutoff The controls should be reset to settings shown below Make sure all the safeties and controls are working properly Suggested Control Settings Refer to Digital Control System user manual for default settings TS 02 Space Temperature Sensor Customer Discretion KP 01 Keypad Display Module Customer Discretion ...

Страница 12: ...e is sensed during a purge period when no flame should be present the control will remain in purge with the gas valve off until the false flame disappears If the gas valve is found to be powered when it should be off or not powered when it should be on the ignition control will enter lockout with all outputs off Reset is accomplished by cycling the power off for a minimum of 5 seconds The Red LED ...

Страница 13: ...gnition control 1 Check power source 2 Check and replace 3 Close or connect customer interlock 4 Enable the fan 5 Check time clock night setback thermostat and field installed controls for proper settings 6 Reset freeze stat by interrupting power Check for proper setting and burner operation 7 Check for power at damper motor and that end switch has been wired correctly to the N O normally open con...

Страница 14: ...lenoids 5 Type of gas natural LP supplied different from factory required type Note components may change 6 Flame detection system not sparking or sensing flame see spark rod diagram P 001117 7 No voltage output terminals of ignition control 8 Main gas valve relay open 1 For DDC System 2 For RTC RE 26 1 Defective or misadjusted transducer PT 15 2 Transducer PT 15 wired incorrectly 3 Transducer PT ...

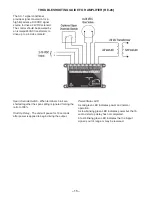
Страница 15: ...1 signal conditioner provides signal conversion for a high impedance 2 10VDC signal source to drive a 24VDC solenoid The control should be powered by an isolated 24VAC transformer to drive up to a 5A dc solenoid Power Status LED A solid green LED indicates power and normal operation A slow blinking green LED indicates power but the 10 second start up delay has not completed A fast blinking green L...

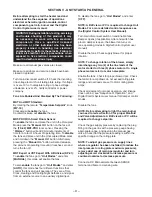
Страница 16: ...fier RE 26 terminals 7 8 2 Inspect 3 Check item B1 Check for 2 10 VDC input signal from UC 01 at terminals 1 2 Check for 0 20 VDC output signal to gas valve at terminals 5 6 4 Check DC Voltage on AO 1 1 Measure resistance across modulator terminals with connecting wires detached 2 Inspect Plunger should be installed to operate freely in solenoid sleeve 1 See valve adjustments in Section X 2 Close ...

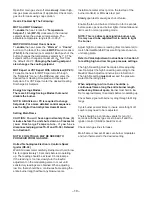
Страница 17: ...plus pressure drop of the valve 2 Read manifold pressure using manometer and compare with the pressure stated on the specification plate 1 Check setpoint on Unit Enable Potentiometer MP 15 2 Check Discharge Air Temperature Sensor TS 03 and wiring See Thermistor curve 3 Check setpoint with BACview or PC 1 Measure resistance across modulator terminals with red lead wires disconnected 2 Inspect wirin...

Страница 18: ...of valve should point in direction of gas flow 1 Remove wires connected to amplifier terminals and measure resistance MR212 60 80 ohms M611 45 55 ohms 2 Inspect plunger should be installed to operate freely in solenoid sleeve 3 Disassemble valve for inspection of internal parts 1 Check for 24V AC at amplifier RE 26 terminals 7 8 2 Inspect 3 Check item B1 Check for 2 10 VDC input signal from UC 01 ...

Страница 19: ...t 1 Open circuit in Space Temperature Sensor TS 02 or Discharge Air Temperature Sensor TS 03 1 Short in modulator coil circuit 2 Short circuit between amplifier and modulator valve 1 Incorrect Maximum Heating Discharge Temperature Setpoint 2 Incorrect Minimum Heating Discharge Temperature Setpoint 3 Incorrect space setpoint 4 Insufficient burner capacity G Continuous High Fire Electronics OK H Con...

Страница 20: ... are energized and condensing unit or evaporative cooler is not on C Incorrect Space Temperature 1 Enable the cooling mode 2 Check auxiliary circuit wiring and contact 3 Adjust the air flow and external static pressure to match the unit rating plate DO NOT ADJUST SWITCHES 4 Change to correct setpoints See Digital Control User Manual 5 See Digital Control System User Manual 1 Check and or replace 2...

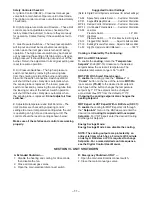
Страница 21: ...tside Air Profile Damper To calibrate the Flow Station Pressure Transducer PT 15 1 Remove the tubes at the Low and High pressure fittings 2 The voltage at COM and OUT should be O VDC If not adjust Z do not adjust S 3 Make sure the Low and High fittings are clean do not insert any sharp objects into the pressure fittings make sure the static pressure sensing pitot tubes and all tubing is also clean...

Страница 22: ...ve disconnected the sensing tubes and get the burner running in high fire Your differential pressure should have dropped If it is near the low switch trip point you need more air Some adjustments can be made by repositioning the burner profile plates If the high switch is open you can open the profile plates If the low switch is open you can close the profile plates Remember to keep the distance b...

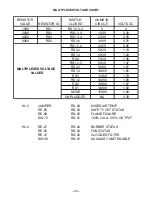
Страница 23: ... 4 6020 1 24 RS4 7020 1 36 RS1 2 3 8060 1 47 RS2 3 9060 1 57 RS1 3 10060 1 65 RS3 11060 1 73 RS1 2 12080 1 80 RS2 13080 1 87 RS1 14080 1 92 NONE 15080 1 98 UNPLUGGED NA 3 30 IN 3 JUMPER RS 04 MIXED AIR TEMP RE 56 RS 03 SAFETY CKT STATUS RE 09 RS 02 FLAME FAILURE SW 72 RS 01 100 OA or 100 OUTPUT IN 4 RE 27 RS 04 BURNER STATUS RE 65 RS 03 FAN STATUS RE 12 RS 02 CLOGGED FILTER SW 09 RS 01 AUXILIARY U...

Страница 24: ...kets and recaulk as necessary q Check all nuts and bolts for tightness NOTE Keep screened air intakes clear of obstruc tions at all times WARNING Failure to comply with the general safety information may result in extensive property damage severe personal injury or death Periodic maintenance is essential to the efficient operation and extended service life of this equipment Failure to provide main...

Страница 25: ... rear end fan housing must be removed to expose the grease plugs 2 Pillow Block Bearings Pillow block bearings are used on supply blower s Bearings have been prelu bricated with a number 2 lithium base grease Relu brication should be done with a similar grease using a low pressure grease gun Wipe all grease fittings clean before adding grease Grease should be added slowly in small amounts at frequ...

Страница 26: ...o this end of the shaft 10 Slide the shaft through the next blower wheel hub and add another bearing Continue this procedure until the shaft is through all of the blower wheels 11 Place a bearing on each end of the shaft 12 Replace the old shims with new 13 Bolt the bearings in place and reattach the grease lines When installing a Sleevlock bearing see note at bottom of page 14 Adjust the shaft so...

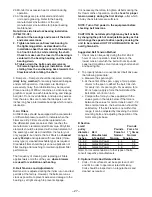
Страница 27: ...blowers are used for ventilation and heating D Belt Tensions and Adjustments Belt tension is adjusted during the initial run in and test periods at the factory However the belts are run as slack as possible to prevent excessive damage to the bearings yet tight enough to prevent slippage It is necessary therefore to tighten all belts during the first few months of operation and to check for proper ...

Страница 28: ... on either side of the mixing plates should be removed with a wire brush Check visually that no holes in the mixing plates are blocked If any burner ports are plugged even partially clear them with a piece of wire See Maintenance of Gas Ports WARNING Do not enlarge burner ports or performance may be drastically affected If any mixing plates are loose or missing fasteners tighten replace as necessa...

Страница 29: ...adequate once the initial piping debris is removed The operating conditions of the burner will determine how frequently maintenance is actually required P001117 Mestek Line Burners Use of an electric drill motor is not suggested unless both Pin Vise and Drill can be chucked up in a vari speed drill unit Use caution because it is easy to snap the bits off in a port when using a drill motor Removal ...

Страница 30: ... WITH DDC MR212 High Fire Manifold Adjustments Note Low fire may need to be set first to get the burner to light off properly 1 Disconnect the plug where the Temperature Sensors TS 01 and TS 03 are wired to the unit control module UC 01 A minimum of 15vdc is required at terminals 5 and 6 on electric relay RE 26 This causes the valve to call for continuous high fire Caution The unit will shut down ...

Страница 31: ...e voltage Above approximately 15 volts DC the Valve should be delivering full flow to the heater and the unit should be on full fire If the DC voltage is obtained on the Valve terminals but the heater does not respond as described the problem can be isolated to the valve itself or to the gas control manifold of the heater If the proper voltages are not obtained the problem can be isolated to the e...

Страница 32: ...y must be ad dressed separately The heater inlet shall be located in accordance with applicable building code provisions for ventilation air Field constructed intake accessories should be prop erly designed to minimize the entry of snow and rain All ventilation air to the heater shall be ducted directly from the outdoors If in doubt regarding the application consult the heater manufacturer ETL lab...

Отзывы: