background image

Video Return


LiveU LU600 User Guide


65 

Figure 81: Video Return on the Home Screen 

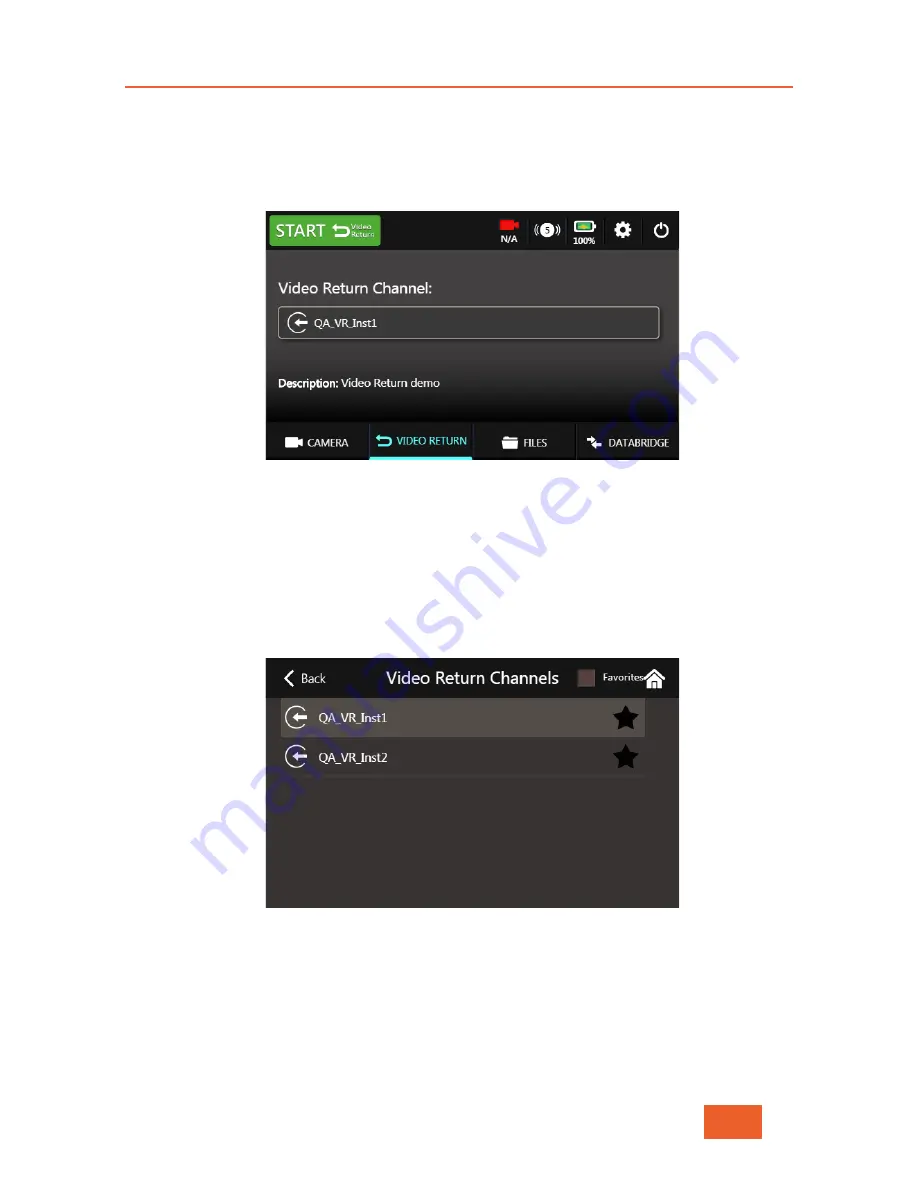
You will now be taken to the Video Return Screen where you can select a channel from 
the Video Return server and START / STOP incoming Video Return. 


Figure 82: The Video Return Screen 

Return Channel Selection 

Tapping on the Video Return Channel name will open a list of currently available video 
channels (previously set up on the Video Return server). Select one of these channels by 
tapping on it. You can also use this screen to “favorite” a channel, using the same method 
as for standard MMH channels (see Marking a Channel as a Favorite on page 31) 


Figure 83: Video Return Channel Selection 

Activating the Video Return stream 

Tap on the green 

START

 button at the top of the screen. After a few seconds, the button 

will change to 

STOP

 and turn red.  

Содержание LU600

Страница 1: ...LiveU LU600 User Guide Version 7 5 x 5th May 2019 Doc Version 7 5 3 P N DOC00211...

Страница 2: ...U600 Chapter 6 File Transfer FTP page 58 describes how to use the LU600 to transfer files from the field directly back to the back office studio Chapter 7 Interrupted Feedback IFB page 63 describes th...

Страница 3: ...er IFB or Video Return For HEVC Card owners only Select encoding for Store Forward files H 264 or HEVC Speed Test measure the total uplink speed from your unit to the output MMH channel More details o...

Страница 4: ...ering On the LU600 Unit 22 Charging the LU600 22 Connecting the Video Camera 24 Viewing the Camera Resolution 25 Streaming Operation Mode Selection 26 Specifying Store Forward Streaming Quality 27 Sel...

Страница 5: ...4 Monitoring S F Sessions 55 Monitoring Files Transfer Info Log Screen 55 Monitoring FILES Screen 56 Chapter 6 File Transfer FTP 58 Introduction 58 File Upload Indication 62 Chapter 7 Interrupted Feed...

Страница 6: ...taching and Replacing a Battery 86 Ethernet Connection 88 Connecting to the LiveU Xtender 88 Connecting the LU600 WiFi Client Pouch to the Backpack 89 Chapter 13 FAQs 94 1 Does the LU600 come with SIM...

Страница 7: ...00 User Guide 7 Appendix A Safety and Maintenance 98 Safety Information 98 Potential Hazards 99 Appendix B Limitation of Liability and Warranty 101 Limitation of Liability and Warranty 101 Appendix C...

Страница 8: ...Setting the Streaming Quality 28 Figure 18 Selecting a Channel 29 Figure 19 Ready to Go Live 29 Figure 20 Channel Busy message 30 Figure 21 Virtual Channel 30 Figure 22 Marking a Favorite Channel 31...

Страница 9: ...2 62 Figure 75 Video Return on the Home Screen 65 Figure 76 The Video Return Screen 65 Figure 77 Video Return Channel Selection 65 Figure 78 Video Return Display 66 Figure 79 DataBridge Solution Archi...

Страница 10: ...pping the Compartment s Zipper 90 Figure 108 Turning the Pouch 90 Figure 109 Threading the LAN Cable 91 Figure 110 Pushing the Cable Through the Hole in the Backpack 91 Figure 111 Connecting the Cable...

Страница 11: ...liveu tv Latin America soporte liveu tv US Latin America Phone line 1 877 88 LiveU 54838 International support liveu tv International Phone Line 1 609 997 0600 When contacting a support representativ...

Страница 12: ...ras using either SDI or HDMI interfaces and can support up to four audio channels when using SDI The LU600 supports 3G 4G LTE and Advanced LTE cellular networks WiFi links and two Ethernet links The L...

Страница 13: ...d server based MMH instance may be used when SDI output isn t required Figure 2 Solution Architecture Your LU600 and indeed any LU2000 that s part of your organization can be controlled and configured...

Страница 14: ...tors This card supports the following video connections 3G HD SD SDI and HDMI 1 4 LiveU can also supply optional alternative video interface cards for the provision of 4K video as follows 4K SDI This...

Страница 15: ...0 720p50 60 25 30 PAL NTSC Camera Mount Configurations The LU600 can be ordered in 3 different camera mount configurations suitable for working with batteries from Anton Bauer V Mount and PAG Figure 5...

Страница 16: ...rnal Cellular Antenna ANT00026 These antennae have the following advantages Hi Performance Antennas 3dBi Each antenna has 2 internal cellular antenna and can be connected to two different cellular mod...

Страница 17: ...U2000 server Figure 8 LiveU Central When LiveU Central takes control of an LU600 the message Unit is under LiveU Central Remote Control is displayed on the LU600 unit Figure 9 Unit Under Remote Contro...

Страница 18: ...reaming Operation Mode Selection section on page 26 4 optionally If you have the Metadata service enabled for your unit set the metadata fields accordingly as described in the chapter on Metadata page...

Страница 19: ...s page 20 Preview and Audio Bars page 20 IFB Headphone Detection Control page 21 Video Input Resolution page 25 Streaming Operation Mode Selection page 26 Channel page 28 Delay page 32 Connections pag...

Страница 20: ...he right Additionally if your audio input was defined as 4 channels this will be reflected in the audio bar display on screen The video feed is displayed a few seconds after the camera is connected an...

Страница 21: ...the video card Tapping this icon will open the IFB Volume screen allowing you to change the volume of any incoming audio signal and to select the audio source either IFB or the Video Return feed Figur...

Страница 22: ...44 Powering On the LU600 Unit The following describes the procedure for charging and turning on the LU600 Charging the LU600 The LU600 comes with a battery that enables up to four hours of standalone...

Страница 23: ...Connector It is good practice to keep the unit plugged into a power outlet when it is not in use ensuring it is charged and ready for operation at a moment s notice To turn on the LU600 unit 1 Press...

Страница 24: ...w Figure 16 LU600 Screen Showing Camera Scene Connecting the Video Camera To connect the camera 1 Connect an SDI or HDMI cable to the video out port on the video camera 2 Connect the other end of the...

Страница 25: ...a can be connected directly to the LU600 at any time Viewing the Camera Resolution The camera icon in the taskbar reflects the camera connection status and the detected incoming resolution Camera is c...

Страница 26: ...ive Store mode will be automatically enabled when going live For more details please see Live Store on page 50 Store Forward When this profile is selected the LU600 stores incoming video on internal s...

Страница 27: ...Forward Streaming Quality If you have selected the Store Forward profile you many now configure the quality and encoding standard H 264 or HEVC of the file to be stored during Store Forward sessions N...

Страница 28: ...rgency and when network coverage is low Medium bit rate Provides good video quality with relatively fast file uploads Highest bit rate Provides the best video quality with the slowest file uploads Thi...

Страница 29: ...the channel name reflects the channel type as follows Channel is a Virtual Group see below Channel is connected to an SDI output 2 Tap the channel to which you would like to stream You can use the sli...

Страница 30: ...following window when pressing the START button Figure 26 Channel Busy message Streaming to a Preview Channel Virtual Group You might want to have your stream visible in LiveU Central without worryin...

Страница 31: ...cannot define when the Virtual Channel in Preview mode goes live This can only be performed by a LiveU Central operator When the LiveU Central operator defines that a Preview channel is live the Prev...

Страница 32: ...elay versus quality requirements Delay of 0 6 4 Seconds Provides the maximum quality within the constraints of the shortest delay This profile is resilient to changes errors and adapts quickly to band...

Страница 33: ...ed by an icon as follows Cellular Ethernet WiFi Optional Dual SIM Cellular Module this icon will also show the SIM slot currently being used either A or B The color of the icon indicates the status of...

Страница 34: ...you will be taken to the Cellular Interface screen for that connection modem This screen shows whether or not the cellular interface is currently connected the connection technology 3G 4G etc and the...

Страница 35: ...e Back at the top of the screen and the LU600 will attempt to reconnect this interface using the new APN information Manual Network Selection When roaming with the unit you can select a different netw...

Страница 36: ...Networks The unit will start scanning and display a list of all cellular networks relevant to the SIM installed This operation may take up to 2 minutes Figure 35 Mobile Network Screen During Scan 6 Se...

Страница 37: ...le in the specific area country you re in Please contact your LiveU sales representative for more details on how to enable this service Dual SIM Modules GUI Additions Your LU600 now supports advanced...

Страница 38: ...the following message Figure 39 Global SIM Slot Switch Message Accept the change by tapping Yes or cancel by tapping No Once accepted the system will try to reconnect all SIMs in the slot you selecte...

Страница 39: ...w tap on the Dual SIM modem you wish to change and the Dual SIM Cellular Interface Screen will open Figure 40 Dual SIM Cellular Interface Screen Select the SIM slot that you d like your LU600 to use f...

Страница 40: ...rnet Interface Screen DHCP Disabled Then configure the following parameters in this screen DHCP When ON indicates that the Ethernet configuration is automatically received from the network This is the...

Страница 41: ...the LiveU WiFi client and not for any other purpose To enable PoE on an interface 1 In the Connections screen see Figure 30 tap an Ethernet interface The Ethernet screen displays Figure 44 Interfaces...

Страница 42: ...rypted Signal Strength Indicator SSI The following describes the buttons at the top of this screen Refresh Tap this button to rescan the WiFi networks in the vicinity Enable Disable WiFi Set this butt...

Страница 43: ...TE When the button is tapped the LU600 attempts to connect to the selected channel If the channel is down or unavailable for any reason the LU600 displays the following message Figure 48 Channel Busy...

Страница 44: ...off your LU600 Software Tap the Power Down button to display the following screen Figure 49 Powering Down 1 Tap Shut Down The following screen displays Figure 50 Powering Down 2 Tap Yes The unit powe...

Страница 45: ...remote button as follows Software Reset Recommended Press and hold the remote button for approximately four seconds After the status LED starts to blink the unit starts its shutdown process which can...

Страница 46: ...vanced configuration settings on the LU600 Tap the Advanced Configuration button in the Home screen to configure LU600 advanced settings Figure 52 Settings You can configure the following settings fro...

Страница 47: ...to check cellular speeds without connecting a camera Figure 53 Speed Test Tap on the Start Speed Test button to start the test Speed Test will send data from your unit to the currently selected MMH c...

Страница 48: ...t 4 Channel input is only supported when using the SDI connection Setting the LU600 to 4 channels with an HDMI camera plugged in will only use 2 channels at 96 Kbps Figure 56 Audio Settings Setting th...

Страница 49: ...lution to ON Figure 57 Auto Resolution IMPORTANT NOTE Disabling auto resolution is not recommended and should only be selected in specific cases About The About screen displays the LU600 unit s name s...

Страница 50: ...iles at a maximum bitrate of 50Mbps based on available bandwidth During a S F session the unit can store the file on one of two types of destinations Internal Storage The LU600 comes with internal sto...

Страница 51: ...camera s storage Configuring S F on the LU600 Unit To configure how S F operates 1 Tap the Settings button in the Home screen The following displays Figure 59 Settings 2 Select Store Forward The follo...

Страница 52: ...o 2TB and must be a Class 10 UHS I SD card from an established manufacturer LU600 supports the following file systems FAT32 NTFS exFAT and ext3 ext4 FAT32 supports single file sizes up to 4GB and ther...

Страница 53: ...bit rate enables quick file upload to the server This option is recommended for urgent situations when network coverage is low MQ Medium bit rate Provides good video quality with relatively quick fil...

Страница 54: ...tarting the S F Session To start the S F session 1 Tap the START button shown below Figure 65 Starting the S F Session The following describes the information displayed describing the S F session in p...

Страница 55: ...he Files Transfer Info list While your S F session is active tap the progress indicator at the top of the screen this indicator shows the overall progress of all the current file transfers from the LU...

Страница 56: ...for under three minutes then the LU600 will automatically resume forwarding the file once reconnected If however there is a loss of connection for more than three minutes then the only way to resume...

Страница 57: ...ve Displays a list of files on the USB drive This option is only active when a USB drive is inserted in the LU600 SD Card Displays a list of the files on the LU600 s micro SD card This option is only...

Страница 58: ...cro SD card capacity can be from 4GB to 2TB and must be a Class 10 UHS I SD card from an established manufacturer When formatting external media please note that the LU600 unit supports the following...

Страница 59: ...ollowing screen displays Figure 73 Storage Selection This screen displays three types of file containers as follows Internal Storage Tap this icon to display a list of the files that were being forwar...

Страница 60: ...nly active when a USB drive is inserted in the LU600 SD Card Tap this icon to display a list of the files on the LU600 s micro SD card This option is not active if the LU600 does not have a micro SD c...

Страница 61: ...low Figure 76 Sorting the File List 6 Tap the Upload button to start sending this file to the LU2000 or the Delete button to delete this file Figure 77 Uploading To pause the file upload of a specific...

Страница 62: ...ransfers in the queue Figure 79 File Transfer Information 1 Tapping this icon opens the following screen which shows information about the uploaded files in the queue and their status including the ti...

Страница 63: ...respond For more details about the IFB feature on the LU2000 see Appendix A Interrupted Feedback IFB in the LiveU LU2000 Server User Guide IFB Setup To set up IFB Plug in the earphones headphones int...

Страница 64: ...ow while cueing up for a live interview Using the channel as a teleprompter to be displayed locally This feature requires a Video Return Server to be installed and configured and for that server to be...

Страница 65: ...eturn Channel name will open a list of currently available video channels previously set up on the Video Return server Select one of these channels by tapping on it You can also use this screen to fav...

Страница 66: ...splay the video full screen on the LU600 by tapping the crosshair icon To exit full screen mode simply double tap the video Going live while streaming a Video Return channel Once you have a live Video...

Страница 67: ...taBridge operational modes The service supports 3 levels of connection Cloud based gateway On premise gateway and direct connection when working in Multipath mode only DataBridge Operational Modes The...

Страница 68: ...rough its Internet network connections The DataBridge Gateway server runs multiple remote connection instances Each remote connection instance recombines the streams received from a specific DataBridg...

Страница 69: ...nstance in LiveU Central To make sure that the Gateway has been correctly set up please contact LiveU Support and request that a DataBridge Gateway instance be assigned to the LU600 unit for this purp...

Страница 70: ...When you are ready to disconnect from the gateway tap the STOP DataBridge button DataBridge Settings You can use the DataBridge settings screen to configure the DataBridge operational mode as well as...

Страница 71: ...creen Configuring DataBridge WiFi Hotspot Parameters To configure DataBridge WiFi Hotspot Parameters tap the Advanced Configuration button in the Home screen and select the DataBridge Settings Screen...

Страница 72: ...word needs to be at least 8 characters long as required for WPA2 keys If you enter a password shorter than this the field will be highlighted in red and your entry won t be accepted Toggling Hotspot S...

Страница 73: ...ported frequencies channels Tap on the Country field to select your country from a list Setting WiFi Channel Tapping on the Channel field will allow you set the WiFi channel that hotspot will use Chan...

Страница 74: ...ve way of managing news whether for a news provider web site news aggregator newspaper or television station When properly integrated NRCS News Room Control Systems like ENPS and iNews can use this XM...

Страница 75: ...itch moving it to the ON position Each transmission will now be accompanied by its own XML file Whenever Metadata is enabled the Metadata Active indicator in the Metadata icon on the home screen will...

Страница 76: ...fields values and when ready tap the Start button To cancel the transmission just tap the Cancel button Figure 95 The Metadata Prompt Window Metadata Field Entry To change Metadata field values simply...

Страница 77: ...rol provided with the LU600 backpack LU600 Wired Remote Control The LU600 backpack includes a wired remote control designed to turn on off the unit and start stop live streaming without using the unit...

Страница 78: ...mote control is designed to work only with the LU600 Plugging it into other LiveU products or any other device such as a PC may cause damage to the device and or the remote Turning the Unit On Off Tur...

Страница 79: ...take approximately 15 seconds to complete After the unit shuts down the status LED turns off Hard Reset Press and hold the remote button for approximately eight seconds Both the unit and the status L...

Страница 80: ...ure 100 LU600 is Streaming Stopping Streaming Quickly double press the remote button to stop streaming this method is designed to prevent sporadic stop streaming events Once the unit stops streaming t...

Страница 81: ...et Connection page 88 Connecting to the Xtender page 88 Inserting a Module SIM Card The LU600 is provided with communication modules already inserted These modules may already have SIM cards inserted...

Страница 82: ...ide 82 To insert module SIM cards 1 Remove the thumbscrew on the back of the unit Figure 101 Releasing the Cover 2 Gently pull the cover of the LU600 upwards and off as shown below Figure 102 Removing...

Страница 83: ...y order We recommend using all eight ports but it is not mandatory For easy recognition modules are clearly marked to indicate whether they are for 3G or 4G 3 Insert the SIM card into the module The m...

Страница 84: ...and a roaming SIM in the other Pre Paid Extension in certain scenarios where it would be more practical to switch an expended pre paid SIM with a fresh one Installing SIMs in a Dual SIM Module Each Du...

Страница 85: ...ons on page 37 Connecting an Extra 9th Modem The LU600 has the option to add an additional 9th modem This additional modem will be automatically dialed and combined into the consolidated broadband upl...

Страница 86: ...rpose one with an Anton Bauer battery and one with a V mount battery If your LU600 has this special camera connector then the Anton Bauer V mount battery charges both the LU600 and the camera Another...

Страница 87: ...the body of the LU600 towards you and gently lift the LU600 body up and away from the battery 3 Position the body of the LU600 so that it is hovering slightly above the replacement battery 4 Use both...

Страница 88: ...he LU600 plug in the Ethernet cable into one of the two available Ethernet slots Figure 110 Ethernet Connections Connecting to the LiveU Xtender The LiveU Xtender can be connected to the LU600 either...

Страница 89: ...L00218 which connects to the LAN port on the LU600 device This connector provides both communication and power To connect the LU600 WiFi Client pouch to the backpack 1 Lie the backpack on a flat surfa...

Страница 90: ...LU600 User Guide 90 3 Unzip the compartment s zipper to expand the compartment Figure 113 Unzipping the Compartment s Zipper 4 Position the pouch so that the cables are on the right as shown below Fig...

Страница 91: ...e 115 Threading the LAN Cable 6 Push the cable from the inside of the backpack through the designated hole into the bottom of the inside of the backpack in order to connect to the LU600 Figure 116 Pus...

Страница 92: ...9 Open the two Velcro straps on the top of the pouch and the two Velcro straps on the bottom of the pouch Figure 118 Opening the Straps 10 Place the pouch on top of the bottom of the backpack and thre...

Страница 93: ...cure the top part of the pouch to the backpack Figure 120 Securing the Top Velcro Straps of the Pouch to the Backpack 12 Press the bottom two Velcro straps down to secure the bottom part of the pouch...

Страница 94: ...rted in my country Browse to the following link to see a list of the operators in your country All operators listed under GSM should work with the modems provided in the LU600 http en wikipedia org wi...

Страница 95: ...ternet What is the problem There is no cellular reception There are no SIM cards inserted in the LU600 unit The SIM cards are not activated or do not support the data plan Modems are not plugged in pr...

Страница 96: ...more information 12 How many hours does the battery last The LU600 battery lasts for three to four hours depending on the amount of unit activity 13 Why can I not hear using the earphones headphones...

Страница 97: ...o office or from an LU600 unit to multiple offices In the MultiPoint service video can be streamed from one LU2000 server and distributed to one or more other LU2000 servers This feature requires a li...

Страница 98: ...battery in fire Avoid excessive physical shock or vibration of the unit Never use a unit that contains a battery that appears to have suffered abuse Store the LU600 in an environment with low humidity...

Страница 99: ...n any area where a potentially explosive atmosphere may exist Sparks in such areas could cause an explosion or fire resulting in bodily injury or even death Be aware and comply with all signs and inst...

Страница 100: ...th these regulations The enclosure can transmit signals that could interfere with various onboard systems and controls While operating a vehicle The driver or operator of any vehicle should not operat...

Страница 101: ...uct the following notice THIS PRODUCT IS LICENSED UNDER THE AVC PATENT PORTFOLIO LICENSE FOR THE PERSONAL USE OF A CONSUMER OR OTHER USES IN WHICH IT DOES NOT RECEIVE REMUNERATION TO i ENCODE VIDEO IN...

Страница 102: ...ision reception which can be determined by turning the equipment off and on the user is encouraged to try to correct the interference by one or more of the following measures Reorient or relocate the...

Страница 103: ...TSI EN 301 489 7 V1 3 1 ETSI EN 301 489 17 V3 1 1 Safety IEC EN 60950 1 A2 2013 CB Scheme Radio EN 300 328 V2 1 1 EN 301893 V2 1 1 EN 301 908 2 V11 1 1 EN 301 908 13 V11 1 1 FCC Canada EMC FCC p15 sub...

Страница 104: ...REINVENTING LIVE...

Отзывы: