background image

• 

SOFTWARE UPDATE

Select this function to update your TV from a USB removable media.

• 

VERSION OF THE APP

This function is used to view the software version installed on your TV.

• 

TV AUTOMATIC SHUTDOWN 

This function is used to program the TV to switch off automatically if no action is taken for a 
certain period of time. (1 to 8 hours). You can also turn off this feature.

• 

STORE MODE

When Store Mode is enabled (demonstration mode), some menu items are not available.

• 

POWER-ON MODE

This setting is used to configure the power-on mode preferences. The 

Last status 

and

 Sleep


options are available.

• 

CEC

This feature allows you to control HDMI CEC compatible devices from the TV remote control 
via the HDMI connection. 

• 

CEC AUTO POWER-ON

This function allows the connected HDMI-CEC compatible device to turn on the TV and 
automatically switch to its input source. Press the Left or Right button to enable or disable this 
function.

• 

SPEAKERS

This option is used to listen to the sound of the TV on a connected compatible audio device. 
You can use the TV remote control to adjust the volume of the audio device.

• 

OSS

This option displays free software license information.

•  INSTALLATION Menu

This menu allows you to perform a channel search or to restart a complete installation of your 
TV.

V.1.0

52

Содержание 32HD-843

Страница 1: ...32HD 843 Notice d utilisation Téléviseur HD User guide HD Television Instrucciones de uso Televisor HD Bedienungsanleitung HD Fernsehen Gebruiksaanwijzing HD Televisie ...

Страница 2: ... 12 4 RACCORDEMENT AVEC UN CÂBLE COMPOSITE 13 5 UTILISATION DU PORT USB 14 6 BRANCHEMENT D UN CASQUE AUDIO 14 7 BRANCHEMENT D UN MODULE CI 15 PREMIERE INSTALLATION 16 UTILISATION DE BASE 17 1 MISE EN FONCTION OU EN VEILLE DU TÉLÉVISEUR 17 2 SÉLECTION DE LA SOURCE 17 3 RÉGLAGE DU VOLUME 17 4 SÉLECTION DES PROGRAMMES 17 5 AFFICHAGE DE LA LISTE DES CHAÎNES 18 6 AFFICHAGE DES INFORMATIONS SUR L ÉMISSI...

Страница 3: ...SON 21 3 UTILISATION DU MENU RÉGLAGES 22 4 UTILISATION DU MENU INSTALLATION 24 5 UTILISATION DU MENU LISTE DES CHAÎNES 25 LECTURE D UN SUPPORT USB 26 GUIDE DES PROGRAMMES EPG 27 INSTALLATION D UN SUPPORT MURAL 28 RÉSOLUTION DES PROBLÈMES 29 DÉCLARATION UE DE CONFORMITÉ 30 FR 3 V 1 0 ...

Страница 4: ...DE L EMBALLAGE DESCRIPTION DU TÉLÉVISEUR FACE AVANT Voyant lumineux Rouge lorsque le téléviseur est en veille éteint lorsque le téléviseur est en fonction Capteur de la télécommande Reçoit les signaux émis par la télécommande Ne pas l obstruer Voyant lumineux Capteur télécommande Bouton de commande V 1 0 4 ...

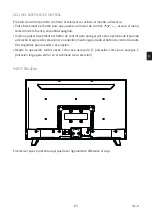
Страница 5: ...brièvement sur le bouton de commandes pour naviguer parmi ces différentes options de la gauche vers la droite Puis après avoir sélectionné une option maintenez le bouton de commandes appuyé pendant trois secondes pour accéder à cette option Répétez l opération autant de fois que nécessaire 1 appui court pour naviguer 1 appui long pour entrer dans le sous menu de votre choix PANNEAU ARRIÈRE Le maté...

Страница 6: ...nt arrière latéraux AV LATÉRAL Connexion AV latéral Audio Vidéo latéral Câble Audio Vidéo Câble de Connexion Latérale Vidéo Audio SPDIF Connexion SPDIF Sortie coaxiale latérale CASQUE Connexion Casque latérale Connexion USB latérale Connexion CI latérale V 1 0 6 ...

Страница 7: ...FONCTIONS DES TOUCHES DE LA TÉLÉCOMMANDE Télécommande 1 2 3 4 5 6 0 LANG BACK MENU OK EXIT Q MENU V V P P 7 8 9 FR 7 V 1 0 ...

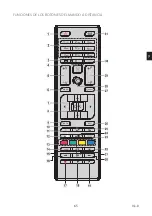
Страница 8: ...s si disponible télévision numérique 15 Activer et désactiver les sous titres si disponibles 16 Lire en vitesse rapide à rebours 17 Touche inactive 18 Démarrer la lecture du média sélectionné 19 Suspendre définitivement la lecture du média en cours 20 Lire en vitesse rapide à rebours 21 Suspendre la lecture d un média en cours 22 Modifier le format de l image 23 Afficher le télétexte si disponible...

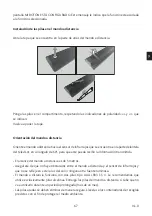
Страница 9: ... angle de 60 pour que ce dernier reçoive les informations transmises La portée de la télécommande est de 5 mètres Assurez vous qu il n y ait pas d obstacles entre la télécommande et le capteur infrarouge et que la lumière du soleil ou une autre source lumineuse ne reflète pas dessus La télécommande fonctionne avec 2 piles de type LR03 AAA 1 5 V Nous vous recommandons de n utiliser que des piles al...

Страница 10: ...ortez les deux pieds de l emballage puis fixez les sur la partie inférieure de part et d autre de l appareil comme indiqué sur le schéma ci contre Pieds en plastique x2 Vis PM4x14 x4 Utilisez un tournevis pour serrer les deux jeux de vis sous chaque pied Ne serrez pas exagérément pour éviter d endommager les parties en plastique V 1 0 10 ...

Страница 11: ...mentés électriquement Raccordement à une antenne terrestre Afin d obtenir la meilleure qualité d image par voie hertzienne il est fortement recommandé d utiliser une antenne extérieure Raccordez l antenne à la prise d entrée de l antenne située au dos du téléviseur La qualité de l image varie en fonction de la qualité de votre réception FR 11 V 1 0 ...

Страница 12: ...tiliser ce mode de branchement afin d obtenir une qualité vidéo optimale Sélectionnez la source HDMI1 ou HDMI2 en appuyant sur la touche de la télécommande et en validant avec la touche OK Si vous utilisez un câble HDMI le téléviseur reçoit des signaux vidéo et audio simultanément Aucun câble pour la connexion audio n est requis Raccordement avec un câble coaxial Câble coaxial g to a TV Set 9a RD ...

Страница 13: ...un câble composite Vous pouvez raccorder un magnétoscope un lecteur DVD ou encore un boîtier décodeur à votre téléviseur Lecteur DVD Blu Ray Console de jeux Insérez le câble vidéo AV fourni dans la prise SIDE AV située au dos de votre téléviseur Insérez un adaptateur jack RCA pour la composite dans la prise SIDE AV située au dos de votre téléviseur Raccordez les prises audio rouge et blanche de vo...

Страница 14: ...eur possède une prise USB destinée à consulter des vidéos des images ou de la musique Sélectionnez la source Média en appuyant sur la touche de la télécommande et en validant avec la touche OK Branchement d un casque audio Casque audio V 1 0 14 ...

Страница 15: ...ume du téléviseur Branchement d un module CI Module CI Pour utiliser le port PCMCIA mettez votre téléviseur hors tension puis insérez votre module dans la fente Insérez ensuite votre carte à puces uniquement de type I et type II dans le module Reportez vous au mode d emploi accompagnant votre module pour plus de détails FR 15 V 1 0 ...

Страница 16: ...de confirmer un code PIN le choix 0000 n est pas accepté 4 Vous pouvez activer à présent l option Mode Magasin ou l option Mode Domestique Le Mode Magasin est uniquement destiné à l usage en magasin Nous vous recommandons de sélectionner le Mode Domestique pour un usage à votre domicile Vous pouvez accéder à cette option à partir du menu Réglages Autres réglages Mode Magasin afin de l activer ou d...

Страница 17: ...re apparaître le menu L indicateur d alimentation devient rouge Sélection de la source SOURCES TV HDMI 1 HDMI 2 SIDE AV Une fois les systèmes externes branchés à votre téléviseur vous pouvez commuter entre vos différentes sources d entrée TNT SIDE AV HDMI1 HDMI2 Appuyez sur la touche de la télécommande Utilisez ensuite les touches ou de la télécommande pour mettre une entrée en surbrillance et app...

Страница 18: ...ez sur les touches pour sélectionner la liste de favoris puis la chaîne et sur la touche OK pour la visualiser Appuyez ensuite sur EXIT pour quitter le menu de sélection Affichage des sous titres Appuyez sur la touche pour activer ou désactiver les sous titres en mode TNT L affichage des sous titres est désactivé lorsque DÉSACTIVÉ est sélectionné Accès aux menus rapides Appuyez sur la touche Q MEN...

Страница 19: ...aste pour ajuster les secteurs blancs de l image ou diminuez le contraste pour ajuster les secteurs noirs de l image LUMINOSITÉ Cette option règle la luminosité de l image Si vous augmentez la luminosité les parties foncées de l image sont éclaircies Si vous diminuez la luminosité vous ajoutez plus d obscurité aux zones pâles de l image DÉFINITION Cette option règle la netteté de l image Augmentez...

Страница 20: ...ode est idéal pour les environnements sombres La luminosité est plus élevée que dans les autres modes ZOOM IMAGE Ce paramètre règle le format et la taille de l image Les options suivantes sont disponibles Auto 16 9 Sous titres 14 9 14 9 Zoom 4 3 Cinéma MODE FILM Les films sont enregistrés avec un nombre d images par seconde différent des programmes de télévision classiques Activez cette fonction l...

Страница 21: ...teur vous pouvez voir une image voilée ou bruitée s afficher à l écran Vous pouvez utiliser la phase pour obtenir une image plus claire Menu SON Ce menu permet de régler le mode audio de la bande son VOLUME Cette option permet de régler le niveau du volume ÉGALISEUR Les paramètres de l égaliseur peuvent être modifiés uniquement lorsque le mode Utilisateur est sélectionné BALANCE Cette option vous ...

Страница 22: ...onction vous permet de régler le type de sortie audio numérique PCM ou Compressé Menu RÉGLAGES Ce menu permet de régler les différents paramètres du téléviseur ACCÈS CONDITIONNEL Cette fonction contrôle votre module d accès conditionnel lorsque celui ci est branché sur votre téléviseur LANGUE Ce sous menu vous permet de sélectionner la langue de votre choix langue des menus langue des sous titres ...

Страница 23: ...de votre téléviseur depuis un support amovible USB VERSION DE L APPLICATION Cette fonction vous permet d afficher la version du logiciel installé sur votre téléviseur ARRÊT AUTOMATIQUE TV Cette fonction vous permet de programmer l extinction automatique du téléviseur si aucune action n est effectuée au delà d un certain temps de 1 à 8 heures Vous pouvez également désactiver cette fonction MODE MAG...

Страница 24: ...CHERCHE DE CHAÎNES AUTOMATIQUE Cette option affiche les options de réglage automatique Antenne Numérique Recherche et enregistre les chaînes TNT Câble Numérique Recherche et enregistre les chaînes câblées TNT Analogique Recherche et mémorise les stations analogiques Antenne Numérique et analogique Recherche et enregistre les chaînes analogiques et TNT Câble Numérique et analogique Recherche et enr...

Страница 25: ...uyez sur ou pour sélectionner la chaîne que vous souhaitez déplacer Appuyez sur la touche OK puis sélectionnez l option Déplacer Entrez le nouveau numéro de chaîne à l aide des touches numériques de la télécommande Appuyez sur le bouton ou pour sélectionner son nouvel emplacement Un message d avertissement apparaît à l écran Appuyez sur la touche OK pour valider ou sur Exit pour quitter ÉDITER LE ...

Страница 26: ... disque dur peuvent être incompatibles avec ce téléviseur Le téléviseur prend en charge les formatages de disque FAT32 et NTFS Toutefois l enregistrement ne sera pas possible avec les disques au format NTFS Vous pouvez rencontrer certains problèmes lors du formatage des disques durs USB d une capacité de stockage supérieure à 1 To Téraoctet Patientez un moment avant de brancher ou de débrancher l ...

Страница 27: ...ur lecture par le système peut prendre un certain temps Certains périphériques USB peuvent ne pas être correctement reconnus Suivant le contenu la lecture ou l affichage de certains fichiers peuvent être impossibles même s ils sont dans un format compatible GUIDE DES PROGRAMMES EPG Certaines chaînes mais pas toutes affichent des informations portant sur l émission en cours et l émission suivante A...

Страница 28: ...iser des moyens de fixation adaptés à votre mur Installez votre téléviseur uniquement sur un mur en brique ou en ciment Veillez à ce que les enfants ne se suspendent pas au téléviseur et ne tentent pas de monter dessus La fixation murale de type VESA est vendue séparément Lors de l installation veuillez vous référer à la notice fournie de votre fixation murale L 75 mm H 75 mm Trou de fixation Trou...

Страница 29: ...iseur n est pas sous tension Allumez le téléviseur Chaînes TNT HD absentes ou présence de mosaïque La réception des chaînes HD de télévision numérique terrestre TNT n est possible que dans les zones couvertes Vérifiez la proximité d un émetteur Vérifiez la qualité et la puissance du signal de réception Faites contrôler votre installation par un professionnel La télécommande ne fonctionne pas Il n ...

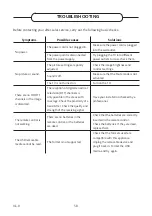
Страница 30: ...odèles telles qu elles sont enregistrées dans la base de données des produits sur le site Web suivant en recherchant l Identifiant de votre modèle figurant sur l étiquette énergétique https eprel ec europa eu La durée de service de votre appareil est de 5 ans Au cours de cette période les pièces de rechange d origine seront disponibles pour assurer le bon fonctionnement de l appareil Vous trouvere...

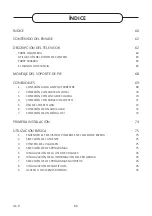
Страница 31: ...N WITH A COAXIAL CABLE 41 4 CONNECTION WITH A COMPOSITE CABLE 42 5 USB PORT USAGE 43 6 CONNECTING HEADPHONES 43 7 CONNECTING A CI MODULE 44 FIRST INSTALLATION 45 BASIC USE 46 1 TURNING THE TV ON OR PUTTING IT IN SLEEP MODE 46 2 SOURCE SELECTION 46 3 VOLUME CONTROL 46 4 PROGRAMME SELECTION 46 5 DISPLAYING THE CHANNEL LIST 46 6 DISPLAYING PROGRAMME INFORMATION 47 7 SELECTING FAVOURITE PROGRAMMES 47 ...

Страница 32: ...SING THE SOUND MENU 50 3 USING THE SETTINGS MENU 51 4 USING THE INSTALLATION MENU 52 5 USING THE CHANNEL LIST MENU 53 READING USB DRIVES 55 PROGRAMME GUIDE EPG 56 INSTALLING A WALL BRACKET 57 TROUBLESHOOTING 58 EU DECLARATION OF CONFORMITY 59 V 1 0 32 ...

Страница 33: ...er manual PACKAGE CONTENTS TV DESCRIPTION FRONT SIDE Indicator light Red when the TV is in sleep mode off when the TV is on Remote control sensor Receives signals from the remote control Do not put an obstacle in front of it Indicator lamp Remote control sensor Control button EN 33 V 1 0 ...

Страница 34: ... on off Briefly press the control button again to navigate through these options from left to right Then after selecting an option press and hold the control button for three seconds to access that option Repeat the operation as many times as necessary 1 short press to navigate 1 long press to enter the sub menu of your choice BACK PANEL The equipment shown may vary from your TV V 1 0 34 ...

Страница 35: ...EN 35 V 1 0 ...

Страница 36: ...REMOTE CONTROL BUTTON FUNCTIONS Télécommande 1 2 3 4 5 6 0 LANG BACK MENU OK EXIT Q MENU V V P P 7 8 9 V 1 0 36 ...

Страница 37: ...gital TV 15 Enabling and disabling the subtitles if available 16 Fast rewind 17 Inactive key 18 Starting the playback of the selected media 19 Permanently suspend playback of the current media 20 Fast rewind 21 Suspending the playback of a media in progress 22 Changing the aspect ratio 23 Display teletext if available Press again to overlay teletext on a normally broadcast image mixing 24 Programm...

Страница 38: ...smitted information The remote control has a range of 5 metres Make sure that there are no obstacles between the remote control and the infrared sensor and that no sunlight or other light source is reflected on them The remote control works with two AAA LR03 1 5 V batteries We recommend using only alkaline batteries Remove the batteries from the remote control if you are not going to use it for a ...

Страница 39: ...ake both feet out of the packaging and attach them to the lower part on either side of the appliance as shown in the diagram opposite Feet made of plastic x2 PM4x14 x4 screws Use a screwdriver to tighten the two sets of screws under each foot Do not over tighten to avoid damaging the plastic parts EN 39 V 1 0 ...

Страница 40: ...pplied with power Connection to a terrestrial antenna In order to obtain the best image quality for terrestrial television an outdoor antenna is strongly recommended Connect the antenna to the antenna input jack on the back of the TV The image quality will vary depending on the quality of your reception V 1 0 40 ...

Страница 41: ... type of connection in order to obtain optimal video quality Select the HDMI1 or HDMI2 source by pressing the button on the remote control and confirming with the OK button If you are using an HDMI cable the TV receives video and audio signals simultaneously No cables are needed to provide the audio connection Connection with a coaxial cable Coaxial cable g to a TV Set 9a RD LDO LJLWDO XGLR 79 66 ...

Страница 42: ...ier Connection with a composite cable You can connect a VCR DVD player or decoding box to your TV DVD Blu Ray Player Game console Insert the supplied AV video cable into the SIDE AV jack on the back of your TV Insert a jack RCA adapter for composite into the SIDE AV jack on the back of your TV Connect the red and white audio jacks of your device to the corresponding ports of the jack RCA adapter S...

Страница 43: ... Select the Media source by pressing the button on the remote control and confirming with the OK button Connecting headphones Headphones Connect the earphone jack to the port on the back of the TV The headphone volume is automatically adjusted according to the volume of the TV EN 43 V 1 0 ...

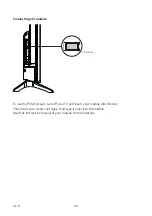
Страница 44: ... CI module To use the PCMCIA port turn off your TV and insert your module into the slot Then insert your smart card type I and type II only into the module Read the instruction manual of your module for more details V 1 0 44 ...

Страница 45: ...r and confirm a PIN code the selection 0000 is not accepted 4 You can now activate the Store Mode option or the Domestic Mode option The Store Mode is for in store use only We recommend that you select the Home Mode for use in your home You can access this option from the Settings menu Other Settings Store Mode to turn it on or off later 5 Press the OK button on the remote control to start the aut...

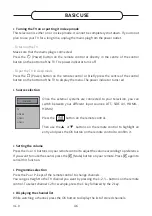
Страница 46: ... the external systems are connected to your television you can switch between your different input sources DTT SIDE AV HDMI1 HDMI2 Press the button on the remote control Then use the p or q buttons on the remote control to highlight an entry and press the OK button on the remote control to confirm it Setting the volume Press the V or V buttons on your remote control to adjust the volume according ...

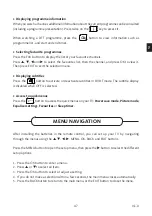
Страница 47: ...DVB T mode The subtitle display is disabled when OFF is selected Access to quick menus Press the Q MENU button to access the quick menus on your TV Powersavemode Picturemode Equaliser settings Favourites or Sleep timer MENU NAVIGATION After installing the batteries in the remote control you can set up your TV by navigating through the menus using the p q t u MENU OK BACK and EXIT buttons Press the...

Страница 48: ...parts of the image are brightened If you decrease the brightness you add more darkness to the pale areas of the image DEFINITION This option is used to adjust the sharpness of the image Increase the sharpness for sharper images or decrease the sharpness for less defined images COLOUR This option adjusts the saturation of the image ENERGY SAVING This function allows you to set the power save mode t...

Страница 49: ...LM MODE Films are recorded with a different number of frames per second than conventional television programmes Enable this function when watching films for superior viewing of accelerated images SKIN TONE This option can be set to between 5 and 5 COLOUR CHANGE This option is used to customise the levels of red and green RESET This option resets the image settings to the default values PC POSITION...

Страница 50: ...en the left and right speakers HEADPHONE This option adjusts the headphone volume Before using headphones make sure that the volume is set to a low level to prevent any damage to your hearing AVL AUTOMATIC VOLUME LIMITATION This function maintains an equal volume level when changing channels to avoid big variations HEADPHONE LINEOUT LINE OUT If you want to connect an external amplifier to your TV ...

Страница 51: ...isplay the lock menu options enter the PIN code The default PIN code is 1234 Locking Menu The Menu lock option activates or deactivates access to the menu Child lock When this option is selected the TV can only be controlled using the remote control In this case the buttons on the control panel will not work Entering the PIN code Defines a new PIN code The default PIN code is 1234 TIMERS This func...

Страница 52: ...The Last status and Sleep options are available CEC This feature allows you to control HDMI CEC compatible devices from the TV remote control via the HDMI connection CEC AUTO POWER ON This function allows the connected HDMI CEC compatible device to turn on the TV and automatically switch to its input source Press the Left or Right button to enable or disable this function SPEAKERS This option is u...

Страница 53: ...ou can use this setting to fine tune analogue channels This option is only available if analogue channels are stored INITIAL INSTALLATION This option deletes all saved channels and settings and restarts the initial installation of the TV default password 1234 LIST OF CHANNELS menu Your television sorts all the stored stations in the channel list You can edit this channel list configure the favouri...

Страница 54: ...n the remote control Press the OK button to confirm or Exit to exit LOCKING A CHANNEL Press p or q to select the channel you wish to lock Press the OK button to confirm Press the OK button and select the Lock Unlock option You must now enter the PIN code A padlock logo appears on the corresponding row indicating that the selected channel is locked To unlock the channel use the same process MANAGIN...

Страница 55: ...shed reading the files If this happens it can physically damage the USB drive and the USB device itself Never remove a USB device while playing a file You can use USB hubs with the TV S USB port USB hubs that are equipped with an external power supply are recommended in this case We recommend connecting USB hard drives directly into the TV s USB port When playing back image files the Media Navigat...

Страница 56: ...les even if they are in a compatible format PROGRAMME GUIDE EPG Some but not all channels display information about the current and next programme Press the button to access the EPG menu Red button Displays next or previous programmes Green button Displays the list of programmes Yellow button Zoom Displays more information about the programme Blue button Filter Displays filter options Press to see...

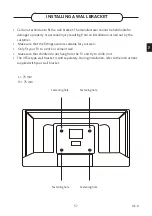
Страница 57: ... the customer Make sure that the fittings used are suitable for your wall Only fit your TV to a brick or cement wall Make sure that children do not hang from the TV and try to climb on it The VESA type wall bracket is sold separately During installation refer to the instructions supplied with your wall bracket L 75 mm H 75 mm Fastening hole Fastening hole Fastening hole Fastening hole EN 57 V 1 0 ...

Страница 58: ... the TV There are no HD DTT channels or the image is distorted The reception of digital terrestrial television DTT channels is only possible in the areas with coverage Check the proximity of a transmitter Check the quality and strength of the receiving signal Have your installation checked by a professional The remote control is not working There are no batteries in the remote control or the batte...

Страница 59: ...You can find information on the models as it is recorded in the product database on the following website by searching for your model ID which is specified on the energy label https eprel ec europa eu The service life of your appliance is 5 years During this period original spare parts will be available to ensure proper operation of the appliance You will find information on repairing your product...

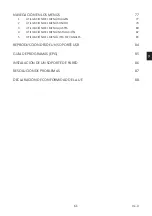
Страница 60: ... 4 CONEXIÓN CON CABLE COMPUESTO 71 5 USO DEL PUERTO USB 72 6 CONEXIÓN DE UN AURICULAR 72 7 CONEXIÓN DE UN MÓDULO CI 73 PRIMERA INSTALACIÓN 74 UTILIZACIÓN BÁSICA 75 1 ENCENDER EL TELEVISOR O PONERLO EN EL MODO DE ESPERA 75 2 SELECCIÓN DE LA FUENTE 75 3 CONTROL DEL VOLUMEN 75 4 SELECCIÓN DE LOS PROGRAMAS 75 5 VISUALIZACIÓN DE LA LISTA DE CANALES 76 6 VISUALIZACIÓN DE LA INFORMACIÓN DEL PROGRAMA 76 7...

Страница 61: ... 3 UTILIZACIÓN DEL MENÚ AJUSTES 80 4 UTILIZACIÓN DEL MENÚ INSTALACIÓN 82 5 UTILIZACIÓN DEL MENÚ LISTA DE CANALES 83 REPRODUCCIÓN DESDE UN SOPORTE USB 84 GUÍA DE PROGRAMAS EPG 85 INSTALACIÓN DE UN SOPORTE DE PARED 86 RESOLUCIÓN DE PROBLEMAS 87 DECLARACIÓN DE CONFORMIDAD DE LA UE 88 ES 61 V 1 0 ...

Страница 62: ...NTENIDO DEL PAQUETE DESCRIPCIÓN DEL TELEVISOR PARTE DELANTERA Indicador luminoso rojo cuando el televisor está en espera y apagado cuando el televisor está en funcionamiento Sensor del mando a distancia Capta las señales que emite el mando a distancia No lo obstruya Indicador luminoso Sensor del mando a distancia Botón de control V 1 0 62 ...

Страница 63: ...brevemente el botón de control para navegar por estas opciones de izquierda a derecha Después de seleccionar una opción mantenga pulsado el botón de control durante tres segundos para acceder a esa opción Repita la operación tantas veces como sea necesario 1 pulsación corta para navegar 1 pulsación larga para entrar en el submenú de su elección PARTE TRASERA El televisor que se presenta aquí puede...

Страница 64: ...V 1 0 64 ...

Страница 65: ...FUNCIONES DE LOS BOTONES DEL MANDO A DISTANCIA Télécommande 1 2 3 4 5 6 0 LANG BACK MENU OK EXIT Q MENU V V P P 7 8 9 ES 65 V 1 0 ...

Страница 66: ...bles TV digital 15 Activar y desactivar los subtítulos si están disponibles 16 Reproducción rápida en sentido inverso 17 Botón inactivo 18 Iniciar la reproducción del soporte seleccionado 19 Suspender definitivamente la reproducción del soporte actual 20 Reproducción rápida en sentido inverso 21 Suspender la reproducción de un soporte en curso 22 Cambiar el formato de la imagen 23 Mostrar el telet...

Страница 67: ...r en un ángulo de 60 para que este pueda recibir la información transmitida El alcance del mando a distancia es de 5 metros Asegúrese de que no haya obstáculos entre el mando a distancia y el sensor de infrarrojos y que no se refleje en este la luz del sol ni ninguna otra fuente luminosa El mando a distancia funciona con dos pilas tipo AAA LR03 1 5 V Le recomendamos que utilice exclusivamente pila...

Страница 68: ...año Extraiga los dos soportes de pie del embalaje y fíjelos en la parte inferior a cada lado del aparato tal y como se muestra en el esquema siguiente Soportes de pie de plástico x2 Tornillos PM4x14 x4 Use un destornillador para apretar los dos conjuntos de tornillos bajo de cada pie No los apriete demasiado para evitar dañar las partes plásticas V 1 0 68 ...

Страница 69: ... eléctrica Conexión a una antena terrestre Para obtener la mejor calidad de imagen por ondas hertzianas se recomienda encarecidamente utilizar una antena exterior Conéctela a la toma de entrada de la antena en la parte trasera del televisor La calidad de la imagen varía en función de la calidad de recepción ES 69 V 1 0 ...

Страница 70: ...ndamos que utilice este modo de conexión para obtener una calidad de vídeo óptima Seleccione la fuente HDMI1 o HDMI2 pulsando el botón del mando a distancia y confirmando con el botón OK Si utiliza un cable HDMI el televisor recibe señales de vídeo y audio simultáneamente No se necesita ningún cable para la conexión de audio Conexión con un cable coaxial Cable coaxial g to a TV Set 9a RD LDO LJLWD...

Страница 71: ...n cable compuesto Puede conectar una videograbadora un reproductor de DVD o un decodificador al televisor Reproductor de DVD Blu Ray Consola de juegos Inserte el cable de vídeo AV suministrado en la toma SIDE AV de la parte trasera de su televisor Inserte un adaptador Jack RCA para el cable compuesto en la toma SIDE AV de la parte trasera de su televisor Conecte las tomas de audio roja y blanca de...

Страница 72: ...moria USB El televisor tiene una toma USB para consultar vídeos imágenes o música Seleccione la fuente de medios pulsando el botón del mando a distancia y confirmando con el botón OK Conexión de los auriculares Auriculares V 1 0 72 ...

Страница 73: ...ción del volumen del televisor Conexión de un módulo CI Módulo CI Para usar el puerto PCMCIA apague el televisor y luego introduzca el módulo en la ranura A continuación introduzca la tarjeta con microchip únicamente de tipo I y tipo II en el módulo Para obtener más detalles consulte las instrucciones de uso incluidas con su módulo ES 73 V 1 0 ...

Страница 74: ...y confirme un código PIN no se aceptará la opción 0000 4 Ahora puede activar la opción Modo tienda o la opción Modo doméstico El Modo tienda es solo para uso en tienda Le recomendamos que seleccione el Modo doméstico para utilizarlo en su casa Puede acceder a esta opción desde el menú Ajustes Otros ajustes Modo tienda para activarlo o desactivarlo posteriormente 5 Pulse el botón OK del mando a dis...

Страница 75: ...e pone en rojo Selección de la fuente SOURCES TV HDMI 1 HDMI 2 SIDE AV Una vez que los sistemas externos se han conectado al televisor puede cambiar entre las diferentes fuentes de entrada TDT SIDE AV HDMI1 y HDMI2 Pulse el botón del mando a distancia A continuación use los botones p o q del mando a distancia para resaltar una entrada y pulse el botón OK del mando a distancia para confirmar Ajuste...

Страница 76: ...as y la hora de inicio y de finalización Selección de programas favoritos Pulse el botón FAV para mostrar la lista de sus canales favoritos Pulse p q t u para seleccionar la lista de favoritos y luego el canal y pulse OK para verlo Luego pulse SALIR para salir del menú de selección Visualización de subtítulos Pulse el botón para activar o desactivar los subtítulos en el modo TDT La visualización d...

Страница 77: ...enú permite ajustar el contraste el brillo el color la nitidez el tono la temperatura de los colores el formato de imagen la reducción de ruido etc MODO Puede cambiar el modo de imagen según sus preferencias o necesidades El modo Imagen se puede configurar con una de estas opciones Cine Deporte Dinámico y Natural CONTRASTE Esta opción ajusta el nivel de blanco de la imagen Aumente el contraste par...

Страница 78: ...ta el valor de la temperatura del color correspondiente Están disponibles las opciones Frío Normal y Cálido Frío este modo es ideal para las habitaciones con mucha iluminación los ajustes de brillo color y nitidez son más débiles que los del resto de los modos Normal por lo general este modo se utiliza en un entorno con brillo constante Cálido este modo es ideal para los entornos oscuros El brillo...

Страница 79: ...talmente hacia el lado derecho o izquierdo de la pantalla POSICIÓN V Esta opción desplaza la imagen verticalmente hacia la parte superior o inferior de la pantalla FRECUENCIA PILOTO Los ajustes de la frecuencia piloto corrigen las interferencias que aparecen por ejemplo líneas verticales en la imagen para presentaciones como hojas de cálculo párrafos o textos con un tamaño de fuente más pequeño FA...

Страница 80: ...un enchufe para auriculares seleccione la opción Lineout Si ha conectado los auriculares al televisor seleccione la opción Auriculares Antes de utilizar unos auriculares asegúrese de que esta opción de menú está configurada como Auriculares Si está ajusta en Lineout la salida de la toma de auriculares se ajustará a un nivel máximo y esto podría dañar su audición GRAVES DINÁMICOS Esta función activ...

Страница 81: ...defecto es 1234 TEMPORIZADORES Esta función permite establecer el tiempo tras el cual el televisor pasará al modo de espera después de un determinado tiempo de inactividad FECHA HORA Esta función le permite definir la fecha y la hora que aparecen en la pantalla FUENTES Esta función activa o desactiva las fuentes seleccionadas OTROS AJUSTES MENÚ DE TIEMPO Esta opción permite cambiar la duración del...

Страница 82: ...del televisor en un dispositivo de audio compatible que se haya conectado Puede utilizar el mando a distancia del televisor para ajustar el volumen del dispositivo de audio OSS Esta opción muestra la información de la licencia del software libre Menú INSTALACIÓN Este menú le permite realizar una búsqueda de canales o reiniciar una instalación completa de su televisor BÚSQUEDA AUTOMÁTICA DE CANALES...

Страница 83: ...as emisoras activas que se incluirán en la lista mediante el menú Lista de canales EDITAR LISTA DE CANALES Pulse el botón OK para cambiar la lista de canales VISUALIZAR UN CANAL Pulse p o q para seleccionar el canal que desea ver Pulse el botón OK una vez para seleccionar el canal y visualizarlo en segundo plano y una segunda vez para verlo en pantalla completa MOVER UN CANAL Pulse p o q para sele...

Страница 84: ...rada USB de éste IMPORTANTE haga una copia de seguridad de los archivos en sus dispositivos de almacenamiento antes de conectarlos al televisor Tenga en cuenta que el fabricante declina cualquier responsabilidad en caso de daños en los archivos o la pérdida de datos Es posible que algunos tipos de dispositivos USB como los reproductores de MP3 o lectores de disco duro no sean compatibles con este ...

Страница 85: ... y no asumiremos ningún tipo de responsabilidad por cualquier pérdida de datos que pudiera producirse por la conexión de un periférico a este aparato Cuando los archivos son de gran tamaño es posible que el sistema tarde un tiempo en reproducirlos Es posible que algunos periféricos USB no se reconozcan correctamente Según el contenido podría resultar imposible reproducir o visualizar algunos archi...

Страница 86: ...te Asegúrese de usar los medios de sujeción adecuados para la pared Instale el televisor solo en una pared de ladrillo o cemento Asegúrese de que los niños no se cuelguen del televisor ni intenten subirse a él El soporte de pared tipo VESA se vende por separado Cuando lo instale consulte las instrucciones incluidas con el soporte de pared Largo 75 mm Alto 75 mm Orificio de sujeción Orificio de suj...

Страница 87: ...silen cio no está activado El televisor no está encendido Encienda el televisor Canales TDT HD ausentes o con presencia de efecto mosaico La recepción de los canales de televisión digital terrestre TDT solo es posible en zonas con cobertura Verifique la proximidad de un transmisor Verifique la calidad y la fuerza de la señal de recepción Solicite a un profesional que revise su instalación El mando...

Страница 88: ...n relativa a los modelos que se encuentra registrada en la base de datos de productos en el sitio web siguiente para ello busque el identificador de su modelo que aparece en la etiqueta energética https eprel ec europa eu La vida útil de su aparato es de 5 años Durante ese periodo tendrá a su disposición piezas de recambio originales para garantizar el funcionamiento correcto del aparato Encontrar...

Страница 89: ... ANSCHLUSS MIT EINEM KOMPOSITKABEL 100 5 BENUTZUNG DES USB ANSCHLUSSES 101 6 EINEN AUDIO KOPFHÖRER ANSCHLIESSEN 101 7 EIN CI MODUL ANSCHLIESSEN 102 ERSTINSTALLATION 103 BASISFUNKTIONEN 104 1 DEN FERNSEHER EINSCHALTEN ODER AUF STANDBY SCHALTEN 104 2 AUSWAHL DER QUELLE 104 3 EINSTELLUNG DER LAUTSTÄRKE 104 4 PROGRAMMAUSWAHL 104 5 DIE SENDERLISTE ANZEIGEN 105 6 ANZEIGE VON INFORMATIONEN ZUR SENDUNG 10...

Страница 90: ...S 108 3 VERWENDUNG DES EINSTELLUNGSMENÜS 109 4 VERWENDUNG DES INSTALLATIONSMENÜS 111 5 VERWENDUNG DES MENÜS SENDERLISTE 112 WIEDERGABE EINES USB DATENTRÄGERS 113 PROGRAMMFÜHRER EPG 115 MONTAGE EINER WANDHALTERUNG 116 FEHLERBEHEBUNG 117 EU KONFORMITÄTSERKLÄRUNG 118 V 1 0 90 ...

Страница 91: ...SINHALT BESCHREIBUNG DES FERNSEHERS VORDERSEITE Kontroll Licht Rot wenn sich der Fernseher im Standbymodus befindet ausgeschaltet wenn der Fernseher in Betrieb ist Sensor der Fernbedienung Empfängt die von der Fernbedienung versendeten Signale Nicht abdecken Leuchtanzeige Fernbedienungs Sensor Bedienknopf DE 91 V 1 0 ...

Страница 92: ...Bedienknopf erneut kurz um von links nach rechts durch diese Optionen zu navigieren Nachdem Sie eine Option ausgewählt haben halten Sie die Steuertaste drei Sekunden lang gedrückt um auf diese Option zuzugreifen Wiederholen Sie den Vorgang so oft wie nötig 1 kurzer Druck zum Navigieren 1 langer Druck zum Aufrufen des gewünschten Untermenüs RÜCKSEITE Das abgebildete Material kann leicht von Ihrem F...

Страница 93: ...DE 93 V 1 0 ...

Страница 94: ...TASTENFUNKTIONEN DER FERNBEDIENUNG Télécommande 1 2 3 4 5 6 0 LANG BACK MENU OK EXIT Q MENU V V P P 7 8 9 V 1 0 94 ...

Страница 95: ...mschalten zwischen Sprachen analoges TV Anzeigen und Ändern der Audiosprache Untertitel falls vorhanden digitales TV 15 Aktivieren und Deaktivieren von Untertiteln falls verfügbar 16 Schneller Rücklauf 17 Inaktive Taste 18 Die Wiedergabe des ausgewählten Mediums starten 19 Die laufende Wiedergabe endgültig unterbrechen 20 Schneller Rücklauf 21 Die Wiedergabe eines laufenden Mediums unterbrechen 22...

Страница 96: ...dienung in einem 60 Winkel auf den Infrarotsensor auf der Vorderseite des Fernsehers damit dieser die übertragenen Informationen empfangen kann Die Reichweite der Fernbedienung beträgt 5 Meter Vergewissern Sie sich dass sich keine Hindernisse zwischen der Fernbedienung und dem Infrarotsensor befinden und kein Sonnenlicht oder eine sonstige Lichtquelle sich auf dem Infrarotsensor widerspiegelt Die ...

Страница 97: ...nehmen Sie die beiden Füße aus der Verpackung und befestigen sie auf beiden Seiten unten am Gerät wie auf dem Schema unten gezeigt Füße aus Kunststoff x2 Schraube PM4x14 x4 Verwenden Sie einen Schraubenzieher um die beiden Schrauben unter jedem Fuß anzuziehen Ziehen Sie sie nicht übermäßig fest an damit die Teile aus Kunststoff nicht beschädigt werden DE 97 V 1 0 ...

Страница 98: ...t Strom versorgt werden Anschluss an eine terrestrische Antenne Um eine bessere Bildqualität bei Funkübertragung zu erzielen wird der Einsatz einer Außenantennedringendempfohlen SchließenSiedieAntenneandieAntenneneingangsbuchse auf der Rückseite des Fernsehers an Die Bildqualität hängt von Ihrer Empfangsqualität ab V 1 0 98 ...

Страница 99: ...dus zu verwenden um eine optimale Videoqualität zu erhalten Wählen Sie die Quelle HDMI1 oder HDMI2 indem Sie auf der Fernbedienung die Taste drücken und mit der Taste OK bestätigen Wenn Sie ein HDMI Kabel verwenden empfängt der Fernseher gleichzeitig Video und Audiosignale Es ist kein Kabel für den Audioanschluss erforderlich Anschluss mit einem Koaxialkabel Koaxialkabel g to a TV Set 9a RD LDO LJ...

Страница 100: ...t einem Kompositkabel Sie können einen Videorekorder DVD Player oder einen Decoder an Ihr Fernsehgerät anschließen DVD Blu Ray Player Spielkonsole Stecken Sie das mitgelieferte AV Videokabel in die SIDE AV Buchse auf der Rückseite Ihres Fernsehers Stecken Sie einen Klinken Cinch Adapter für das Kompositkabel in die SIDE AV Buchse auf der Rückseite Ihres Fernsehers Verbinden Sie die roten und weiße...

Страница 101: ...er besitzt einen USB Anschluss der zur Wiedergabe von Videos Bildern oder Musik dient Wählen Sie die Medienquelle indem Sie auf der Fernbedienung die Taste drücken und mit der Taste OK bestätigen Einen Audio Kopfhörer anschließen Kopfhörer DE 101 V 1 0 ...

Страница 102: ...ärke des Fernsehers angepasst Ein CI Modul anschließen CI Modul Um den CI Anschluss Common Interface zu nutzen trennen Sie Ihren Fernseher vom Stromnetz und stecken dann Ihr Modul in den Schlitz Stecken Sie dann Ihre Chipkarte nur Typ I und Typ II in das Modul Weitere Details entnehmen Sie bitte der zu Ihrem Modul gehörigen Bedienungsanleitung V 1 0 102 ...

Страница 103: ...tigen die Wahl von 0000 als Code wird nicht akzeptiert 4 Sie können nun die Option Geschäfts Modus oder die Option Häuslicher Modus aktivieren Der Geschäfts Modus ist ausschließlich für die Verwendung im Geschäft bestimmt Wir empfehlen Ihnen für die Nutzung bei Ihnen zu Hause den häuslichen Modus auszuwählen Sie können diese Option über das Menü Einstellungen Weitere Einstellungen Geschäfts Modus ...

Страница 104: ... Menü aufzurufen Die Netzanzeige leuchtet rot Auswahl der Quelle SOURCES TV HDMI 1 HDMI 2 SIDE AV Nachdem die externen Systeme an Ihren Fernseher angeschlossen sind können Sie zwischen Ihren verschiedenen Eingangsquellen umschalten TNT SIDE AV HDMI1 HDMI2 Drücken Sie die Taste der Fernbedienung Verwenden Sie dann die Tasten oder der Fernbedienung um einen Eingang zu markieren und drücken dann die ...

Страница 105: ...en Sie die FAV Taste um die Liste Ihrer Lieblingssender anzuzeigen Drücken Sie um die Favoritenliste auszuwählen dann den Sender und drücken Sie OK um ihn anzuzeigen Drücken Sie dann auf EXIT um das Auswahlmenü zu verlassen Anzeige von Untertiteln Drücken Sie die Taste um Untertitel im DVB T Modus zu aktivieren oder zu deaktivieren Die Anzeige von Untertiteln ist deaktiviert wenn AUS ausgewählt is...

Страница 106: ...Sport Dynamisch und Natürlich KONTRAST Diese Option regelt den Weißanteil des Bildes Erhöhen Sie den Kontrast um die weißen Bereiche im Bild anzupassen oder verringern Sie den Kontrast um die schwarzen Bereiche im Bild anzupassen HELLIGKEIT Diese Option regelt die Helligkeit des Bildes Wenn Sie die Helligkeit erhöhen werden die dunklen Teile im Bild heller Wenn Sie die Helligkeit verringern werden...

Страница 107: ...als bei den anderen Modi Normal Dieser Modus wird im Allgemeinen in einer Umgebung mit gleichbleibender Helligkeit eingesetzt Warm Dieser Modus ist ideal für dunkle Umgebungen Die Helligkeit ist höher als bei den anderen Modi BILD ZOOM Dieser Parameter regelt das Bildformat und die Bildgröße Es sind folgende Optionen verfügbar Auto 16 9 Untertitel 14 9 14 9 Zoom 4 3 Cinema FILM MODUS Filme werden ...

Страница 108: ...die als vertikale Linien im Bild von Darstellungen wie Excel Tabellen Absätzen oder Texten mit kleineren Schriftgrößen auftreten PHASE Je nach Eingangsquelle Computer usw kann es sein dass das Bild das Sie auf dem Schirm sehen Schleier aufweist oder rauscht Sie können die Phase benutzen um ein deutlicheres Bild zu erhalten TON Menü Mit diesem Menü lässt sich der Audio Modus der Tonspur einstellen ...

Страница 109: ...pfhörer benutzen vergewissern Sie sich bitte dass dieses Menüelement als Kopfhörer definiert wurde Wenn es auf Lineout eingestellt ist wird der Kopfhörerausgang auf die Höchststufe eingestellt wodurch Ihr Gehör geschädigt werden kann DYNAMISCHER BASS Mit dieser Funktion kann die Funktion Dynamischer Bass aktiviert oder deaktiviert werden SURROUND SOUND Sie können den Surround Sound Modus ein oder ...

Страница 110: ...das Fernsehgerät nach einer bestimmten Zeit der Inaktivität in den Standby Modus wechselt DATUM UHRZEIT Mit dieser Funktion können Sie das auf dem Bildschirm angezeigte Datum und die Uhrzeit einstellen QUELLEN Diese Funktion aktiviert oder deaktiviert die ausgewählten Quellen WEITERE EINSTELLUNGEN ZEITMENÜ Mit dieser Option lässt lässt sich die Abschaltdauer der Menübildschirme ändern SOFTWARE UPD...

Страница 111: ...nktion zu aktivieren oder zu deaktivieren LAUTSPRECHER Mit dieser Option können Sie den Ton des Fernsehers auf einem angeschlossenen und kompatiblen Audiogerät abhören Sie können die Lautstärke des Audiogeräts mit der Fernbedienung des Fernsehers einstellen OSS Diese Option zeigt die Lizenzinformationen der freien Software an Menü INSTALLATION In diesem Menü können Sie eine Sendersuche durchführen...

Страница 112: ...r Über das Menü Senderliste können Sie diese Senderliste bearbeiten Favoriten oder aktive Sender konfigurieren die in die Liste aufgenommen werden sollen SENDERLISTE BEARBEITEN Drücken Sie die Taste OK um die Senderliste zu ändern EINEN SENDER ANSCHAUEN Drücken Sie auf oder um den Sender auszuwählen den Sie anschauen möchten DrückenSiedieOK Tasteeinmal umdenSenderauszuwählenundimHintergrundanzuzei...

Страница 113: ...e verschiedenen Sender auf die vier verschiedenen Listen verteilen WIEDERGABE EINES USB DATENTRÄGERS Sie können externe 2 5 und 3 5 Zoll Festplatten Festplatten mit externem Stromversorgungskabel über den USB Eingang an Ihren Fernseher anschließen WICHTIG Speichern Sie Ihre Dateien auf Ihren Speicher Peripheriegeräten ab bevor Sie diese an den Fernseher anschließen Bitte beachten Sie dass der Hers...

Страница 114: ...n haben Sie Zugriff auf die Bild Ton und Einstellungs Menüs Durch erneutes Drücken der Menütaste wird der Bildschirm ausgeblendet Sie können die Einstellungen Ihres Media Browsing über Ihr Einstellungsmenü festlegen Der Fernseher ist mit USB Peripheriegeräten kompatibel die mit den Dateisystemen FAT32 oder NTFS formatiert wurden Wir raten Ihnen das USB Peripheriegerät mit Hilfe des Fernsehers zu f...

Страница 115: ...Zoom Zeigt weitere Informationen über das Programm an Blaue Taste Filter Zeigt Filteroptionen an Drücken Sie um das Menü des gewählten Genres anzuzeigen Mit dieser Funktion können Sie die Programmführer Datenbank nach dem gewählten Genre abfragen Die im Programmführer verfügbaren InformationenwerdendurchsuchtunddieErgebnisse dieIhrenKriterienentsprechen werdenaufgelistet Drücken Sie die Taste um d...

Страница 116: ...d geeignete Befestigungsmittel eingesetzt werden Bringen Sie Ihren Fernseher nur an einer Wand aus Ziegelstein oder Zement an Achten Sie darauf dass Kinder nicht am Fernseher hangeln und nicht versuchen ihn zu erklettern Die Wandhalterung des Typs VESA wird separat verkauft Nehmen Sie bei der Montage bitte auf die Anleitung Bezug die mit Ihrer Wandhalterung geliefert wurde L 75 mm H 75 mm Befestig...

Страница 117: ...B T HD Sender oder Anzeige als Miniaturen Der Empfang von digitalen terrestrischen FernsehSendern DVB T ist nur in den entsprechend abgedeckten Gebieten möglich Überprüfen Sie ob sich ein Sender in der Nähe befindet Überprüfen Sie die Qualität und Stärke des empfangenen Signals Lassen Sie Ihre Installation von einem Fachmann prüfen Die Fernbedienung funk tioniert nicht Es befinden sich keine Batte...

Страница 118: ... Die in der Produktdatenbank registrierten Modellinformationen finden Sie unter der auf dem Energieetikett angegebenen Modell Identifizierung auf der folgenden Website https eprel ec europa eu Die Kundendienstdauer Ihres Gerätes beträgt 5 Jahre Während dieser Zeit sind Original Ersatzteile erhältlich um den ordnungsgemäßen Betrieb des Geräts zu gewährleisten Informationen zur Reparierbarkeit Ihres...

Страница 119: ...ANSLUTIING MET EEN COMPOSIETKABEL 130 5 GEBRUIK VAN DE USB POORT 131 6 AANSLUITING VAN EEN HOOFDTELEFOON 131 7 AANSLUITING VAN EEN CI MODULE 132 EERSTE INSTALLATIE 133 BASISGEBRUIK 134 1 HET TELEVISIETOESTEL AAN OF IN WAAKSTAND ZETTEN 134 2 SELECTIE VAN DE BRON 134 3 INSTELLEN VAN HET VOLUME 134 4 SELECTIE VAN DE PROGRAMMA S 134 5 WEERGAVE VAN DE LIJST MET KANALEN 135 6 WEERGAVE VAN DE INFORMATIE ...

Страница 120: ... GELUID 138 3 GEBRUIK VAN HET MENU INSTELLINGEN 139 4 GEBRUIK VAN HET MENU INSTALLATIE 141 5 GEBRUIK VAN HET MENU LIJST MET KANALEN 142 LEZEN VAN EEN USB STICK 143 PROGRAMMAGIDS EPG 145 INSTALLATIE VAN EEN WANDHOUDER 146 PROBLEEMOPLOSSING 147 EU CONFORMITEITSVERKLARING 148 V 1 0 120 ...

Страница 121: ...IJVING VAN HET TELEVISIETOESTEL VOORZIJDE Waarschuwingslampje Rood wanneer het televisietoestel in waakstand staat uit wanneer het televisietoestel aan staat Sensor van de afstandsbediening Ontvangt de signalen die uitgestuurd worden door de afstandsbediening Deze mag niet worden belemmerd Controlelampje Sensor afstandsbediening Bedieningsknop NL 121 V 1 0 ...

Страница 122: ...de bedieningsknop om van links naar rechts door deze verschillende opties te navigeren Nadat u een optie hebt gekozen houdt u de bedieningsknop drie seconden lang ingedrukt om toegang te krijgen tot die optie Herhaal de handeling zo vaak als nodig 1 keer kort drukken om te navigeren 1 keer lang drukken om naar het gewenste submenu te gaan ACHTERPANEEL Het voorgestelde materiaal kan licht verschill...

Страница 123: ...NL 123 V 1 0 ...

Страница 124: ...FUNCTIES VAN DE TOETSEN VAN DE AFSTANDSBEDIENING Télécommande 1 2 3 4 5 6 0 LANG BACK MENU OK EXIT Q MENU V V P P 7 8 9 V 1 0 124 ...

Страница 125: ...re overschakelen analoog televisietoestel de audiotaal de taal van de ondertitels weergeven en wijzigen indien beschikbaar digitaal televisietoestel 15 De ondertitels in en uitschakelen indien beschikbaar 16 Snel achteruit spoelen 17 Inactieve toets 18 Het afspelen van het geselecteerde medium starten 19 Het afspelen van het huidige medium definitief opschorten 20 Snel achteruit spoelen 21 Het afs...

Страница 126: ...ndsbediening naar de infraroodsensor op de voorzijde van het televisietoestel in een hoek van 60 zodat deze laatste de doorgegeven informatie kan ontvangen Het bereik van de afstandsbediening is 5 meter Zorg ervoor dat er zich geen obstakels bevinden tussen de afstandsbediening en de infraroodsensor en dat zonlicht of andere lichtbronnen niet worden gereflecteerd De afstandsbediening werkt met 2 b...

Страница 127: ...voeten uit de verpakking en bevestig ze aan het onderste gedeelte aan weerszijden van het toestel zoals aangegeven op de tekening hiernaast Voeten in kunststof x2 Schroef PM4x14 x4 Gebruik een schroevendraaier om de twee schroeven onder elke voet vast te draaien Draai ze niet te vast aan om te vermijden dat de kunststof onderdelen beschadigd raken NL 127 V 1 0 ...

Страница 128: ...t van stroom worden voorzien Aansluiting op een grondantenne Om de beste beeldkwaliteit via de ether te bekomen is het sterk aanbevolen om een buitenantenne te gebruiken Sluit de antenne aan op de antenne ingang aan de achterkant van het televisietoestel De beeldkwaliteit verschilt in functie van de kwaliteit van uw ontvangst V 1 0 128 ...

Страница 129: ...aansluiting te gebruiken om een optimale videokwaliteit te verkrijgen Selecteer de bron HDMI1 of HDMI2 door op de toets van de afstandsbediening te drukken en bevestig met de toets OK Wanneer u een HDMI kabel gebruikt ontvangt uw televisietoestel gelijktijdig video en audiosignalen Voor de audioverbinding is geen kabel vereist Aansluiting met een coaxkabel Coaxkabel g to a TV Set 9a RD LDO LJLWDO ...

Страница 130: ...sluiting met composietkabel U kunt een videorecorder dvd speler of decoder aansluiten op uw televisietoestel DVD Blu Ray speler Spelconsole Steek de bijgeleverde AV videokabel in de SIDE AV aansluiting achteraan uw televisietoestel Steek een jack RCA adapter voor composiet in de SIDE AV aansluiting achteraan uw televisietoestel Verbind de rode en witte audiostekkers van uw toestel met de correspon...

Страница 131: ...is uitgerust met een USB aansluiting die bedoeld is om video s foto s of muziek te raadplegen Selecteer de mediabron door op de toets van de afstandsbediening te drukken en bevestig met de toets OK Aansluiten van een hoofdtelefoon Hoofdtelefoon NL 131 V 1 0 ...

Страница 132: ... aangepast aan het volume van het televisietoestel Aansluiten van een CI module CI module Om de PCMCIA poort te gebruiken schakelt u uw televisietoestel uit en stopt u uw module in de sleuf Plaats vervolgens uw chipkaart enkel type I en type II in de module Voor meer details verwijzen we naar de gebruikshandleiding die bij uw module zit V 1 0 132 ...

Страница 133: ...stigen de keuze 0000 wordt niet aanvaard 4 U kunt nu de optie Winkelmodus of de optie Huismodus activeren De Winkelmodus is enkel bedoeld om te worden gebruikt in de winkel Wij raden u aan de Huismodus te selecteren voor een gebruik bij u thuis U kunt naar deze optie gaan via het menu Instellingen Overige instellingen Winkelmodus om deze later in of uit te schakelen 5 Druk op de knop OK van de afs...

Страница 134: ...nu te laten verschijnen De stroomindicator wordt rood Selectie van de bron SOURCES TV HDMI 1 HDMI 2 SIDE AV Eenmaal de externe systemen aangesloten zijn op uw televisietoestel kunt u schakelen tussen uw verschillende ingangsbronnen TNT SIDE AV HDMI1 HDMI2 Druk op de toets van de afstandsbediening Gebruik vervolgens de toetsen of van de afstandsbediening om een ingang te markeren en druk op de toet...

Страница 135: ...ijst van uw favoriete kanalen weer te geven Drukopdetoetsen omdelijstmetfavorietenenvervolgenshetkanaalteselecteren en druk op de toets OK om het te bekijken Druk vervolgens op EXIT om het selectiemenu te verlaten Weergave van de ondertitels Druk op op de toets om de ondertiteling in de DVB T modus in of uit te schakelen De weergave van ondertitels is uitgeschakeld wanneer UITGESCHAKELD is geselec...

Страница 136: ...eze optie stelt het witheidsniveau van het beeld in Verhoog het contrast om de witte sectoren van het beeld aan te passen of verminder het contrast om de zwarte sectoren van het beeld aan te passen LICHTSTERKTE Deze optie stelt de lichtsterkte van het beeld in Wanneer u de lichtsterkte verhoogt worden de donkere delen van het beeld lichter Wanneer u de lichtsterkte verlaagt maakt u de bleke zones ...

Страница 137: ...dere modi Normaal Deze modus wordt over het algemeen gebruikt in een omgeving met constante lichtsterkte Warm Deze modus is ideaal voor duistere omgevingen De lichtsterkte is hoger dan in de andere modi BEELD ZOOMEN Deze parameter regelt het formaat en de grootte van het beeld De volgende opties zijn beschikbaar Automatisch 16 9 Ondertitels 14 9 14 9 Zoom 4 3 Cinema FILMMODUS De films worden opgen...

Страница 138: ...ragrafen of teksten met een klein lettertype FASE Afhankelijk van de ingangsbron computer kunt u een gesluierd of verzorgd beeld op het scherm zien verschijnen U kunt de fase gebruiken om een meer helder beeld te krijgen Menu GELUID Via dit menu kunt u de audiomodus van de soundtrack instellen VOLUME Met deze optie kunt u het niveau van het volume instellen EQUALIZER De instellingen van de equaliz...

Страница 139: ...oor zou kunnen beschadigen DYNAMIC BASS Via deze functie kan de functie Dynamic bass worden in of uitgeschakeld SURROUND SOUND U kunt de modus Surround Sound in of uitschakelen DIGITALE UITGANG Met deze functie kunt u het type digitale audio uitgang instellen PCM of Gecomprimeerd Menu INSTELLINGEN Via dit menu kunnen de verschillende parameters van het televisietoestel worden ingesteld CI MODULE D...

Страница 140: ...NEN Via deze functie worden de geselecteerde bronnen in of uitgeschakeld ANDERE INSTELLINGEN TIJDMENU Deze optie laat u toe de weergaveduur van de menuschermen te wijzigen SOFTWARE UPDATE Selecteer deze functie om een update uit te voeren van uw televisietoestel via een verwijderbare USB stick VERSIE VAN DE APP Via deze functie kunt u de versie van de software die op uw televisietoestel is geïnsta...

Страница 141: ...tel gebruiken om het volume van het audiosysteem te regelen OSS Via deze optie worden de licentievoorwaarden van de Open Source software weergegeven Menu INSTALLATIE Met dit menu kunt u een kanaal zoeken of een volledige installatie van uw televisietoestel opnieuw starten AUTOMATISCHE KANAALSCAN Deze optie geeft de automatische instelopties weer Digitale antenne zoeken en vastleggen van DTT zender...

Страница 142: ... selecteren dat u wilt bekijken Druk één keer op de toets OK om het kanaal te selecteren en op de achtergrond weer te geven en een tweede keer om het op volledig scherm weer te geven EEN KANAAL VERPLAATSEN Druk op of om het kanaal te selecteren dat u wilt verplaatsen Druk op de toets OK en selecteer vervolgens de optie Verplaatsen Voer het nieuwe kanaalnummer in met behulp van de cijfertoetsen op ...

Страница 143: ...nt niet kan worden ingeroepen in geval van schade aan een bestand of verlies van gegevens Bepaalde soorten USB randapparatuur bijvoorbeeld MP3 spelers of harde schijven zijn mogelijk niet compatibel met het televisietoestel Het televisietoestel ondersteunt de schijfformatteringen FAT32 en NTFS Het zal evenwel niet mogelijk zijn op te nemen met schijven van het formaat NTFS U kunt bepaalde probleme...

Страница 144: ...aten die zijn geformatteerd met de bestandssystemen FAT32 of NTFS We raden u aan de USB randapparatuur te formatteren met behulp van het televisietoestel alvorens uw gegevens er in op te nemen We kunnen niet waarborgen dat het toestel compatibel werking en of voeding van de bus is met alle USB opslagrandapparatuur en kunnen niet aansprakelijk worden gesteld voor elk verlies van gegevens dat kan op...

Страница 145: ...eft meer informatie over het programma Blauwe toets Filter Geeft filteropties weer Druk op de toets om het menu van het geselecteerde genre te zien Met deze functie kunt u de database van de programmagids opvragen volgens het geselecteerde genre De in de programmagids beschikbare informatie wordt doorzocht en de resultaten die aan uw criteria beantwoorden worden opgelijst Druk op de toets om gedet...

Страница 146: ...ingsmiddelen te gebruiken die geschikt zijn voor uw muur Installeer uw televisietoestel enkel op een stenen of betonnen muur Zorg ervoor dat kinderen niet aan het televisietoestel gaan hangen of er proberen op te klimmen De muurbevestiging van het type VESA wordt afzonderlijk verkocht Zorg er tijdens de installatie voor dat u de handleiding raadpleegt die meegeleverd is voor uw muurbevestiging L 7...

Страница 147: ...levisietoestel aan Geen DTT HD kanalen of aanwezigheid van mozaïek De ontvangst van de HD kanalen van Digital Terrestrial Television DTT is enkel mogelijk in de gedekte zones Controleer of er een zender in de buurt staat Controleer de kwaliteit en het vermogen van het ontvangstsignaal Laat uw installatie controleren door een professional De afstandsbediening werkt niet Er zitten geen batterijen in...

Страница 148: ...ormatie over de modellen zoals die opgenomen is in de database van de producten terugvinden op de volgende website door het ID van uw model op te zoeken zoals dat op het kenplaatje vermeld staat https eprel ec europa eu De serviceduur van uw toestel bedraagt 5 jaar In de loop van deze periode zijn de originele wisselstukken beschikbaar om de goede werking van het toestel te garanderen U vindt de i...

Страница 149: ...NL 149 V 1 0 ...

Страница 150: ......

Страница 151: ......

Страница 152: ...ualquier fallo que resulte de un defecto de fabricación o material Esta garantía no cubre defectos o daños que resulten de una instalación inadecuada uso indebido o desgaste normal del producto El período de garantía se especifica en la factura de compra ACHTUNG Dieses Symbol auf dem Produkt bedeutet dass es sich um ein Gerät handelt dessen Entsorgung den Vorschriften für elektrische und elektroni...

Отзывы: