


4
432-LIPPERT (432-547-7378)
Rev: 06.15.22
SureShade
®
Power
Bimini Upgrades: Fly
Extension
Installation and Owner’s Manual
(For Aftermarket Applications)
CCD-0004538
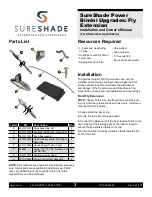
5.
Snap the two sections of the tube together
(Fig.1)
.
NOTE:
The round support tube for the front of the fly
extension is shipped in two pieces.
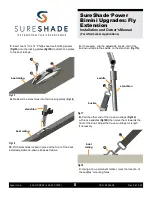
6.
Position the tube so the ends curve upward and
are vertically aligned to one another at the 12 o’clock
position
(Fig.2)
.
Fig.1
Fig.2
7.
Use an
1/8
” hex wrench to loosen the setscrew
(Fig.3A)
in a jawslide, remove the jaw screw
(Fig.3B)
then set the
screw aside.
set tube to
vertical
aligned tube ends
8.
Slip the jawslide onto one end of the tube, position it
flush to the end of the tube, then align the clamping jaw
vertical to the tube ends
(Fig.4)
.
Fig.3
A
jawslide
B
snap button
snap button
tube
jawslide
flush
aligned jawslide
tube’s
vertical
centerline
clamping
jaws
Fig.4
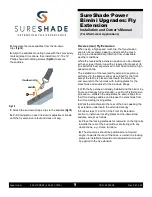
9.
Rotate the jawslide to the 1 o’clock position (30 degrees)
then secure it in place with the setscrew using an
1/8
” hex
wrench
(Fig.5)
.
Fig.5
30 degrees
tube
jawslide


