background image

English

   - 9 -

Media Browser Menu

You can play photo, music and movie 

¿

les stored on a 

USB disk by connecting it to your TV. Connect a USB 
disk to one of the USB inputs located on the side of 
the TV. Pressing the 

Menu

 button while in the 

Media 

Browser

 mode will access the 

Picture

Sound

 and 

Settings

 menu options. Pressing the 

Menu

 button 

again will exit from this screen.


You can set your 

Media


Browser

 preferences by using the 

Settings

 menu.

/

oop

Shuf

À

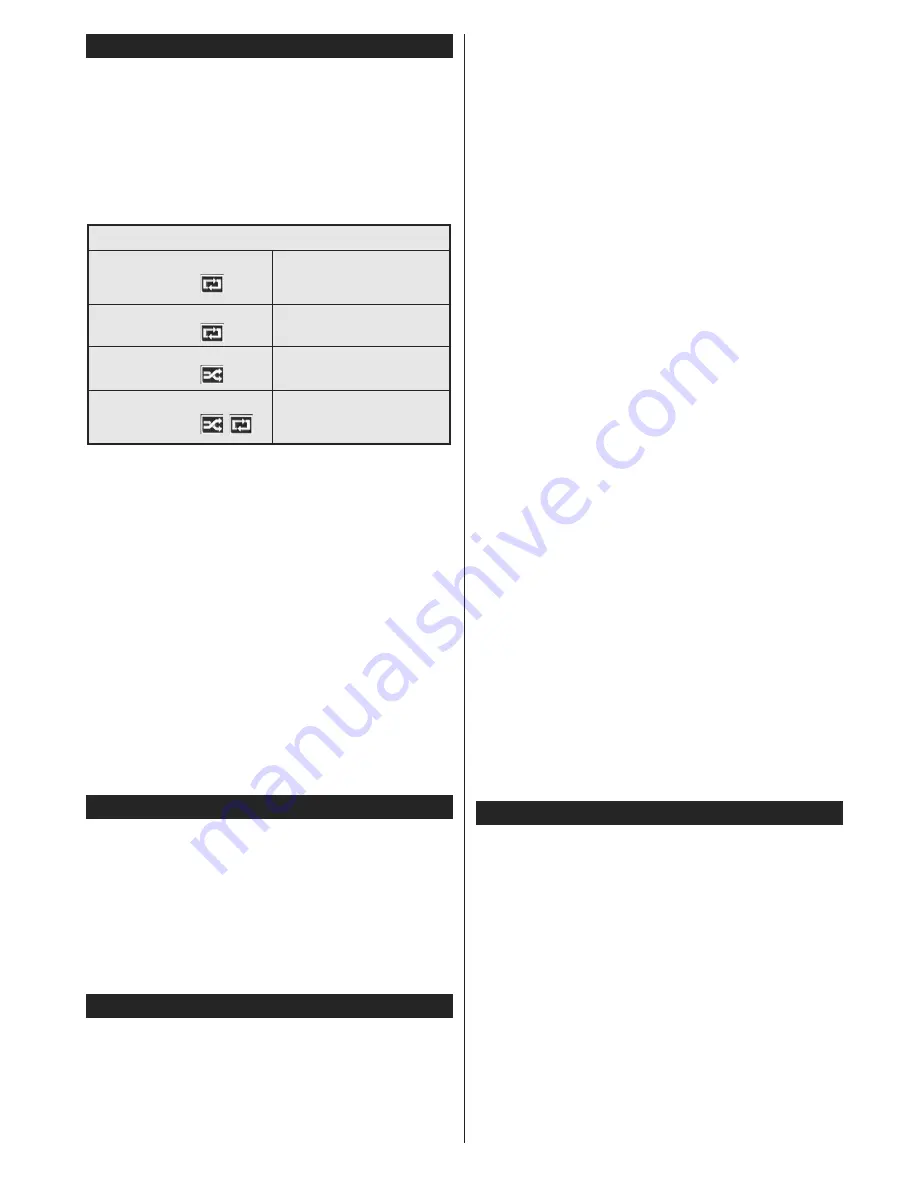
e Mode Operation

Start playback with the 

Play 

button and activate 

All 

¿

les in the list will be 

continuously played in original 
order

Start playback with the 

OK 

button and activate 

The same 

¿

le will be played 

continuously (repeat)

Start playback with the 

Play


button and activate 

All 

¿

les in the list will be 

played once in random order

Start playback with the 

Play


button and activate 

All 

¿

les in the list will be 

continuously played in the 
same random order.

Custom Boot Up Logo

You can personalize your TV and see your favorite 
image or photo on the screen each time your TV boots 
up. To do this, copy your favorite image 

¿

les into a USB 

disk and open them from the 

Media Browser

 menu. 

When you have chosen the desired image, highlight it 
and press 

OK

 to view it in full screen. Press 

OK

 again 

to choose the image as custom logo. A con

¿

rmation 

message will be displayed. Select 

Yes

 and press 

OK


again. If the image is suitable

(*)

 you will see it on the 

screen during the TV’s next boot up.

Note:

 If you perform a First Time Installation the TV will return 

to using the default logo, if any.

(*) 

Images should have an aspect ratio of 16:9 and they should 

be in .

M

pg, .

M

peg or .

M

pe 

¿

le formats. Only 

¿

les with si

]

es no 

greater then 300KB are supported. The image cannot be 
set as boot logo, which’s resolution doesn’t appear on the 
info banner.

FollowMe TV (if available)

With your mobile device you can stream the current 
broadcast from your smart TV using the 

FollowMe 

TV

 feature. Install the appropriate Smart Center 

application to your mobile device. Start the application. 
For further information on using this feature refer to 
the instructions of the application you use.

Note:

 This application may not be compatible with all mobile 

devices.  HD channels are not supported and both of the 
devices must be connected to the same network.

CEC and CEC RC Passthrough

This function allows to control the CEC-enabled 
devices, that are connected through HDMI ports by 
using the remote control of the TV.
The 

CEC

 option in the 

System>Settings>More

 menu 

should be set as 

Enabled

 at 

¿

rst. Press the 

Source


button and select the HDMI input of the connected 

CEC device from the 

Sources List

 menu. When 

new CEC source device is connected, it will be listed 
in source menu with its own name instead of the 
connected HDMI ports name(such as DVD Player, 
Recorder 1 etc.).
The TV remote is automatically able to perform the 
main functions after the connected HDMI source has 
been selected.
To terminate this operation and control the TV via 
the remote again, press 

Quick Menu

 button on the 

remote, highlight the 

CEC RC Passthrough

 and 

set as 

Off

 by pressing Left or Right button. This 

feature can also be enabled or disabled under the 

System>Settings>More

 menu.

The TV supports also ARC(Audio Return Channel) 
feature. This feature is an audio link meant to replace 
other cables between the TV and the audio system 
(A/V receiver or speaker system).
When ARC is active, TV does not mute its other audio 
outputs automatically. So you need to decrease TV 
volume to zero manually, if you want to hear audio 
from connected audio device only (same as other 
optical or co-axial digital audio outputs). If you want 
to change connected device’s volume level, you 
should select that device from the source list. In that 
case volume control keys are directed to connected 
audio device.

Note:

 ARC is supported only via the HDMI2 input.

System Audio Control

Allows an Audio Ampli

¿

er/Receiver to be used with 

the TV. The volume can be controlled using the 
remote control of the TV. To activate this feature set 
the 

Speakers

 option in the 

System>Settings>More


menu as 

Ampli

¿

er

. The TV speakers will be muted 

and the sound of the watched source will be provided 
from the connected sound system.

Note:

 The audio device should support System Audio Control 

feature and 

CEC

 option should be set as 

Enabled

.

E-Manual (if available)

You can 

¿

nd instructions for your TV’s features in 

the E-Manual. 
To use E-Manual, press to the 

Info 

button while main 

menu is displayed on the screen or press 

Quick Menu


button, select 

Information


Booklet

 and press 

OK

.

By using the directional buttons select a desired 
category. Every category includes different topics. 
Select a topic and press 

OK

 to read instructions.

To close the E-Manual screen press the 

Exit

 or 

Menu


button.

Note:

 The contents of the E-Manual may vary according to 

the model.

Содержание 24LED4000

Страница 1: ...2 285 7 9 6 21 2 23 5 7 1 16758 7 216 XVWRPHU HOSOLQH...

Страница 2: ...letext Services 15 Software Upgrade 15 Troubleshooting Tips 16 PC Input Typical Display Modes 17 AV and HDMI Signal Compatibility 17 Supported Video File Formats for USB Mode 18 Supported Picture File...

Страница 3: ...pose the TV to dripping or splashing of liTuids and do not place obMects lled with liTuids such as vases cups etc on or over the TV e g on shelves above the unit Do not expose the TV to direct sunligh...

Страница 4: ...btain from your local dealer if not supplied with your TV Do not install the TV on a ceiling or on an inclined wall Use the speci ed wall mounting screws and other accessories Tighten the wall mountin...

Страница 5: ...it isn t being operated for a while it will go into standby When you next switch on the following message will be displayed TV switched to stand by mode automatically because no operation was made fo...

Страница 6: ...the HDMI Logo are trademarks or registered trademarks of HDMI Licensing LLC in the United States and other countries Manufactured under license from Dolby Laboratories Dolby and the double D symbol ar...

Страница 7: ...15 Play Starts to play selected media 16 Stop Stops the media being played 17 Rapid advance Moves frames forward in media such as movies 18 Subtitles Turns subtitles on and off where available 19 Scr...

Страница 8: ...connection If an external device is connected via the SCART socket the TV will automatically switch to AV mode When receiving DTV channels Mpeg4 H 264 or while in Media Browser mode output will not b...

Страница 9: ...off on later Press OK button on the remote control to continue and the Network Internet Settings menu will be displayed if you con rm the previously displayed message asking whether you want to do th...

Страница 10: ...nction allows to control the CEC enabled devices that are connected through HDMI ports by using the remote control of the TV The CEC option in the System Settings More menu should be set as Enabled at...

Страница 11: ...ss of the picture by pressing Left or Right buttons Picture Zoom Sets the desired image size format Film Mode Films are recorded at a different number of frames per second to normal television program...

Страница 12: ...ports AVL Automatic Volume Limiting Sets the sound to obtain xed output level between programmes Headphone Lineout When you connect an external ampli er to your TV using the headphone jack you can sel...

Страница 13: ...aired audience Press OK to see all available Audio Description menu options This feature is available only if the broadcaster supports it Net ix You can view your ESN number and deactivate Net ix ES1...

Страница 14: ...device set as Ampli er You can use the remote control of the TV to control the volume of the audio device OSS Displays Open Source Software license information Installation Menu Contents Automatic cha...

Страница 15: ...e This setting enables or disables access some of the MHEG applications Disabled applications can be released by entering the right PIN Set PIN De nes a new PIN number Default CICAM PIN This option wi...

Страница 16: ...nder the tab Featured highlight Connected Red Button and press OK to start the service On the opening page you can access to BBC s main services such as BBC iPlayer BBC News BBC Sport and many others...

Страница 17: ...g Tips Tv will not turn on Make sure the power cord is plugged in securely to wall outlet Check if batteries are exhausted Press the Power button on the TV Poor picture Check if you have selected the...

Страница 18: ...75Hz 32 1280x960 85Hz 33 1280x1024 60Hz 34 1280x1024 75Hz 35 1280x1024 85Hz 36 1400x1050 60Hz 37 1400x1050 75Hz 38 1400x1050 85Hz 39 1440x900 60Hz 40 1440x900 75Hz 41 1600x1200 60Hz 42 1680x1050 60Hz...

Страница 19: ...on JPEG 640x480 30fps 10 Mbps Other 1080P 30fps 40 Mbps avi MPEG1 2 MPEG4 Sorenson H 263 H 263 H 264 WMV3 Motion JPEG mkv MPEG1 2 MPEG4 H 263 H 264 WMV3 Motion JPEG asf Sorenson H 263 H 264 WMV3 Motio...

Страница 20: ...8Kbps 384Kbps MPEG1 2 Layer3 8Kbps 320Kbps WMA 128bps 320Kbps 8KHz 48KHz WMA 10 Pro M0 192kbps 48KHz WMA 10 Pro M1 384kbps 48KHz WMA 10 Pro M2 768kbps 96KHz mkv mka MPEG1 2 Layer1 32Kbps 448Kbps 16KH...

Страница 21: ...Kbps 640Kbps 32KHz 44 1KHz 48KHz AAC HEAAC 8KHz 48KHz swf MPEG1 2 Layer3 8Kbps 320Kbps 16KHz 48KHz ec3 EAC3 32Kbps 6Mbps 32KHz 44 1KHz 48KHz rm rmvb ra AAC HEAAC 8KHz 48KHz LBR cook 6Kbps 128Kbps 8KHz...

Страница 22: ...using DVI converter cable DVI to HDMI cable not supplied you can refer to the following resolution information 56Hz 60Hz 66Hz 70Hz 72Hz 75Hz 640x400 640x480 800x600 832x624 1024x768 1152x864 1152x870...

Страница 23: ...desired one and press Left or Right button to change the setting from Automatic to Manual Now you can enter the Manual IP and or Manual DNS values Select the related item in the drop down menu and ent...

Страница 24: ...with the router and then activate the sharing software on your mobile device Then select les that you want to share with your TV If the connection is established correctly you will be able to access t...

Страница 25: ...PC with the Nero Media Home programme For more information about the installation please refer to the Nero Media Home Installation section 2 Connect to a Wired or Wireless Network See the Wired Wirele...

Страница 26: ...is server over your Internet connection Portal feature allows you to view the music video clip or web content with de ned short cuts Whether you can view this content without interruption depends on t...

Страница 27: ...catch up service If you wish to watch Demand 5 on Freeview Play please use the other options listed below to access the catch up service 2 Freeview Play via the FPlay button Click Freeview Play button...

Страница 28: ...ications use your tablet as a remote control for your TV and share media les Note Being able to use all functions of this application depends on the features of your TV Getting Started To use Smart Ce...

Страница 29: ...al DVB T C S SD channels are supported Multilanguage audio support and subtitle on off features are not functional The streaming performance may change depending on the quality of your connection Medi...

Страница 30: ...ter out Do not use solvents such as benzine thinner commercially available cleaners or anti static spray intended for vinyl LPs Licence Noti cation This product incorporates copyright protection techn...

Страница 31: ...ot recorded on the disc only the available language on the disc will be heard 10 Some DVDs may not contain root and or title menus 11 Reverse stepping is not available 12 For your convenience If you a...

Страница 32: ...MP3 is recorded as a Digital Signal with better audio quality less distortion and less deterioration of audio quality over time PICTURE CD Video still picture 12 cm It depends on JPEG quality JPEG is...

Страница 33: ...rch mode 8 Coloured Buttons Red Zoom Green Repeat Yellow Root Blue Title 9 Language selection 10 Rapid reverse 11 Pause 12 Play 13 Stop 14 Rapid advance 15 Subtitle 16 Angle 17 Navigation buttons 18 I...

Страница 34: ...during playback Press repeatedly to switch between modes LANGUAGE Auto language MENU Displays TV menu OK Enter View Play GREEN BUTTON Displays repeat options RETURN BACK Returns back to the previous...

Страница 35: ...minal which is marked with the letter E or by the earth symbol or coloured green or green and yellow The wire which is coloured blue or black must be connected to the terminal which is marked with the...

Страница 36: ...n the Sky remote control blinks twice 4 Key in 0065 or one of the above codes The light on the Sky remote control should blink twice 5 Press the STANDBY button on your Sky remote control If your TV sw...

Страница 37: ...ensure you visit www linsar com to activate your free ve year guarantee VESA WALL MOUNT MEASUREMENTS W Sizes mm W H 75 75 es th X min mm 5 max mm 8 d z M4 W E Z W E 10105916 D E 24LED4000 s 61 cm K t...

Страница 38: ...3HQFRHG 7HFKQRORJ 3DUN ULGJHQG 0LG ODPRUJDQ 6RXWK DOHV 8...

Отзывы: