


25
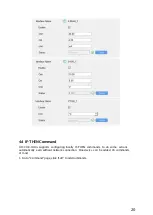
Note: When this feature is enabled and the command is triggered, the device will not send data
to LoRaWAN
®
network server.
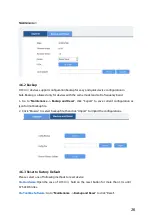
4.6 Maintenance
4.6.1 Upgrade
IOT-C300
supports upgrade locally via ToolBox software.
1.
Download firmware from www.linovision.com to your PC.
2.
Go to “
Maintenance ->Upgrade”
,click “
Browse”
to import firmware and upgrade the device.
You can also click “
Up to Date”
to search for the latest firmware of the device and upgrade.
Note:
Any operation on ToolBox is not allowed during upgrading,otherwise the upgrading will be
interrupted,or even the device will break down.