background image


960-0001-20 

 iGrowSeries 100 Installation and User Manual  

51 

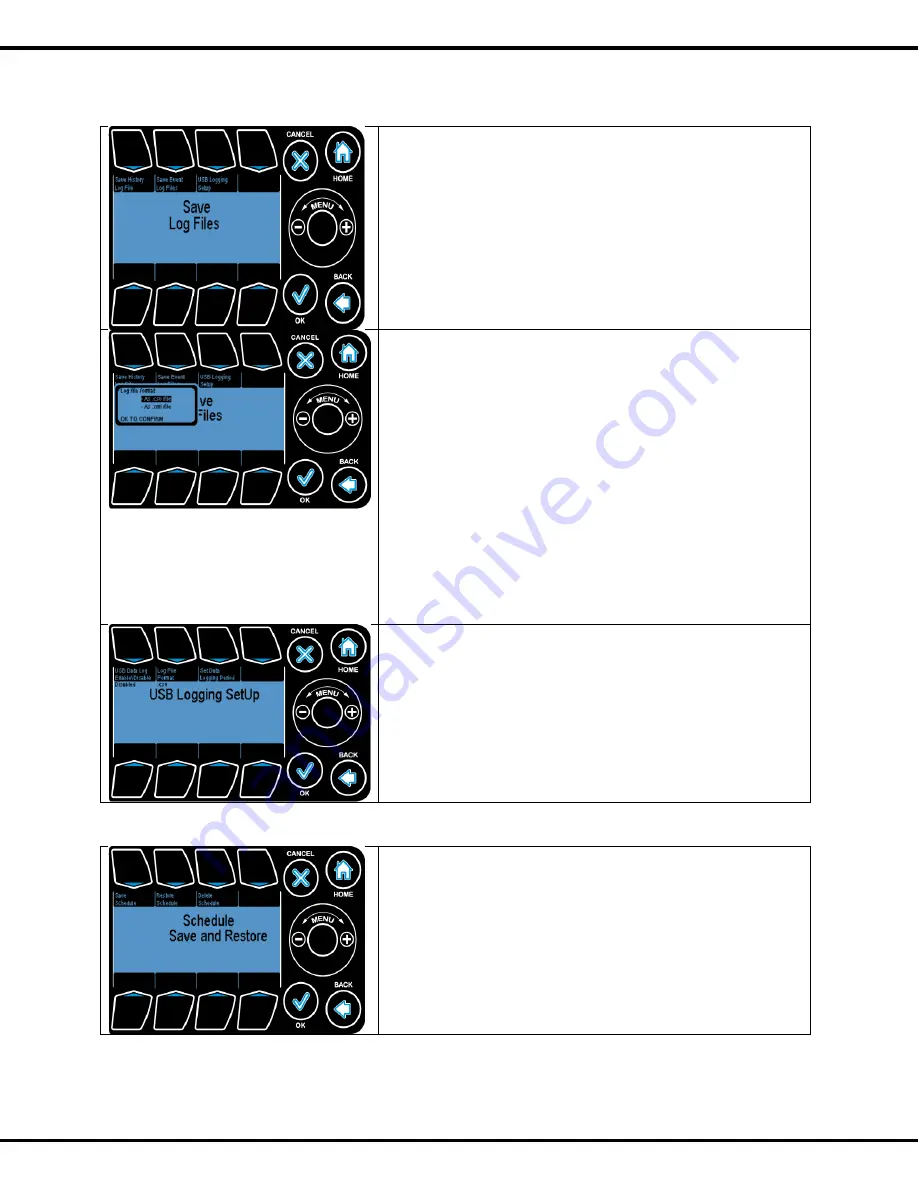
4.7.2 Save Log Files 


To save the log file select the Save Log Files option by 
highlighting it using the 

Wheel

 or by pressing Button 

#2

 and 

press 

OK

 
Currently supported Save Log File options include: 
• Save History Log File 
• Save Event Log Files 
• USB Logging Setup 
 

Buttons #1, #2 or #

3 are used to go to the corresponding 

options. 


On selecting the Save History Log Files a popup indicating the 
file formats pop-ups. Log files can be saved in either .xml or 
.csv file formats. 
 
Select a given format using 

Wheel

 and pressing 

OK


After selecting the required format the user is promoted to 
choose the drive to store the file in. 
 
User can select an option by scrolling and pressing 

OK


The system prompts the user to enter a file name. 
 

Note: The process of writing from system memory to USB can 
be time consuming. 


USB Logging setup will let you set the time interval in which 
you want to log files. 
 
Press 

#1

 to enable/ disable the option 

Press 

#2

 to change the file format. 

Press 

#3 

to change the logging period 


4.7.3 Save/Restore Schedule 


This is similar to save/restore configuration settings 


Содержание iPonic 600

Страница 1: ...iPonic 600 I N T E L L I G E N T E N V I R O N M E N T AL C O N T R O L L E R Installation and User s Guide November 2011 Preliminary Edition Copyright 2011 Corporation...

Страница 2: ...iPonic 600 I N T E L L I G E N T E N V I R O N M E N T AL C O N T R O L L E R Installation and User s Guide November 2011 Preliminary Edition Copyright 2011 Corporation...

Страница 3: ...Installation 11 Equipment Installation 12 Low Voltage Output Installation 13 Programming 15 Before You Begin 15 iPonic 600 Main Status Screens 15 Navigation 15 Main Status Screen Entries 18 Programmi...

Страница 4: ...Up 44 4 3 1 4 Analog Sensor Mapping 45 4 4 Alarms Setup 46 4 5 Time Date Setup 47 4 5 1 Set Time 47 4 5 2 Set Date 47 4 6 Advanced 48 4 6 1 Air Exchange Settings 48 4 6 2 Diagnostics 49 4 6 3 Time Set...

Страница 5: ......

Страница 6: ...you to focus on plants and profits The reason why we stand out from others is because of our Link4 Promise Our passion is to provide growers with intelligent control solutions We understand controlli...

Страница 7: ...ranty period when all such liability shall terminate Link4 shall not be responsible for any loss or claims due to consequential damages afford by the Buyer Link4 also reserves the right to make any ne...

Страница 8: ...ou begin installation If there is any visible damage or missing parts please contact our customer service at support Link4corp com or 1 866 755 LINK or fax us at 714 558 9782 1 iPonic 600 unit 2 Senso...

Страница 9: ...er 3 The iPonic 600 comes with a 115 VAC power cord Make sure there is a power outlet within approximately 6 feet It is recommended that the outlet is not switched and is on a circuit that is independ...

Страница 10: ...e Stage Separation or Stage Width Whenever the temperature rises 1 degree above the cool setpoint 70 0 then the iPonic 600 TM will activate the appropriate equipment to bring the hydroponic facility t...

Страница 11: ...setpoint time periods Of course the ramp times can be set to 0 and in this case there will be an immediate step transition in the set points This is best explained by the illustration shown below 12am...

Страница 12: ...e and planning are required In order to aid you with the process Link4 has provided several worksheets in the following pages It is assumed that you already possess a general understanding of hydropon...

Страница 13: ...8 iGrowSeries 100 Installation Manual 960 0001 20 Figure 3 3 Blank worksheet for setpoints and stages...

Страница 14: ...w the iPonic 600 looks on the inside Although the unit is pre wired it is good to have some familiarity with the internal layout Figure 4 2 Board Layout of the iPonic 600 PCB Manual Override Switches...

Страница 15: ...10 iGrowSeries 100 Installation Manual 960 0001 20 Figure 4 3 Electrical Connection Diagram of the iPonic 614...

Страница 16: ...ons the wire and adapter can be purchased from Link4 It should be noted that the controller is calibrated for a 50 ft temperature probe If additional wires are added or removed software calibration wi...

Страница 17: ...s gives a total of six outputs that can be controlled independently These outputs are numbered from 1 3 on the left side from top to bottom and 4 6 on the right side also from top to bottom In a typic...

Страница 18: ...and negative terminals The board mounted relays are intended as pilot relays For most loads you will want the iPonic 600 outputs to control a load relay or contactor that is connected to the motor Ho...

Страница 19: ...14 iGrowSeries 100 Installation Manual 960 0001 20...

Страница 20: ...rol Strategies that are relevant to your application are understood and are completely filled out You can upgrade your controller to the latest firmware by going to iponic link4corp com Follow the pro...

Страница 21: ...ection o If an alphanumeric field is highlighted the wheel can be used to increment or decrement the data entry o Note that the center of the wheel is not a button HOME o Pressing HOME will bring the...

Страница 22: ...ton numbers match outlet numbers AUTO FORCE ON FORCE OFF SETTINGS OK TO CONFIRM 8 green output status indicators Will turn off after 5 minutes 1 2 4 and 5 control ONE power outlet each 3 6 control TWO...

Страница 23: ...umidify mode active page 33 Highlighted means output is ON Current CO2 level page 25 CO2 target level page 25 Grow Schedule is ACTIVE page 28 Alarm indicators page 46 Output 7 8 are INTERNAL defaulted...

Страница 24: ...ed Alarm Indicators This shows which type of alarm is set In the above case Humidity Low and Co2 low have been set G Curve This shows that the growth schedule is active It also shows the growth week i...

Страница 25: ...Schedule if you are using the growth schedules this is where you program the vegetative and flowering phases and other related parameters 3 Reports a variety of sensor data can be graphed and viewed h...

Страница 26: ...is parameter the condition is considered too dry and the system will go into humidification stage Dehumidify if the RH reading is above this parameter the condition is considered too damp and the syst...

Страница 27: ...tpoint and Cool Setpoint by pressing 5 6 respectively The temperature is adjusted by turning the Wheel Pressing the Set Time button 7 will allow the start time for the Day Time Setpoint to be set Nigh...

Страница 28: ...aration temperature the system will go into Cool 2 and so forth Press 3 followed by wheel to increase or decrease OutTemp OverrideThreshold This is the temperature at or below which the outside air ex...

Страница 29: ...be off Outside humidity override has two options On Off and Offset On Off is where it enables or disables this option Offset option allows you to input the minimum amount of humidity Let say if the i...

Страница 30: ...On 1 3 1 CO2 Global Settings DeadBand This is the number of PPM that the CO2 must drop below the Setpoint before CO2 injection is resumed Press 1 to set the CO2 deadband There are a few conditions tha...

Страница 31: ...y default the controller has been programmed to cycle on for 10 seconds i e inject CO2 for 10 seconds and cycle off for 50 seconds The cycle repeats again until the CO2 level has increased beyond the...

Страница 32: ...ress 5 to enter Start Time of light enable window Press 6 to enter End Time of light enable window Press 4 to go to Global Light Settings see next screen Ref Page No 47 to change start time end time 1...

Страница 33: ...screen where you will enter the start date for the whole process the total duration in weeks and the start dates for the vegetative and flowering phases This takes you to the Vegetative stage of the g...

Страница 34: ...tion vegetative duration flowering duration and so forth This takes you to the growth curve setup screen shown on the next screen Press 1 to enable or disable the growth curve process Press 2 to enter...

Страница 35: ...wSeries 100 Installation Manual 960 0001 20 Press 1 to save your current growth schedule Press 2 to restore a previously stored schedule Press 3 delete a previously stored schedule Please refer to Pag...

Страница 36: ...s under Reports 1 Sensor Reports 2 Graphs To highlight the sub options Wheel or Buttons 1 2 can be used to go to the corresponding options Pressing OK will let user select the options 3 1 Sensor Repor...

Страница 37: ...onding options Pressing OK will let user select the options 3 2 1 Temperature In the temperature option user can view graphs for the following Inside Temperature Outside Temperature Heat Setpoint Cool...

Страница 38: ...graphs for different time periods 3 2 3 Light In the light option user can view graphs for the following time periods Since Reset Last Hour Last 24 hour Last 7 days To highlight the sub options Wheel...

Страница 39: ...ssing OK or Button 3 will let the user to go to system setup submenu The subsections under the system setup are 1 Equipment Setup 2 Scheduling Setup 3 Sensor Setup 4 Alarm Setup 5 Time Date Setup 6 Ad...

Страница 40: ...e names displayed 4 1 1 Quick Setup In this screen you can select the equipment that will control your Growth Room and the setup is automatically run by your iPonic The equipment to be controlled is n...

Страница 41: ...in Equipment Settings menu This is useful when a user changes any equipment previously mapped to a channel Note The runtime is set to 0 if yes is selected Note This cannot be undone 4 1 2 1 Timed Over...

Страница 42: ...uipment that turns on and off in each of the heating cooling dehum stages For example heater fan cool pad pump etc FAN refers to the Vent Fan or Ventilation Fan AC refers to air conditioning equipment...

Страница 43: ...open position and vice versa On selecting the Set Open Close Duration the following screen comes up By pressing Button 1 user can to go Set Open Close time duration option The screen enables to set t...

Страница 44: ...re limit Set Temp Limit This is the user specified temperature value which triggers the Vent Open Limit when temperature drops below set value These values can be changed by selecting Buttons 1 and 2...

Страница 45: ...d sunset values Location setup can be used to input the coordinates Press Button 5 and OK to confirm Then user can change the time by pressing Buttons 1 2 3 5 and 6 Note The sunrise and sunset values...

Страница 46: ...You can enable disable this option by pressing 1 Press 5 to change the start time Press 6 to change the end time Press 7 to change the on time Press 8 to change the off time Please refer to Page no 4...

Страница 47: ...he growth curve process Press 2 to enter the total number of weeks for the growing process Press 3 to enter the number of weeks for the Vegetative phase Press 4 the number of weeks for the Flowering p...

Страница 48: ...ou to another screen Press 2 to go to advanced settings 4 3 1 Advanced The Sensor Setup page is where the user can map the sensor that is used for inside temperature readings Sensors can also be calib...

Страница 49: ...ects None Disabled for that sensor 4 3 1 2 Calibrate Sensors To calibrate an input the sensor is selected The Previous and Next buttons are used to scroll through the different sensors Raw Value This...

Страница 50: ...used to go to the corresponding option Wheel can be used to increase or decrease the values Note In the event that a sensor failsthe test and no backup sensor is in place significant crop damage can...

Страница 51: ...g a temperature level This is normally connected to a telephone dialer such as the Sensaphone High Temp Alarm Threshold is the maximum temp above which the alarm is triggered Press 1 followed by wheel...

Страница 52: ...a given field is already highlighted repressing that button causes the value in that field to be increased 12H 24H Used to set the time display as 24 hr 12 hr duration Set Hour Used to highlight the h...

Страница 53: ...able This option lets you enable the startup wizard i e when you reset the controller you will have to set up time date equipment and growth start date Press 6 to toggle between enable disable option...

Страница 54: ...n lets you to check whether the curtain is fully closed or open Bump off time is the time interval after which the system checks the curtain position Press 2 followed by wheel to change the value Note...

Страница 55: ...e Restore button and pressing OK we get a menu to choose from Save Restore Config Store and restore the configuration file Save Log Files Save the log file to USB Save Restore Sched Store and restore...

Страница 56: ...s Log files can be saved in either xml or csv file formats Select a given format using Wheel and pressing OK After selecting the required format the user is promoted to choose the drive to store the f...

Страница 57: ...lect this option EDIT LATITUDE Allows the user to edit the latitude value EDIT LONGITUDE Allows the user to edit the longitude value Valid Location SetUp If set to False indicates that the latitude an...

Страница 58: ...menu Wheel or Button 7 can be used to go to highlight this option and OK to select this option IP Address Setup Allows the user to configure the network settings to enable the unit for web access Serv...

Страница 59: ...f the System Setup Scroll the Wheel to the desired menu and select OK The units can be changed by pressing the buttons for the corresponding measurement Button 5 6 7 Pressing the buttons toggles the u...

Страница 60: ...onfiguration Allows the user to delete the configuration files stored in system memory USB Save Configuration Allows you to store controller settings configuration to SD Card USB System Memory Restore...

Страница 61: ...d dehumidification stages The Stage settings can be set for Temp Stages Humidity stages Note There are up to 8 temperature stages and 4 humidity dehumidify stages There are 2 heating H1 H2 and up to 6...

Страница 62: ...ices vents curtains the second channel is disabled 6 2 Humidity Stages When choosing to assign individual equipment to a humidity stage the following screen is shown The arrows are used for moving the...

Страница 63: ...58 iGrowSeries 100 Installation Manual 960 0001 20 NOTES AREA...

Страница 64: ...960 0001 20 iGrowSeries 100 Installation and User Manual 59 NOTES AREA...

Страница 65: ...60 iGrowSeries 100 Installation Manual 960 0001 20 VISIT US ON THE WEB Product Information User Manuals Quick Start Guides Firmware Upgrades www iponic link4corp com...

Страница 66: ...ranty period when all such liability shall terminate Link4 shall not be responsible for any loss or claims due to consequential damages afford by the Buyer Link4 also reserves the right to make any ne...

Страница 67: ...setpoint time periods Of course the ramp times can be set to 0 and in this case there will be an immediate step transition in the set points This is best explained by the illustration shown below 12am...

Страница 68: ...w the iPonic 600 looks on the inside Although the unit is pre wired it is good to have some familiarity with the internal layout Figure 4 2 Board Layout of the iPonic 600 PCB Manual Override Switches...

Страница 69: ...s gives a total of six outputs that can be controlled independently These outputs are numbered from 1 3 on the left side from top to bottom and 4 6 on the right side also from top to bottom In a typic...

Страница 70: ...and negative terminals The board mounted relays are intended as pilot relays For most loads you will want the iPonic 600 outputs to control a load relay or contactor that is connected to the motor Ho...

Страница 71: ...numbers match outlet numbers AUTO FORCE ON FORCE OFF SETTINGS OK TO CONFIRM 8 green output status indicators Will turn off after 5 minutes 1 2 4 and 5 control ONE power outlet each 3 6 control TWO 7...

Страница 72: ...ode active page 33 Highlighted means output is ON Current CO2 level page 25 CO2 target level page 25 Grow Schedule is ACTIVE page 28 Alarm indicators page 46 Output 7 8 are INTERNAL defaulted to OFF p...

Отзывы: