Lindy 43125 Скачать руководство пользователя страница 3


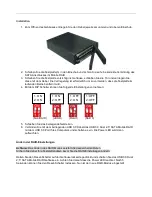
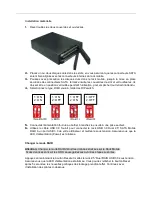
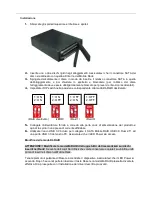
Hardware Installation 


Unlock the Upper and Lower covers, and open the doors. 


Place  your  HDD(s)  in  the  slots,  ensuring  the  HDDs  SATA  connectors  are  correctly  lined  up  with  the 
connector inside the Mobile RAID. 

Carefully push the drive into the Mobile RAID, so the drive’s SATA connector is securely seated. Close 
the door and lock it. 

The  door  MUST  be  locked  when  the  Mobile  RAID  is  in  use.  This  prevents  unexpected  removal  and 
potential damage to your drive. 

Adjust the DIP switch to set the storage policy: 

1: ON 
2: ON 

1: ON 

2: OFF 

1: OFF 

2: ON 

1: OFF 
2: OFF 


(Non-RAID) 

(JBOD) 

(Raid 1) 

(Raid 0) 

Before powering on the Mobile RAID, ensure you are using the included PSU and the supplied USB 3.0 
cable to attach it to your computer 

Switch on the power. The power LED will light up. 

Changing the RAID mode 
 

Caution 

Changing RAID modes destroys data stored on the Mobile RAID 

If you have saved data on the HDD, back it up before carrying out the following steps. 


1.  Press and Hold the Reset switch while powering on the 2.5” Dual RAID USB 3.0 Enclosure. 
2.  Make sure the Power LED is on. 
3.  After 5 seconds, release the Reset Switch. 
4.  The new storage policies will take effect. Continue with the driver installation below. 


Содержание 43125

Страница 1: ...RONICS LIMITED LINDY ELEKTRONIK GMBH FIRST EDITION Sep 2014 Dual 2 5 SATA Mobile RAID USB 3 0 User Manual English Benutzerhandbuch Deutsch Manuel Utilisateur Fran ais Manuale Italiano LINDY No 43125 w...

Страница 2: ...HDD ACTIVE LED POWER LED LOCK HDD GATE HDD ACTIVE LED Mode Select USB 3 0 Power Switch DC Jack Reset...

Страница 3: ...policy 1 ON 2 ON 1 ON 2 OFF 1 OFF 2 ON 1 OFF 2 OFF Non RAID JBOD Raid 1 Raid 0 Before powering on the Mobile RAID ensure you are using the included PSU and the supplied USB 3 0 cable to attach it to...

Страница 4: ...Remove Hardware utility before turning off or disconnecting the USB 3 0 Dual 2 5 SATA Mobile RAID Windows 8 7 Verify that the HDD access LED is OFF before proceeding Click the Safely Remove Hardware...

Страница 5: ...Raid 1 Raid 0 5 Schlie en Sie das beiliegende Netzteil an 6 Verbinden Sie mit dem beiliegenden USB 3 0 Kabel das USB 3 0 Dual 2 5 SATA Mobile RAID mit dem USB 3 0 Port Ihres Computers und schalten es...

Страница 6: ...ATA Mobile RAID mit dem Symbol Hardware sicher entfernen in der Taskleiste Windows 8 7 1 Achten Sie darauf dass sie HDD Access LED nicht leuchtet 2 Klicken Sie dann auf das Symbol Hardware sicher entf...

Страница 7: ...limentation fournie au bo tier branchez le ensuite une prise secteur 6 Utilisez le c ble USB 3 0 fournit pour connecter le rack USB 3 0 Dual 2 5 SATA Mobile RAID un port USB 3 0 de votre ordinateur et...

Страница 8: ...rique en toute s curit pour d sactiver ou d connecter le rack USB 3 0 Dual 2 5 SATA Mobile RAID Windows 8 7 1 V rifiez que la LED d acc s HDD est teinte avant de proc der 2 Cliquez sur l ic ne retirer...

Страница 9: ...fornito a corredo alla porta Jack di alimentazione del prodotto e quindi la spina in una presa di corrente affidabile 6 Utilizzate il cavo USB 3 0 incluso per collegare il SATA Mobile RAID USB 3 0 Dua...

Страница 10: ...omputer Utilizzate la funzione di Rimozione Sicura di Windows per spegnere o disconnettere il Mobile RAID SATA Dual 2 5 USB 3 0 Windows 8 7 1 Verificate che il LED di acceso all Hard disk sia spento p...

Страница 11: ...ermany Deutschland Die Europ ische Union hat mit der WEEE Direktive umfassende Regelungen f r die Verschrottung und das Recycling von Elektro und Elektronikprodukten geschaffen Diese wurden von der Bu...

Отзывы: