USB 2.0 & FireWire
Hard Disk Box
Installation Guide
English
Installationsanleitung
Deutsch
Manuel Utilisateur
Français
LINDY No. 42911
www.lindy.com
© LINDY ELECTRONICS LIMITED & LINDY-ELEKTRONIK GMBH - SECOND EDITION (Feb 2008)
INSTALLATION
1.
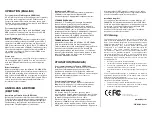
Carefully push in the ‘snap in’ connectors at the 4
shown positions (Fig 1) and remove the top cover.
Drücken Sie vorsichtig die Druckverschlüsse an den
im Bild gezeigten 4 Stellen zusammen (Fig 1) und
heben Sie gleichzeitig die obere Gehäusehälfte an.
Pousser doucement les 4 connecteurs aux
extrémités et (Fig 1) retirez la partie supérieure.
2.
Carefully remove the printed circuit board from the
bottom housing. Attach your 2.5” HDD to the 44 way
IDC connector and secure it to the printed circuit
board with the supplied screws. Do not over fasten.
Important!
The hard drive must not be more than
12.5mm in height.
Important!
Take care not to damage the printed
circuit board.
Nehmen Sie dann die Platine vorsichtig aus der
unteren Gehäusehälfte heraus. Befestigen Sie ihre
2,5” Festplatte am IDC 44 Pol Sockel. Das Gehäuse
ist nur für 2,5” Platten mit einer Maximalhöhe von
12,5mm geeignet! Verwenden Sie die beiliegenden
Schrauben um Ihre Platte an der Platine
festzuschrauben, ziehen Sie die Schrauben nicht zu
fest an um die Platine nicht zu beschädigen.
Retirez délicatement le circuit imprimé de la partie
inférieure du boîtier. Connectez ensuite le disque 2,5”
au connecteur IDC 44 et fixez le au circuit imprimé
avec les vis fournies.
IMPORTANT : Le disque ne doit pas excéder
12,5mm de hauteur. Veillez à ne pas endommager le
circuit imprimé.
3.
Put your 2.5” HDD with printed circuit board back
into the bottom housing. Make sure the PCB is
aligned so that the holes in the corners of the PCB go
firmly over the plastic posts. Otherwise the top cover
cannot be fully closed. Push on the top cover until the
four push buttons correctly snap in.
Legen Sie Platine mit Festplatte vorsichtig in die
untere Gehäusehälfte. Achten Sie darauf, dass die
Rundlöcher in der Platine korrekt über die runden
Plastik-Zentrierbuchsen der unteren Gehäusehälfte
rutschen. Andernfalls lassen sich das Gehäuse nicht
komplett schließen. Setzen Sie die Gehäusehälften
wieder zusammen. Die Druckverschlüsse müssen
hör- und sichtbar einrasten.
Insérez ensuite le disque dur 2.5” HDD avec le circuit
imprimé à nouveau dans la partie inférieure. Assurez
vous que le circuit imprimé soit aligné dans les coins
du boîtier.
Fermez ensuite le boîtier avec la partie supérieure.
Fig. 1
Push to open
Push to open


