background image

Benutzerhandbuch 


Deutsch


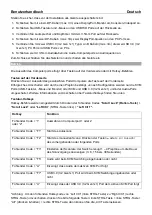
Stellen Sie sicher, dass vor der Installation alle Geräte ausgeschaltet sind. 

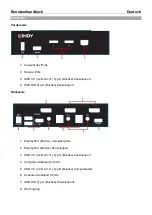
1.  Schließen Sie mit einem DP-Kabel (max. 3m) einen DisplayPort-Monitor am Konsolen-Videoport an. 
2.  Schließen Sie USB-Tastatur und -Maus an den USB HID Ports auf der Rückseite an. 
3.  Verbinden Sie Lautsprecher und Kopfhörer mit dem 3.5mm Port auf der Rückseite.  
4.  Schließen Sie mit zwei DP-Kabeln (max. 3m) zwei DisplayPort-Quellen an den PC Ports an.  
5.  Verbinden Sie mit zwei USB 3.0 (3.2 Gen 1x1) Typ A an B Kabeln (max. 3m) die zwei USB 3.0 (3.2 

Gen1x1) PC Ports mit USB Ports von PCs. 

6.  Schließen sie mit 3.5mm Audiokabeln die Audio-Computerports an Audioquellen an. 

Zum Schluss schließen Sie das Netzteil an und schalten alle Geräte ein. 

Betrieb 

Die Auswahl des Computerports erfolgt über Tasten auf der Vorderseite oder mit Hotkey-Befehlen. 

Tasten auf der Vorderseite 

Drücken Sie zur Auswahl des gewünschten Ports/Computers die Taste auf der Vorderseite. 

Erfolgreiches Umschalten wird durch einen Piepton bestätigt. Je nach Konfiguration werden nur die KVM 

Ports (USB-Tastatur, -Maus und Monitor) oder KVM und USB 3.0 (3.2 Gen1x1) und/oder Audio-Ports 

umgeschaltet. Weitere Informationen zu Umschalten über Tastaturhotkeys finden Sie unten. 

Tastatur-Hotkeys 

Hotkey-Befehle werden eingestellt durch Drücken der führenden Codes 

“Scroll Lock” (Rollen-Taste)

 + 

“Scroll Lock”

 oder 

“Left Ctrl

” (STRG-Taste links) + 

“Left Ctrl”*.


Hotkey 

Funktion 

Führender Code + “1” 

oder “2” 

Auswahl von Computerport 1 oder 2 

Führender Code + “F1” 

Start des Autoscans 

Führender Code + “F2” 

Start des manuellen Scans: Drücken der Tasten 


oder


zur Auswahl 


des vorhergehenden oder folgenden Ports 

Führender Code + “F3” 

Einstellen der Scanrate: der Switch erzeugt 1 – 4 Pieptöne um die Dauer 

des Scanvorgangs anzuzeigen (3, 8, 15 bzw. 30 Sekunden) 

Führender Code + “F5” 

Audio wird beim KVM Switching eingebunden oder nicht 

Führender Code + “A” 

Erzwingt, dass Audio dem aktiven KVM Port folgt 

Führender Code + “F7” 

USB 3.0 (3.2 Gen1x1) Port wird beim KVM Switching eingebunden oder 

nicht 

Führender Code + “U” 

Erzwingt, dass der USB 3.0 (3.2 Gen1x1) Port dem aktiven KVM Port folgt 


*Achtung:  Um den führenden Hotkeycode von “Left Ctrl” (linke STRG-Taste) zu “Right Ctrl” (rechte 

STRG-Taste) umzuschalten, drücken Sie bitte folgende Tasten: linke STRG-Taste + linke STRG-Taste + 

“Alt” (drücken & halten) + rechte STRG-Taste; dann können Sie die „Alt”-Taste loslassen.

Содержание 39312

Страница 1: ...LINDY Group FIRST EDITION November 2020 2 Port DisplayPort 1 4 USB 3 0 Audio KVM Switch User Manual English Benutzerhandbuch Deutsch Manuel Utilisateur Fran ais Manuale Italiano No 39312 lindy com...

Страница 2: ...LINDY Group FIRST EDITION November 2020...

Страница 3: ...tric shocks or damage Do not open the product nor its power supply There are no user serviceable parts inside Only qualified servicing personnel may carry out any repairs or maintenance Never use dama...

Страница 4: ...3 0 KVM Switch 4 Rubber feet 12VDC 1 5A Multi country Power Supply UK EU US AUS Barrel Size 5 5 2 1mm DC Jack This Manual Features Simple switching of DisplayPort and USB devices via push buttons keyb...

Страница 5: ...e Port 4 USB HID Type A Female Console Port Rear 1 DisplayPort Female Computer Ports 2 DisplayPort Female Console Port 3 USB 3 0 3 2 Gen 1x1 Type A Female Console Port 4 Computer Audio 3 5mm Ports 5 U...

Страница 6: ...r the switching will be confirmed by a beep Depending on the configuration only the KVM ports USB keyboard mouse and monitor or KVM and USB 3 0 3 2 Gen1x1 and or Audio ports are switched To learn more...

Страница 7: ...en Sie weder das Produkt noch sein Netzteil Es befinden sich keine vom Benutzer zu wartenden Teile im Inneren Ausschlie lich qualifiziertes Personal darf Reparaturen oder Wartungen durchf hren Verwend...

Страница 8: ...ieferumfang 2 Port DisplayPort 1 4 USB 3 0 KVM Switch 4 Gummif e 12VDC 1 5A Multi Country Netzteil UK EU US AUS DC Hohlstecker 5 5 2 1mm Dieses Handbuch Eigenschaften Einfaches Umschalten von DisplayP...

Страница 9: ...lenport 4 USB HID Typ A Buchse Konsolenport R ckseite 1 DisplayPort Buchse Computerports 2 DisplayPort Buchse Konsolenport 3 USB 3 0 3 2 Gen 1x1 Typ A Buchse Konsolenport 4 Computer Audioports 3 5mm 5...

Страница 10: ...Maus und Monitor oder KVM und USB 3 0 3 2 Gen1x1 und oder Audio Ports umgeschaltet Weitere Informationen zu Umschalten ber Tastaturhotkeys finden Sie unten Tastatur Hotkeys Hotkey Befehle werden einge...

Страница 11: ...entation lectrique Il n y a pas de pi ces r parables par l utilisateur l int rieur Seul un personnel d entretien qualifi est autoris effectuer toute r paration ou entretien Ne jamais utiliser de c ble...

Страница 12: ...ort 1 4 USB 3 0 2 ports 4 pieds caoutchouc Alimentation multi pays 12VDC 1 5A UK EU US AUS prise ronde DC 5 5 2 1mm Ce manuel Caract ristiques Commutation simple pour des p riph riques DisplayPort et...

Страница 13: ...2 Port console DisplayPort femelle 3 Port console USB 3 0 3 2 Gen 1x1 Type A femelle 4 Ports ordinateurs audio 3 5mm 5 Ports ordinateurs USB 3 0 3 2 Gen 1x1 Type B femelle 6 Port console audio 3 5mm 7...

Страница 14: ...ts KVM clavier souris et cran USB ou les ports KVM et USB 3 0 3 2 Gen1x1 et ou Audio sont commut s Pour en savoir plus sur ces fonctionnalit s veuillez vous r f rer aux options de commutation des touc...

Страница 15: ...l interno La riparazione o manutenzione del prodotto pu essere effettuata solo da personale qualificato Non utilizzare mai cavi danneggiati Non fate entrare il prodotto in contatto con acqua e non uti...

Страница 16: ...ne Switch KVM Display Port USB 3 0 2 porte 4 piedini di gomma Alimentatore Multi country 12VDC 1 5A UK EU US AUS Dimensioni jack DC 5 5 2 1mm Manuale Lindy Caratteristiche Semplice commutazione della...

Страница 17: ...tipo A Femmina 4 Porta console HID USB tipo A Femmina Pannello posteriore 1 Porte PC DisplayPort femmina 2 Porta console DisplayPort femmina 3 Porta console USB 3 0 3 2 Gen 1x1 di tipo A femmina 4 4 P...

Страница 18: ...da un segnale acustico A seconda della configurazione vengono commutate solo le porte KVM tastiera USB mouse e monitor o le porte KVM e USB 3 0 3 2 Gen1x1 e o Audio Per saperne di pi su queste caratte...

Страница 19: ...plies with part 15 of the FCC Rules Operation is subject to the following two conditions 1 This device may not cause harmful interference and 2 This device must accept any interference received includ...

Страница 20: ...clingprozess bernehmen die Ger tehersteller LINDY bietet deutschen Endverbrauchern ein kostenloses R cknahmesystem an beachten Sie bitte dass Batterien und Akkus den Produkten vor der R ckgabe an das...

Отзывы: