


User Manual
English
Installation
Hardware Installation
1. Attach the mounting brackets to the unit, using the four retaining screws provided for each of the
brackets.
2. Choose a mounting position for the brackets (several options).
3. Align the mounting holes of the brackets with the notched hole on the vertical rail and attach with the
retaining screws.
4. Connect the input and output power cables.
5. Connect the Ethernet cable to the unit.
6. Switch on the IPower Switch Classic.
Please note: The IPower Switch will request an IP address if a DHCP server is present in your network.
If there is no DHCP server present, the IP address will be set to 192.168.0.216.
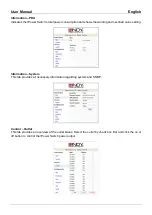
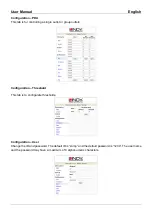
Software Installation
To manage a group of outlets, we recommend downloading the software from the Lindy website. Single
outlets might be controlled via the web interface.
1.
Go to the included Software folder and open the “setup” file.
2. Follow the install wizard.
3. Once installed, the PDU software can be opened.
4. Default Login n
ame is “admin” and default Login password is “1234”.
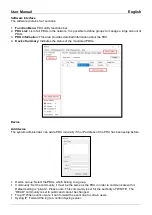
Please note: For some systems, especially Windows 10, NET Framework 2.0 is required. This can be
enabled within Windows 10 as it comes pre-installed.
1. Go to
“Control Panel”.
2.
Click “Turn Windows Feature on or off”.
3. Tick the box for .NET Framework (Includes .Net 2.0 and 3.0), click install automatically when
prompted.
4. Restart PC when prompted.
Содержание 32657
Страница 2: ......