background image

8    

11. HOW TO WORK WITH SPEED FITTINGS

11.1  Speed Fitting Installation 

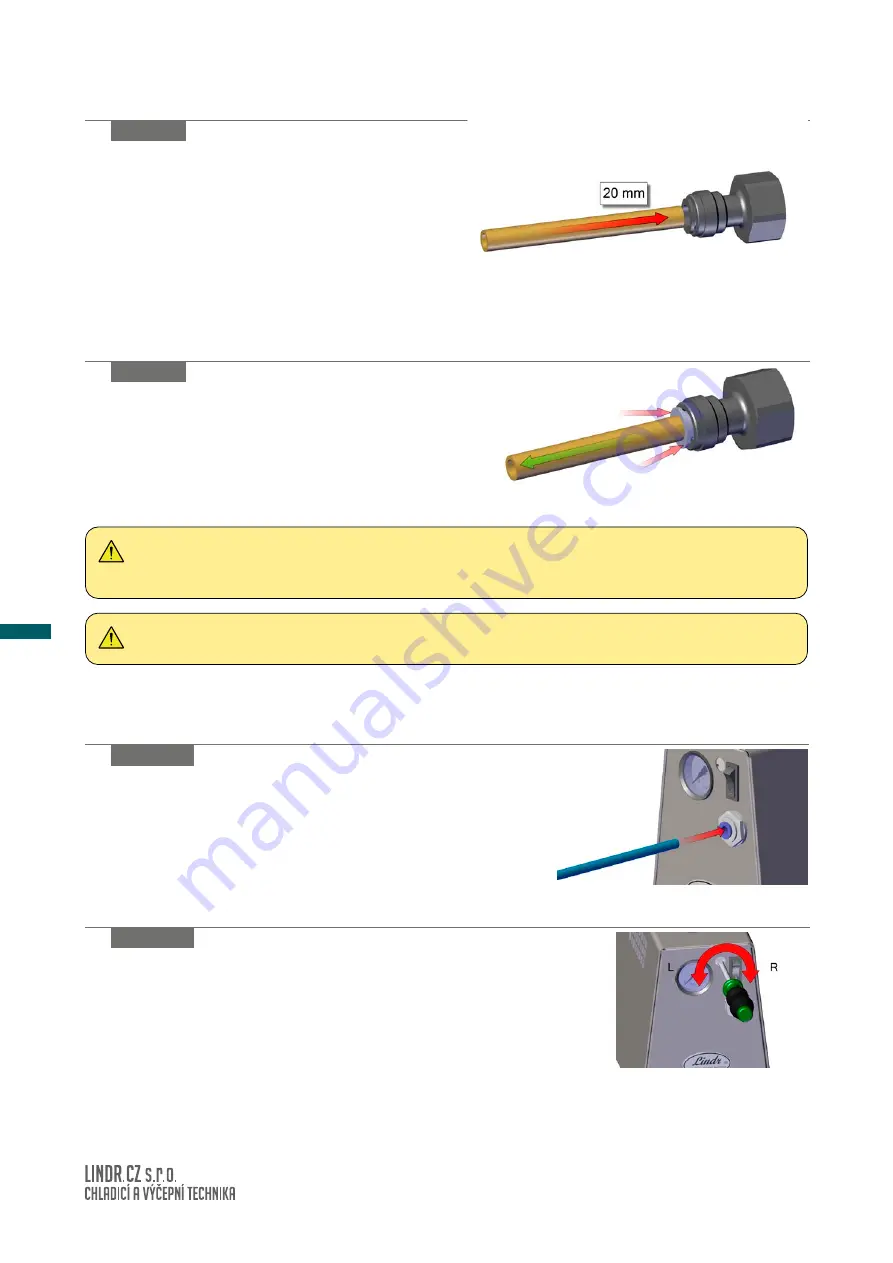
Grasp the speed fitting and insert the hose all 

the way inside the speed fitting body (ca. 20 

mm). The end of the hose must be straight so 

that it plugs fully into the coupling. If the hose 

will not go in, moisten the end of the hose. 

figure

  8 A

11.2  Speed Fitting Removal 

Hold the grey ring tight against the body of 

the speed fitting and pull out the hose.

figure

  8 B

WARNING:


If you do not hold the grey ring but pull at the hose, the speed fitting will cut 

even deeper into the hose.

WARNING:


Hoses must not be pressurised during removal.

12. AIR CONNECTION

Connect the VK LINDR mini compressor to a keg coupler. Plug 

a 5/16” air hose into the speed fitting on the front of the com-

pressor - Air outlet (1.).

13. AIR PRESSURE ADJUSTMENT

Pressure is adjusted mechanically using the adjustment screw 

(3.) located on the front of the compressor. Set the pressure to 

the desired value according to the pressure gauge. 

figure

  8 C

figure

  8 D

Содержание VK 15

Страница 1: ...LINDR MINI COMPRESSOR Number 013 2020 REV00 Valid 2020 06 01 INSTRUCTION MANUAL ENGLISH VK15 vk30MINICOMPRESSOR...

Страница 2: ...ling and using the device It contains important information necessary to ensure that all operations are done prop erly and safely WARNING Not following instructions may cause injury or damage the devi...

Страница 3: ...nection 7 Testing 8 Warranty 9 Device description 10 Connection and pressurisation 11 How to work with speed fittings 12 AIR connection 13 Air pressure adjustment 14 Putting into operation 15 Table of...

Страница 4: ...structions WARNING Children aged 15 or more and persons with reduced physical sensory or mental capabilities or insufficient experience and knowledge may only use the device when supervised or instruc...

Страница 5: ...situations DANGER Do not use or turn on the device if the power lead cable is damaged 7 TESTING The product is delivered ready for immediate use 8 WARRANTY The device comes with a warranty in accord a...

Страница 6: ...DESCRIPTION 1 Air outlet 4 Pressure gauge 2 Switch 5 Power cable 3 Adjusting screw NOTE The VK LINDR mini compressor is primarily designed as an accessory for flow through coolers and beverage keg pre...

Страница 7: ...system A system M system 3 F 5 8 x 9 5 mm speed fitting 4 F 5 8 x 8 mm speed fitting 5 VK LINDR mini compressor 6 Beverage 10 2 Connection and Pressurisation by VK LINDR 30 Mini Compressor Two Tap Dev...

Страница 8: ...fitting and pull out the hose figure 8 B WARNING If you do not hold the grey ring but pull at the hose the speed fitting will cut even deeper into the hose WARNING Hoses must not be pressurised during...

Страница 9: ...nd replug the air hose in accordance with point 11 How to Work with Speed Fittings Do not forget to specify the following type of defect product type production year product s serial number found on t...

Страница 10: ...1x a week check that the device is not ex posed to radiant heat 1x a week check that air circulation is not obstructed 1x a year have an engineering inspector check the electrical safety of the device...

Страница 11: ...SPECIFICATIONS Name LINDR 15 LINDR 30 Maximum output l hour 40 120 Voltage V Hz 1 220 240 V 50Hz 1 220 240 V 50Hz 1 Input power W W 92 115 Current A A 0 4 0 5 Frame dimensions WxDxH mm 150x240x250 15...

Страница 12: ......

Отзывы: