background image

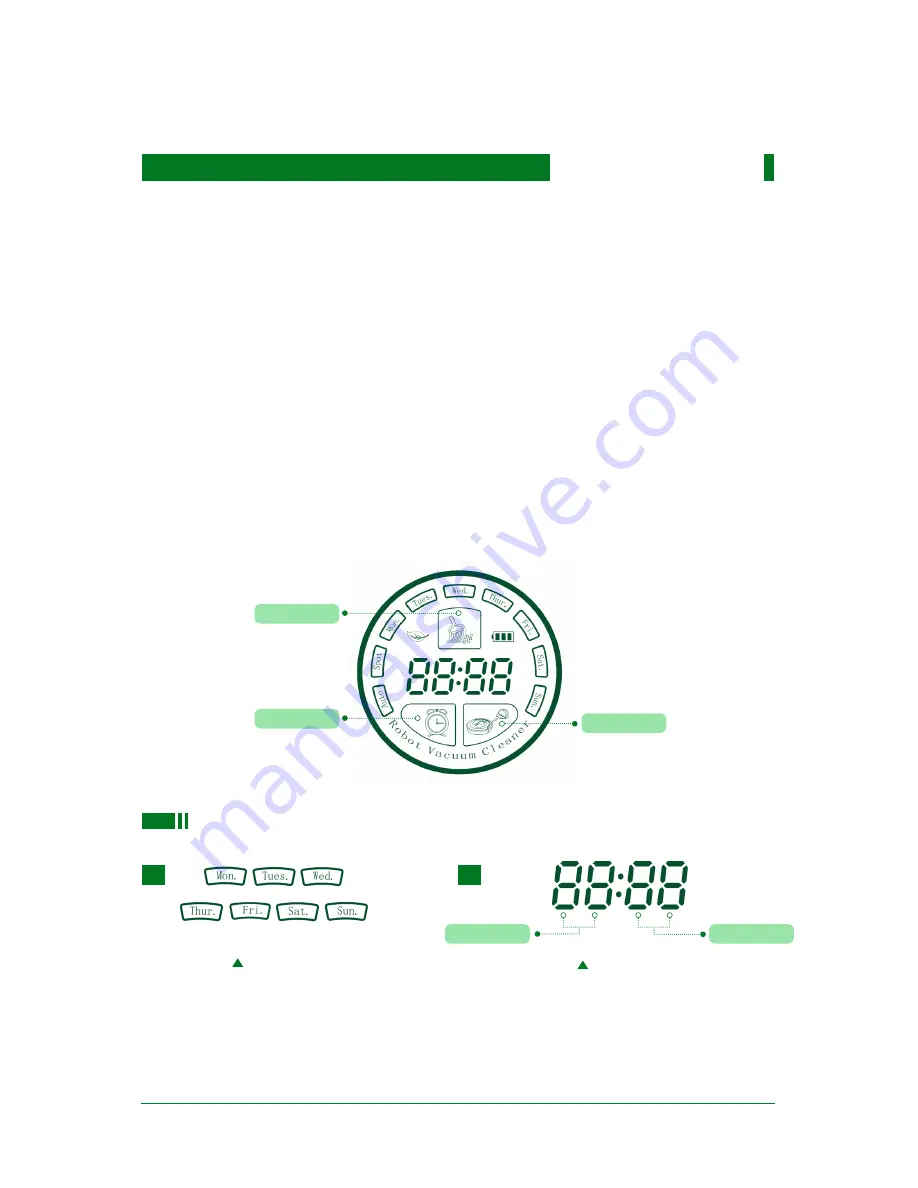
1.Setting the "Day"


A. 

Turn on the power switch, and press 

CHARGE button instantly to enter into the 

current time setting(At this moment, Monday 

light is pulsing).

   B. 

Press SCHEDULE button to select the 

correct Day, then press CHARGEbutton twice 

to confirm(When the Day light is always on, it 

means the setting is successful). 

2.Setting the "Minute" and "Hour"       

     A. 

Press SCHEDULE button continuously 

till the first figure on the time display flashes, 

then press CHARGE button to select the correct 

Hour(Pressing CHARGE button to cycle from 0 

to 9).

    B. 

Press SCHEDULE button continuously 

till the second figure on the time display 

flashes, then press CHARGE button to select 

the correct figure of Hour. You can complete 

the Minute setting in the same way.

Note: You must press CLEAN button to confirm and save the time setting

Setting Current Time

11

CLEAN

SCHEDULE 

Day Light

1.

2.

Time Display

Minute Light

Hour Light

CHARGE

Содержание D6601 Series

Страница 1: ...Before using please read the contents on the Safety Instructions Pages carefully to ensure safe operations of the robot User s Manual D6601 Series Robotic Vacuum Cleaner...

Страница 2: ...1 18 20 18 17 17 16 15 14 13 12 12 11 10 10 10 09 08 07 06 05 02 01 Before Using How to use Care and Maintenance Robot Features Safety Instructions Cleaning Modes Packing List Main Body Anatomy Button...

Страница 3: ...traditional vacuum cleaners and intelligent cleaners perfectly It can pick up fine dust on the carpet Easy Clean Dust Bin With humanized design you can clean the dust bin more easily Can avoid second...

Страница 4: ...will not be crushed or punctured Or may cause a electric shock fire or product failure If the power cord is broken do not plug it into the outlet Do not place the robot or charging base near the heat...

Страница 5: ...ch immediately if the robot generates any abnormal knocking odor or smoking Or may cause fire or product failure Do not operate robot in the room where the child is sleeping Or may cause injury or pro...

Страница 6: ...Please check the following items before using Remove fragile or unnecessary objects from the room that will be cleaned e g Remove the expensive potteries and valuables from the floor Do not use the r...

Страница 7: ...detecting the wall or furniture the robot will clean along the wall or navigate around furniture with its side brushes This mode can help to clean the dust at the corner of sofa bed wall etc This cle...

Страница 8: ...ist Main Body Remote Controller 1 PCS Charging Base 1 PCS Side Brush 2 PCS User s Manual 1 PCS Power Adapter 1 PCS Microfiber Mop 2 PCS 06 Before using please read the contents on the Safety Instructi...

Страница 9: ...Display Screen Dust Bin Button Rubber Bumper Transparent Window Power Switch DC Jack Universal Wheel Charging Terminal UV Lamp Battery Cover Side Brush Left Right wheel Main Brush Dusting Brush Mop M...

Страница 10: ...omatically Auto Clean Press this button the robot will enter into auto cleaning mode Spot Press this button the robot will enter into spot cleaning mode Mute Press this button to exchange between norm...

Страница 11: ...cleaning mode 2 SCHEDULE Press this button to select Day and cycle from Monday to Sunday to time when setting time 3 CHARGE A Press this button the robot can enter into auto recharging mode B When set...

Страница 12: ...that robot and remote controller Tip One remote controller is only used to control one robot Please confirm the robot can work properly first then try to pair the robot with the remote controller Pair...

Страница 13: ...ress SCHEDULE button continuously till the first figure on the time display flashes then press CHARGE button to select the correct Hour Pressing CHARGE button to cycle from 0 to 9 B Press SCHEDULE but...

Страница 14: ...able to return to the charging base to recharge Please charge the robot manually How to Use How to Start and Pause Cleaning How to Charge 12 2 Pause Cleaning 1 1 Turn on the power switch 1 2 Touch CL...

Страница 15: ...ot will enter into the stand by state B Press SCHEDULE button to select the Day you want then press CHARGE button twice to confirm When the Day light is always on it means the setting is successful Yo...

Страница 16: ...chedule Tip Mop is only suitable for the hard floors Please unrig mop and mop plate when using the robot on the carpet Day Light 1 2 Time Display Minute Light Hour Light 1 Get the mop wet 2 Stick the...

Страница 17: ...f 1 Press dust bin button to pop up the dust bin 4 Close the bottom board of dust bin When washing dust bin and HEPA filter please disassemble the fan After washing dry them in the well ventilated pla...

Страница 18: ...e brushes in order to prevent any damage 2 Remove brush bracket by lifting both fixed clasps 5 Install main brush and dusting bush into the robot 3 Lift up the right side of brushes and take them out...

Страница 19: ...smooth soft and level surface remove the screws from the center of side brushes with a screwdriver 2 Pull out the side brushes and wash them 3 After drying the side brushes in well ventilated place a...

Страница 20: ...out the universal wheel 2 Wash the mop carefully 2 Clean the hair and debris from the universal wheel 3 Dry the mop in a sunny well ventilated place 1 Turn the robot over put it on a smooth soft and l...

Страница 21: ...them 7 Install the brush bracket 6 Make the hole of wheels align with the hole of wheel frame then install the connection shaft And fix the screws to the wheels 5 Dry the right and left wheels in a we...

Страница 22: ...oute is abnormal Wipe off the cliff sensors with a dry cloth If having the mop installed please confirm that the installation is correct Please turn off the power switch then restart the robot Suction...

Страница 23: ...d About 150mm sec Working Temperature Range 10 40 Working Humidity Range 85RH Remote Controller Dimension 150 46 15mm Battery Type 2 AAAAlkaline Battery not included Control Distance Within 15 meters...

Страница 24: ......

Отзывы: