DC12V
GND
—
N.O.
COM.
DIN
GND
AIN
GND
AOUT
—
485
+
485
Installation Guide
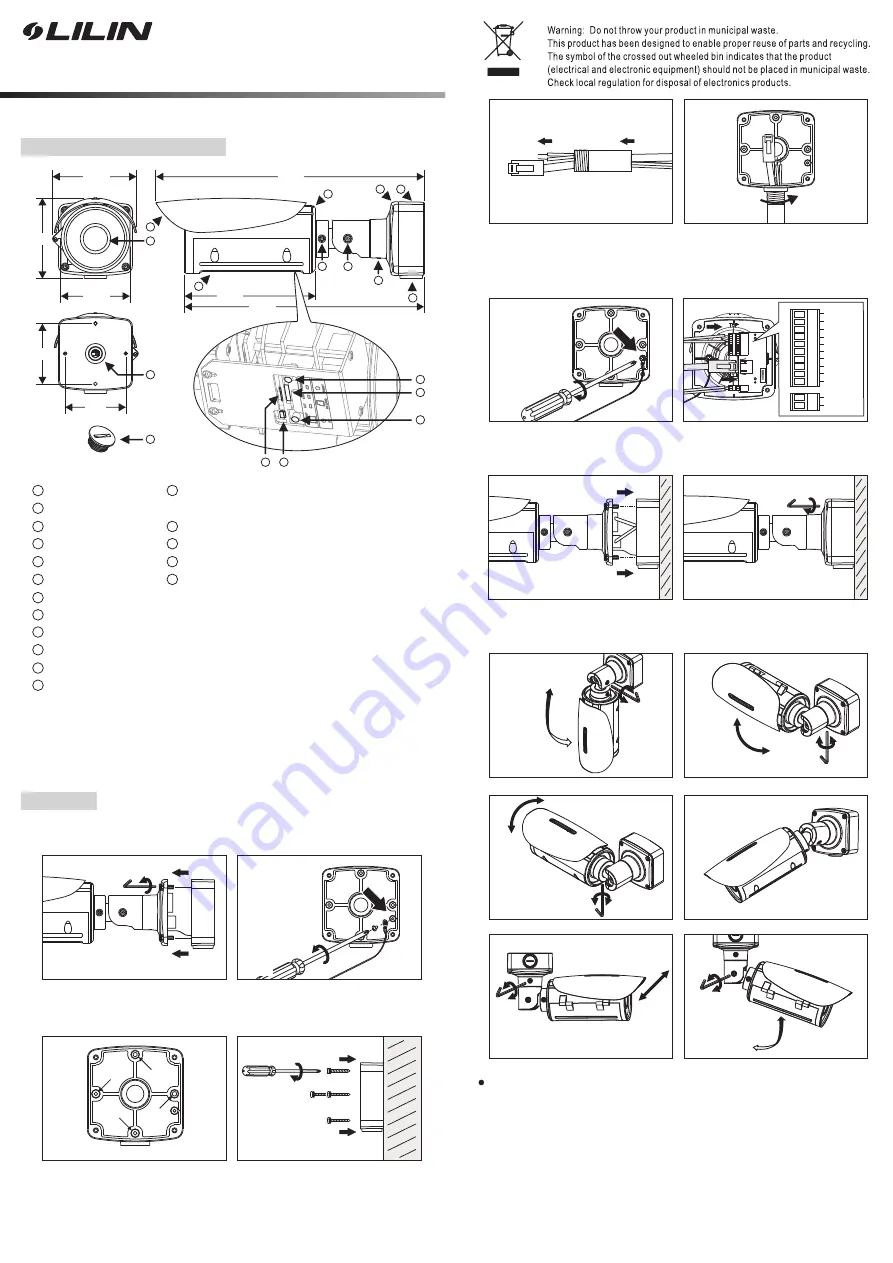
Part Description & Dimensions
D/N HD AF IR IP CAMERA
66-8022CSE-1B
372
12
1
6
5
4
3
2
7
11
10
333
182
116
8
9
112
ø95
84
84
13
14
15
16
17
Top Case
Bottom Case
Lens
Sun Shield
Bottom Box
Top Box
Side Hole
Bottom Hole
Hole Plug
Adjustment Screw A
Adjustment Screw B
Adjustment Screw C
Factory default button
Restores the server back to factory default settings.
Micro SD card slot
Auto Focus button
Live Video Output Connector
LED Indicators
Green (Power): Indicates system status.
Green (Link): Illuminates when the camera is
connected to a network
Orange (ACT): Flashes when data communication
is in process.
1
2
3
4
5
6
7
8
9
10
11
12
13
14
15
16
17
The IP camera will automatically adjusts the camera lens to obtain focus after press
the AF (Auto Focus) button continuously for 2 seconds. User can adjust the image
view by using zoom in/out button via web access, and refocus using the Auto-Focus
link on the main Web page.
Installation
1. Remove the camera from the box. Separate the bottom box from the top box using
a torx wrench (FIG.1), and remove the safety cable on the bottom box (FIG.2).
2. Secure the bottom box to anywhere you want by tightening the included truss-head
screws (M4.0x25) to the mounting holes marked “a” on the bottom box (FIG.3&4).
FIG.1
FIG.2
FIG.3
FIG.4
a
a
a
a
FIG.5
FIG.6
4. Attach the safety cable to the mounting hole on the bottom box (FIG.7), and
connect the network cable and power cable to the camera’s RJ-45 connector
and power input, respectively (FIG.8).
FIG.7
FIG.8
+12V IN
GND
–
N.O.
COM.
DIN
GND
AIN
GND
AOUT
–
485
+
485
5. Use a torx wrench to lock the top box to the bottom box by tightening the screws
(FIG.9&10).
FIG.9
FIG.10
3. Firstly, insert the network cable and power cable through a pipe with ½" PT
(FIG.5), and then secure the pipe to the side hole or bottom hole (FIG.6. please
make sure the connection between the pipe and the side hole is watertight, and
the side hole is facing downwards).
6. Adjust the three adjustment screws to turn the camera to the desired position.
Then tighten the screws (FIG.11-16).
FIG.11
FIG.12
FIG.13
FIG.14
FIG.15
FIG.16
Change the Outlet Position for the Network Cable and Power Cable
1. Loosen the hole plug on the bottom box and secure it to the side hole (FIG.17).
Unit: mm
2.Insert the network cable and power cable through bottom hole on the bottom box
(FIG.18), and then connect the network cable and power cable to the camera’s
RJ-45 connector and power input, respectively (FIG.8). For watertight installation,
please refer to
Installation-3
.


