background image


5. Software Control – Lightware Device Controller 

DA2DVI-HDCP-Pro – User's Manual 

15

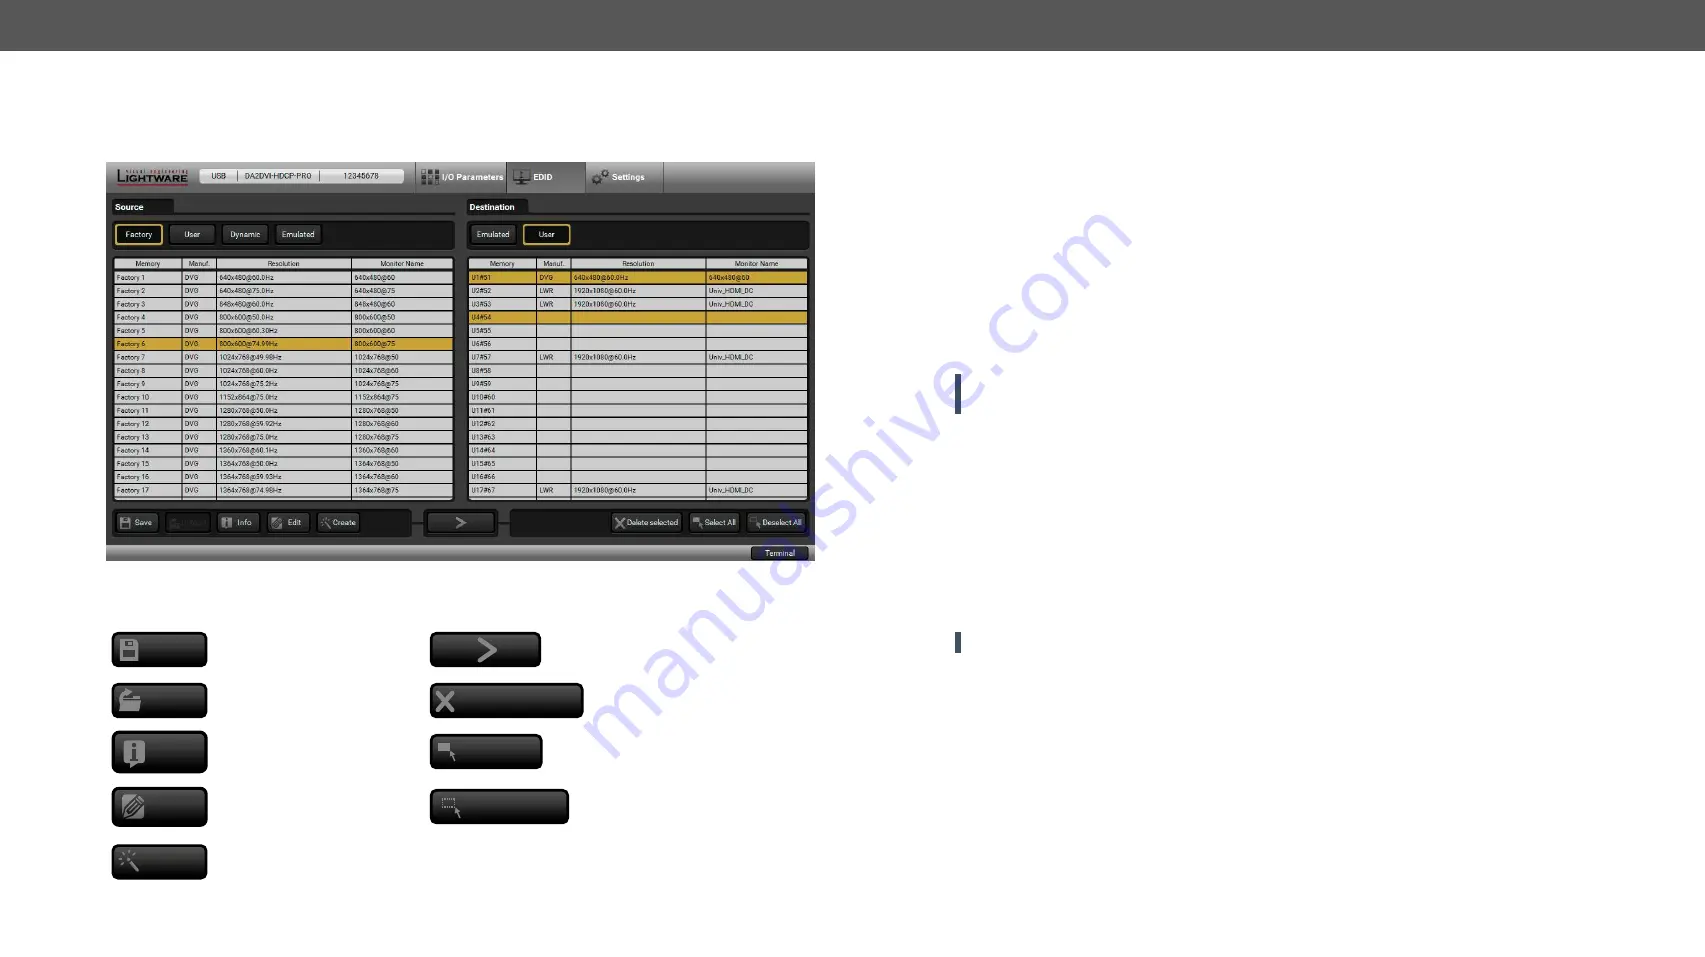
5.4. EDID Menu

Advanced EDID Management can be accessed by selecting the EDID menu. There are two panels: left one 

contains Source EDIDs, right one contains Destination places where the EDIDs can be emulated or copied.

EDID Menu

Control Buttons

A

Save

Exporting an EDID 

(save to a file)

A

Executing EDID emulation or 

copying (Transfer button)

A

Upload

Importing an EDID 

(load from a file)

A

Delete selected

Deleting EDID 

(from User memory)

A

Info

Display EDID Summary 

window

A

Select All

Selecting all memory places 

in the right panel

A

Edit

Opening Advanced EDID 

Editor with the selected EDID

A

Deselect All

Selecting none of the 

memory places in the right 

panel

A

Create

Opening Easy EDID Creator

5.4.1. EDID Operations

Changing Emulated EDID

Step 1. 

Choose the desired 

EDID list

 on the source panel and select an 

EDID

.

Step 2. 

Press the 

Emulated

 button on the top of the Destination panel.

Step 3. 

Select the desired 

port

 on the right panel (one or more ports can be selected); the EDID(s) will be 

highlighted with a yellow cursor.

Step 4. 

Press the 

Transfer

 button to change the emulated EDID.

Learning an EDID

The process is the same as changing the emulated EDID; the only difference is the Destination panel: press 

the 

User

 button. Thus, one or more EDIDs can be copied into the user memory either from the factory memory 

or from a connected sink (Dynamic).

Exporting an EDID

ATTENTION!


This function is working on Windows and Mac OS X operating systems and under Firefox or 

Chrome web browsers only.

Source EDID can be downloaded as a file (*.bin, *.dat or *.edid) to the computer.

Step 1. 

Select the desired 

EDID

 from the Source panel (line will be highlighted with yellow).

Step 2. 

Press the 

Export

 button to open the dialog box and save the file to the computer.

Importing an EDID

Previously saved EDID (*.bin, *.dat or *.edid file) can be uploaded to the user memory:

Step 1. 

Press the 

User

 button on the top of the Source panel and select a 

memory

 slot.

Step 2. 

Press the 

Upload

 button below the Source panel.

Step 3. 

Browse the file in the opening window then press the 

Open

 button. Browsed EDID is imported into the 

selected User memory.

ATTENTION!


The imported EDID overwrites the selected memory place even if it is not empty.

Deleting EDID(s)

The EDID(s) from User memory can be deleted as follows:

Step 1. 

Press 

User

 button on the top of the Destination panel.

Step 2. 

Select the desired 

memory

 slot(s); one or more can be selected (“Select All” and “Select None” buttons 

can be used). The EDID(s) will be highlighted with yellow.

Step 3. 

Press the 

Clear selected

 button to delete the EDID(s).

 

Содержание DA2DVI-HDCP-Pro

Страница 1: ...DA2DVI HDCP Pro User s Manual Multimedia Signal Distribution Amplifier ...

Страница 2: ...cordance with the installation instructions The apparatus shall not be exposed to dripping or splashing and that no objects filled with liquids such as vases shall be placed on the apparatus No naked flame sources such as lighted candles should be placed on the apparatus Waste Electrical Electronic Equipment WEEE This marking shown on the product or its literature indicates that it should not be d...

Страница 3: ...ature or a function TIPS AND TRICKS Ideas which you may have not known yet but can be useful Navigation Buttons Go back to the previous page If you clicked on a link peviously you can go back to the source page by the button Navigate to the Table Contents Step back one page Step forward to the next page Document Information This User s Manual applies to the following versions of the mentioned soft...

Страница 4: ... Information Tab 17 5 5 2 Log Tab 18 5 6 Terminal Window 18 6 PROGRAMMER S REFERENCE 19 6 1 Protocol Description 19 6 2 Status Commands 19 6 2 1 View Product Type 19 6 2 2 View Serial Number 19 6 2 3 View Firmware Version 19 6 2 4 Compile Time 20 6 2 5 View Installed Board 20 6 2 6 View Board Information 20 6 3 System Commands 20 6 3 1 Restart the Device 20 6 4 EDID Router Commands 20 6 4 1 Save E...

Страница 5: ...he unit is equipped with the highest grade gold plated connectors to ensure reliable connection 1 3 Model Denomination DA2DVI HDCP Pro distribution amplifier 5V DC adaptor with interchangeable plugs Safety warranty info Quick Start Guide Safety and Warranty Info Quick Start Guide DA2DVI HDCP Pro Pixel Accurate Reclocking and Advanced EDID Management support 2x DVI outputs Distribution Amplifier HD...

Страница 6: ...ximum suggested by DVI 1 0 standard Lightware devices support 5V 500 mA constant current output on both of its outputs to power long distance fiber optical cables like our DVI OPT TX110 Universal Power Supply DA2DVI HDCP Pro is equipped with a universal 5V power adaptor which accepts AC voltages from 100 to 240 Volts with 50 or 60 Hz line frequency Special plug of wall adaptor ensures safe power s...

Страница 7: ... P P Pr ro o POWER SIGNAL PRESENT MONITOR 1 HOTPLUG EDID STATUS MONITOR 2 HOTPLUG LEARN PRESS 00 EDID COPY FROM OUT 1 HDCP ACTIVE 2 OUTPUT HDCP AND HDMI1 3 COMPLIANT DISTRIBUTION AMPLIFIER USB CONTROL SOURCE 5V 0 0 1 1 2 2 3 3 4 4 5 5 6 6 7 7 8 8 9 9 0 0 1 1 2 2 3 3 4 4 5 5 6 6 7 7 8 8 9 9 2 2 Connecting Steps D DA A2 2D DV VI I H HD DC CP P P Pr ro o POWER SIGNAL PRESENT MONITOR 1 HOTPLUG EDID ST...

Страница 8: ...ction Status LEDs Source 5V Indicates if 5V power signal is sent to pin 14 of the INPUT connector by the DVI source PC Laptop etc Signal Present BLINKING slow HDMI signal is present on INPUT and OUTPUT ports BLINKING fast HDMI to DVI conversion is enabled See more information in Output Port Properties section HDCP Active BLINKING green HDCP is disabled For more information see HDCP Management sect...

Страница 9: ...ock 10 TMDS Data1 C1 nc 11 TMDS Data1 Shield C2 nc 12 nc C3 nc 13 nc C4 nc 14 5V Power C5 GND 15 GND for 5V DVI Output Monitor hotplug is detected on the OUTPUT ports Monitor hotplug LED lights green After a hotplug event the DA2DVI HDCP Pro tries to read the EDID of the connected device Fiber Cable Powering As a special feature the device is able to supply 500 mA current on DDC 5V output pin 14 o...

Страница 10: ...If a new sink device monitor is connected while HDCP is enabled the DA2DVI HDCP Pro virtually reconnects the source device to ensure HDCP functionality Switching the Hotplug signal off and on again indicates to the source device that the sink is ready to communicate This may cause the picture disappear for a few seconds Short pause 1x 2x 2x Short pause EDID STATUS EDID STATUS EDID STATUS If HDCP p...

Страница 11: ...o and hold it down for approximately 2 seconds If the teaching is successful the Status LED blinks four times green if the teaching is unsuccessful the Status LED blinks four times red Step 3 The normal function of the LEDs is in effect INFO If the DA2DVI HDCP Pro is unable to read the monitor s EDID or there is no currently attached monitor the last attached monitor s valid EDID will be stored in...

Страница 12: ...on the Windows and the Mac application has the same look and functionality This type of the installer is equal with the Normal install in case of Windows and results an updateable version with the same attributes Mount the DMG file with double clicking on it and drag the LDC icon over the Applications icon to copy the program into the Applications folder If you want to copy the LDC into another lo...

Страница 13: ...he panel the input port and the two output ports properties window can be accessed by selecting them 5 3 1 Input Port Properties The state of the incoming signal is displayed Input Port Properties Tab The Port Status parameters Power 5V Signal Present Signal Type are shown in the panel The following settings are available for the input port Input equalization The device has an built in automatic c...

Страница 14: ...output signals Pre emphasis ON is recommended Use OFF setting if the cable between the OUTPUT port and the display device is very short Internal termination Always use ON Mute The specific OUTPUT port can be switched off No signal will be on the OUTPUT De skew Adjust setting if the output signal is noisy Default setting gives good result in most cases Output Mode This setting is used to determine ...

Страница 15: ...ging the emulated EDID the only difference is the Destination panel press the User button Thus one or more EDIDs can be copied into the user memory either from the factory memory or from a connected sink Dynamic Exporting an EDID ATTENTION This function is working on Windows and Mac OS X operating systems and under Firefox or Chrome web browsers only Source EDID can be downloaded as a file bin dat...

Страница 16: ...dow The editor can read and write all descriptors which are defined in the standards including the additional CEA extensions Any EDID from the device s memory or a saved EDID file can be loaded into the editor The software resolves the raw EDID and displays it as readable information to the user All descriptors can be edited and saved in an EDID file or uploaded to the User memory For more details...

Страница 17: ...s possible to create custom EDIDs in four simple steps By clicking on the Create button below Source panel Easy EDID Creator is opened in a new window For more details about EDID Editor please visit our website www lightware eu and download EDID Editor user s manual Easy EDID Creator Window 5 5 Settings Menu 5 5 1 Device Information Tab Device Information Tab in the Settings Menu The serial number...

Страница 18: ... g another DA2DVI HDCP Pro The command file can be generated by Lightware support This is needed when some special commands have to be used for configuring the device or troubleshooting 5 6 Terminal Window This general purpose terminal is intended mainly for testing and debugging purposes All commands can be used here that are discussed in the programmer s reference The command text can be typed d...

Страница 19: ... respond commands can contain upper and lower case letters as well Legend for control commands loc location number in 1 2 or 3 digit ASCII format id id number in 1 or 2 digit ASCII format id id number in 2 digit ASCII format CrLf Carriage return Line feed 0x0D 0x0A space character 0x20 each command issued by the controller each response received from the router 6 2 Status Commands 6 2 1 View Produ...

Страница 20: ...Lf SL END CrLf SL 0 DA2DVI HDCP PRO SCH_1 1 PCB_1 1 SL END Format Example Command FC fc Response CF DESC CrLf CF END CrLf CF DA2DVI HDCP PRO FW 1 2 2r CF END Format Example Command RST rst Response 6 4 EDID Router Commands 6 4 1 Save EDID to User Memory Description Learn EDID from loc2 to loc1 Explanation EDID from output 3 is saved to user EDID 4 Legend loc1 has to be Uxx loc2 can be Fxx or Uxx o...

Страница 21: ... from all inputs frame size loc Result PNPID code The three letter abbreviation of the manufacturer Preferred resolution The resolution and refresh rate stored in the preferred detailed timing block Name The name of the display device stored in product descriptor 6 4 5 Delete EDID from Memory Description Clear EDID from memory location loc Explanation All user EDIDs are cleared from memory Legend ...

Страница 22: ...anation Full EDID uploaded to memory location U3 Format Example Command WL loc wl U3 Response E_L_S CrLf E_L_S CrLf Command WB 1 B1 B2 B3 B4 B5 B6 B7 B8 WB 1 00 FF FF FF FF FF FF 00 Response EL num CrLf EL 1 CrLf Command WB 2 B9 B10 B11 B12 B13 B14 B15 B16 WB 2 38 A3 8E 66 01 01 01 01 Response EL num CrLf EL 2 CrLf Command WB 32 B249 B250 B251 B252 B253 B254 B255 B256 WB 32 36 59 42 0A 20 20 00 96...

Страница 23: ...ecting firmware to upgrade Step 7 Starting the upgrade process Step 8 Restarting the device 7 2 Detailed Instructions Use the Lightware Bootloader application to upgrade the device s firmware The distribution amplifier can only be upgraded via USB so connect the device directly to the Windows based computer with an USB cable Step 1 Installing the bootloader application with Installer_LW_ bootloade...

Страница 24: ...ng If you selected a controller to upgrade but you had not selected a file for it then you will also get an information message about which file is missing Quick Bootload mode can be switched on or off any time It makes the bootloader software faster by only checking the checksum of the controller No data verification is done after writing if the checksum was correct A progress bar will show the c...

Страница 25: ...data rates the cables must fit very well DVI connectors have to be locked with screws no tensions or breaches are allowed Different interface is selected If your source or display as more connectors then make sure that the proper interface is selected Analog signal sent to a digital port Although the device is equipped with DVI I connectors analog signals are not supported You cannot use VGA cable...

Страница 26: ...nitors projectors plasma displays etc must support the EDID data structure Source BIOS and operating systems are likely to query the sink using DDC2B protocol to determine what pixel formats and interface are supported DVI standard uses EDID data structure to identify the monitor type and capabilities Most DVI sources VGA cards set top boxes etc will output DVI signal after accepting the connected...

Страница 27: ...TOR 1 HOTPLUG EDID STATUS MONITOR 2 HOTPLUG LEARN PRESS 00 EDID COPY FROM OUT 1 HDCP ACTIVE 2 OUTPUT HDCP AND HDMI1 3 COMPLIANT DISTRIBUTION AMPLIFIER USB CONTROL SOURCE 5V 0 0 1 1 2 2 3 3 4 4 5 5 6 6 7 7 8 8 9 9 0 0 1 1 2 2 3 3 4 4 5 5 6 6 7 7 8 8 9 9 Setting the HDCP parameter to Auto on the output port and disable HDCP on the input port the transmitted signal will not be encrypted if the conten...

Страница 28: ...pin Power consumption 4 W typ Enclosure Rack mountable Yes with rack shelf 1U high Material 1 mm steel Dimensions in mm 110 W x 180 D x 42 H mm Dimensions in inch 4 33 W x 7 08 D x 1 65 H Weight 680 g 1 499 lbs Input Connector 29 pole DVI I digital only Input cable equalization Automatic 40dB max EDID emulation Yes Input cable equalization Yes Output Connector 29 pole DVI I digital only Reclocking...

Страница 29: ...P encrypted HDCP is disabled Use MEM01 LEARN to enable disable HDCP compliant operation Copy from OUT1 Copy from OUT2 MEM00 LEARN RELOAD FACTORY DEFAULT To turn ON OFF HDMI to DVI conversion use USB CONTROL software HDMI Signal present on input port Connected outputs have HDMI Signal with embedded audio HDMI Signal on input port is converted to DVI on one of the connected output ports No embedded ...

Страница 30: ...bject to a seven 7 year warranty period under the same terms as outlined in this document 1 2 If during the first three 3 months of purchase the customer is unhappy with any aspect of a Lightware product Lightware will accept a return for full credit 1 3 Any product that fails in the first six 6 months of the warranty period will automatically be eligible for replacement and advanced replacement w...

Отзывы: